

Family Restaurant Operation Guide - Terminal F&B System
VENUE Booking & F&B Usage Guide
1. How Customers Place Orders
1.1 Pay After Dining
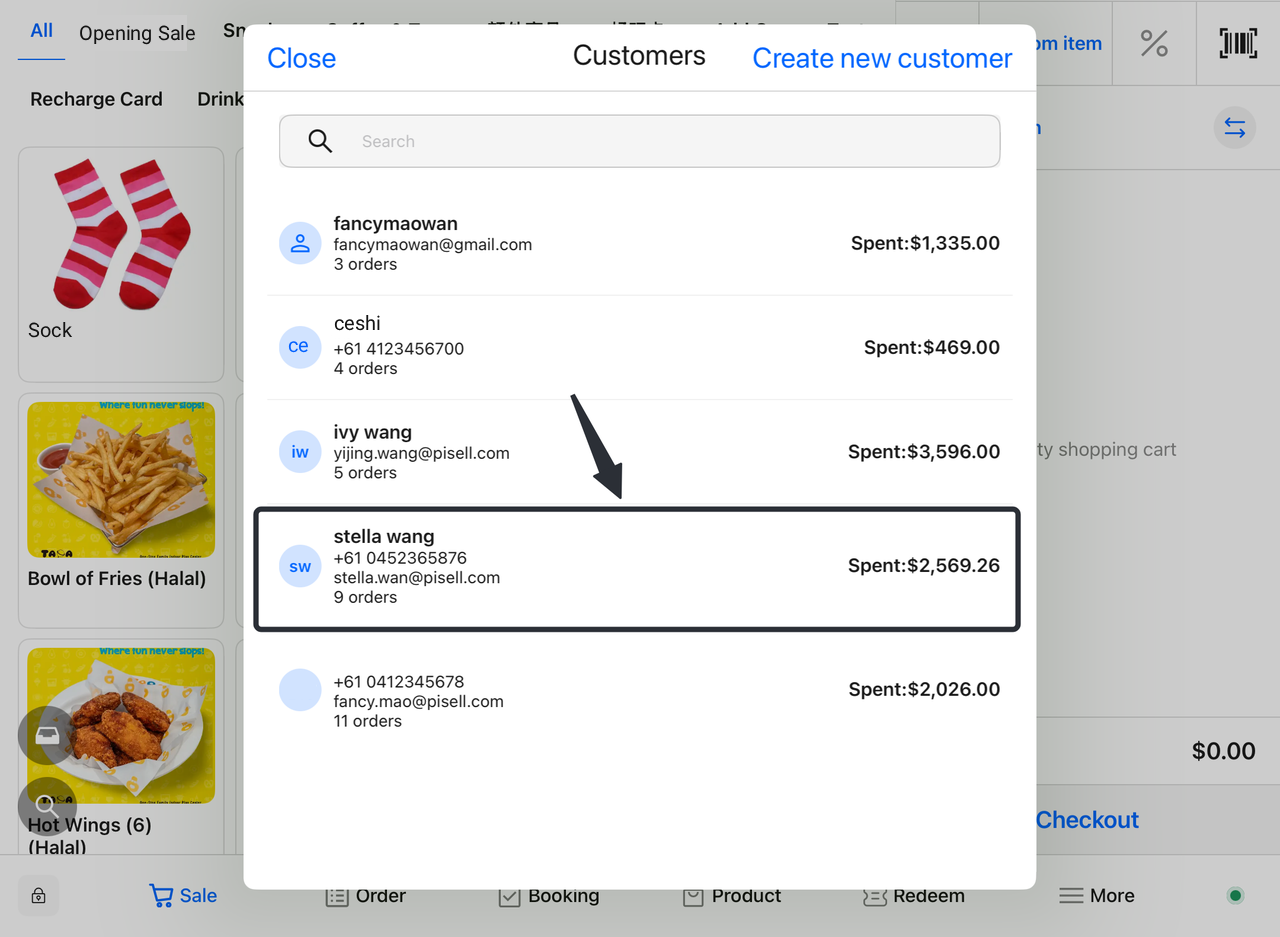
- Customer Places Order
-
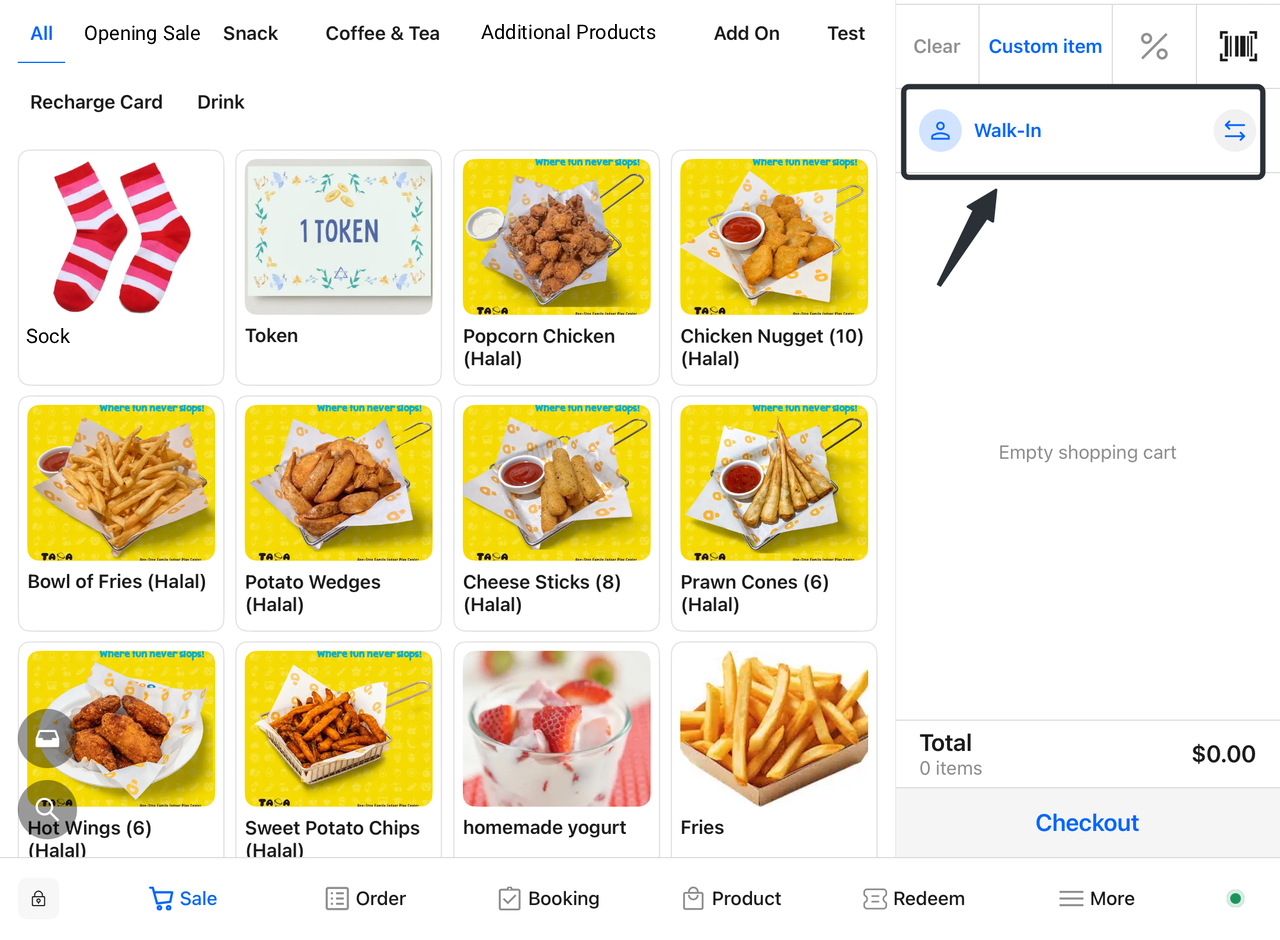
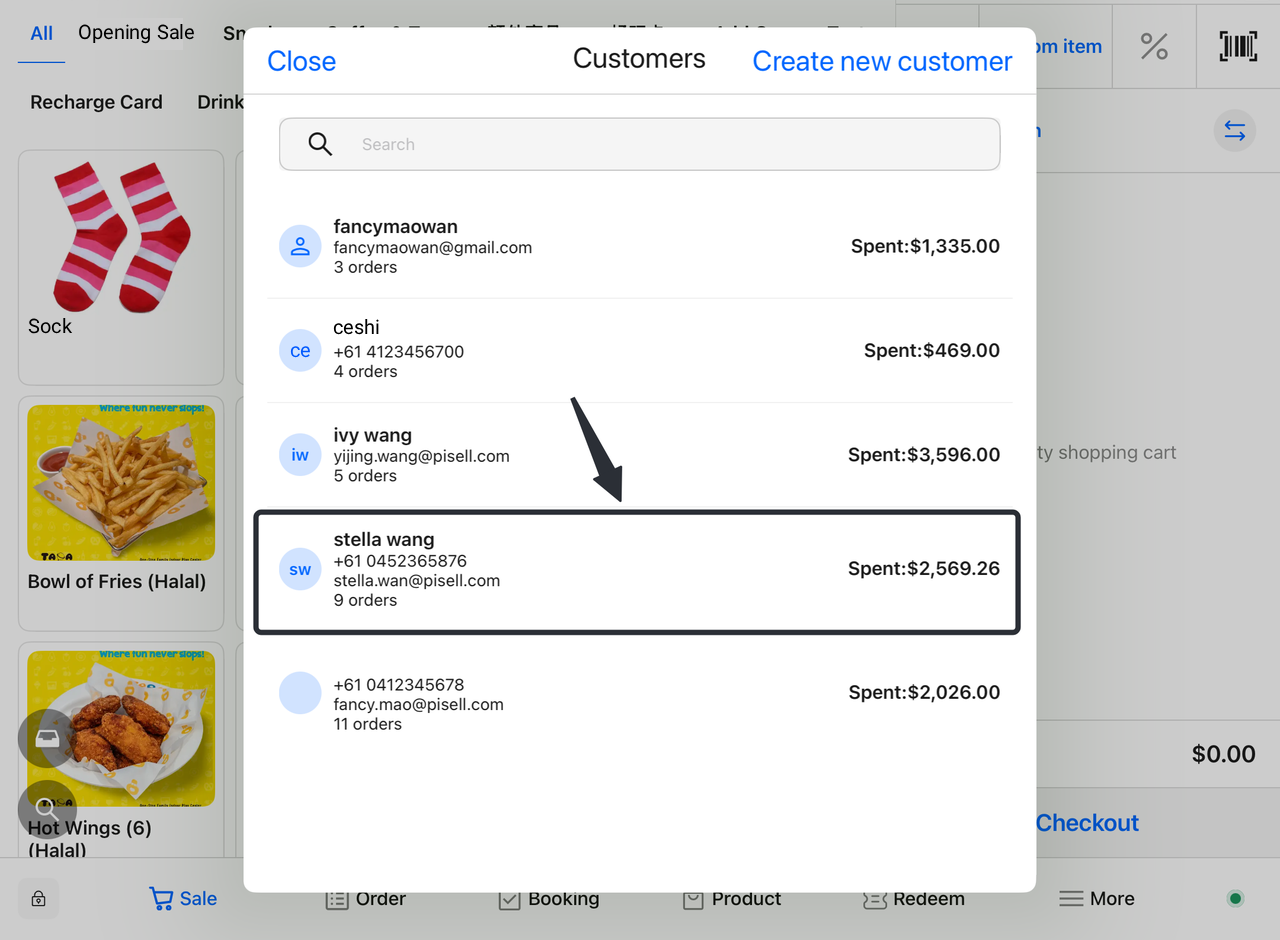
- Customers can place orders anonymously (walk-in) or bind an existing customer account for record-keeping.
- Select desired dishes from the menu and click "Add to Cart".

- View Cart
-
- Click the cart icon in the upper right corner to check selected dishes and the total amount.

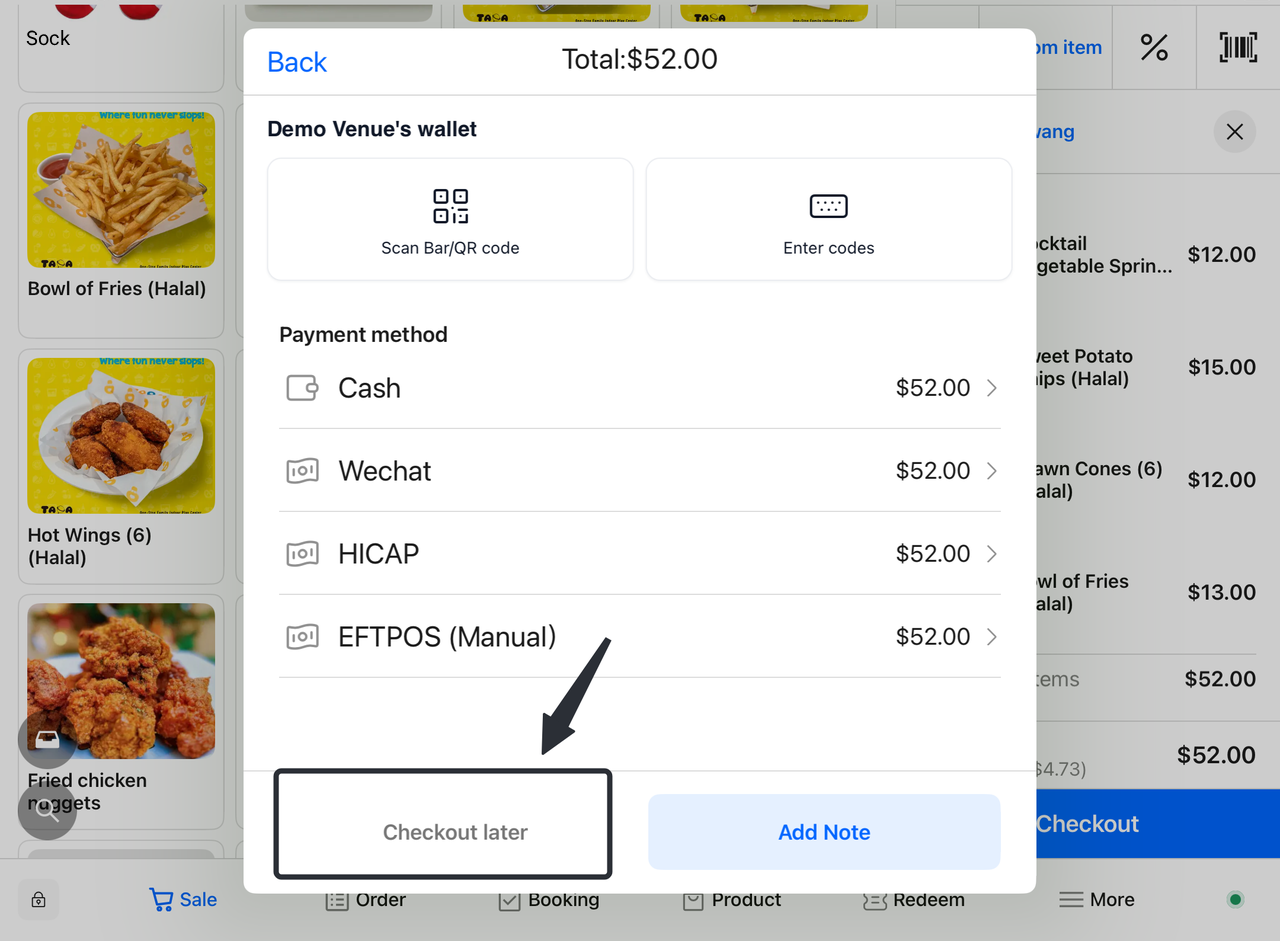
- Select Checkout Option
-
- On the checkout page, choose the "Checkout Later" option to pay after dining.
- Proceed to Checkout After Dining
-
-
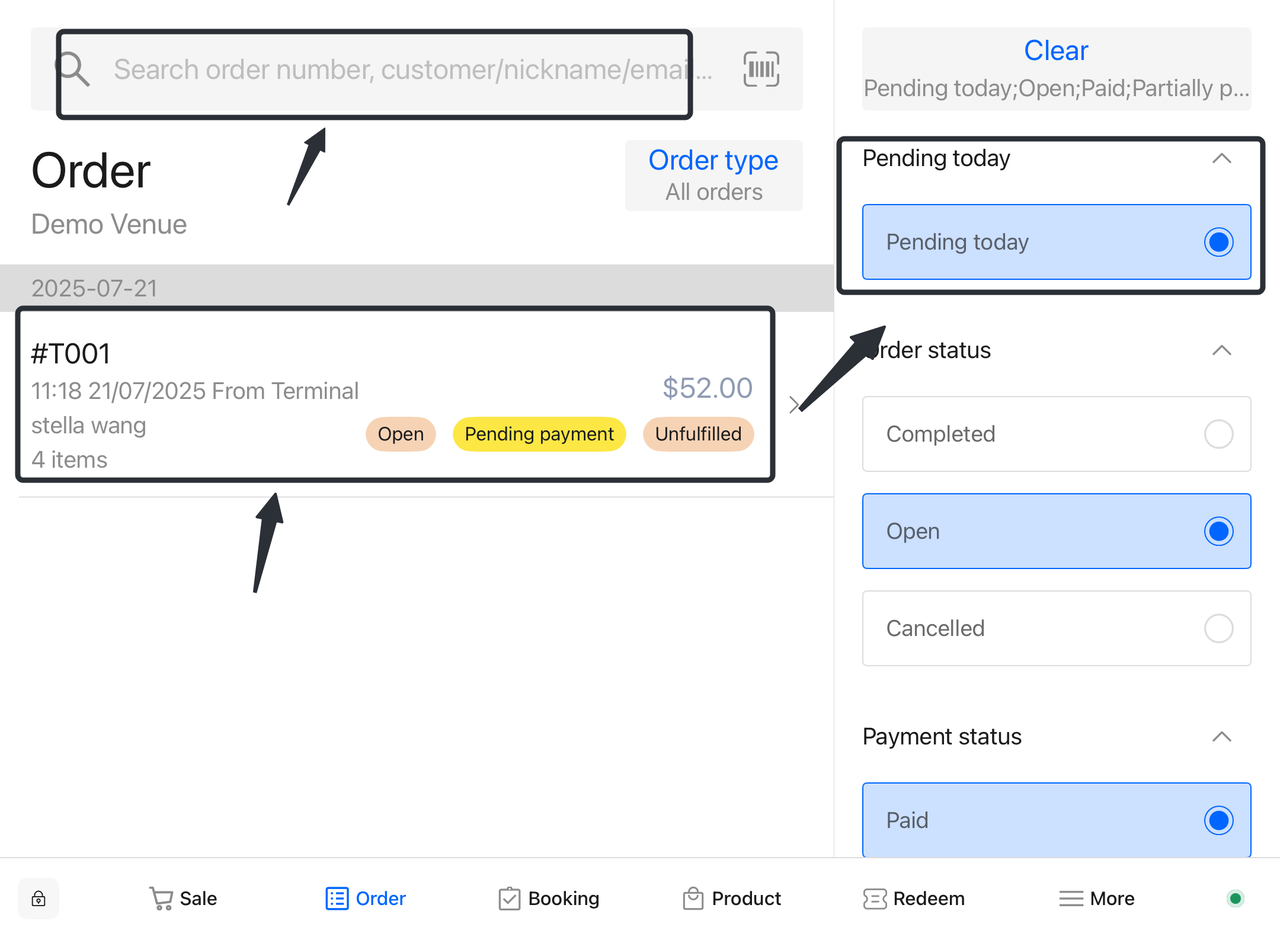
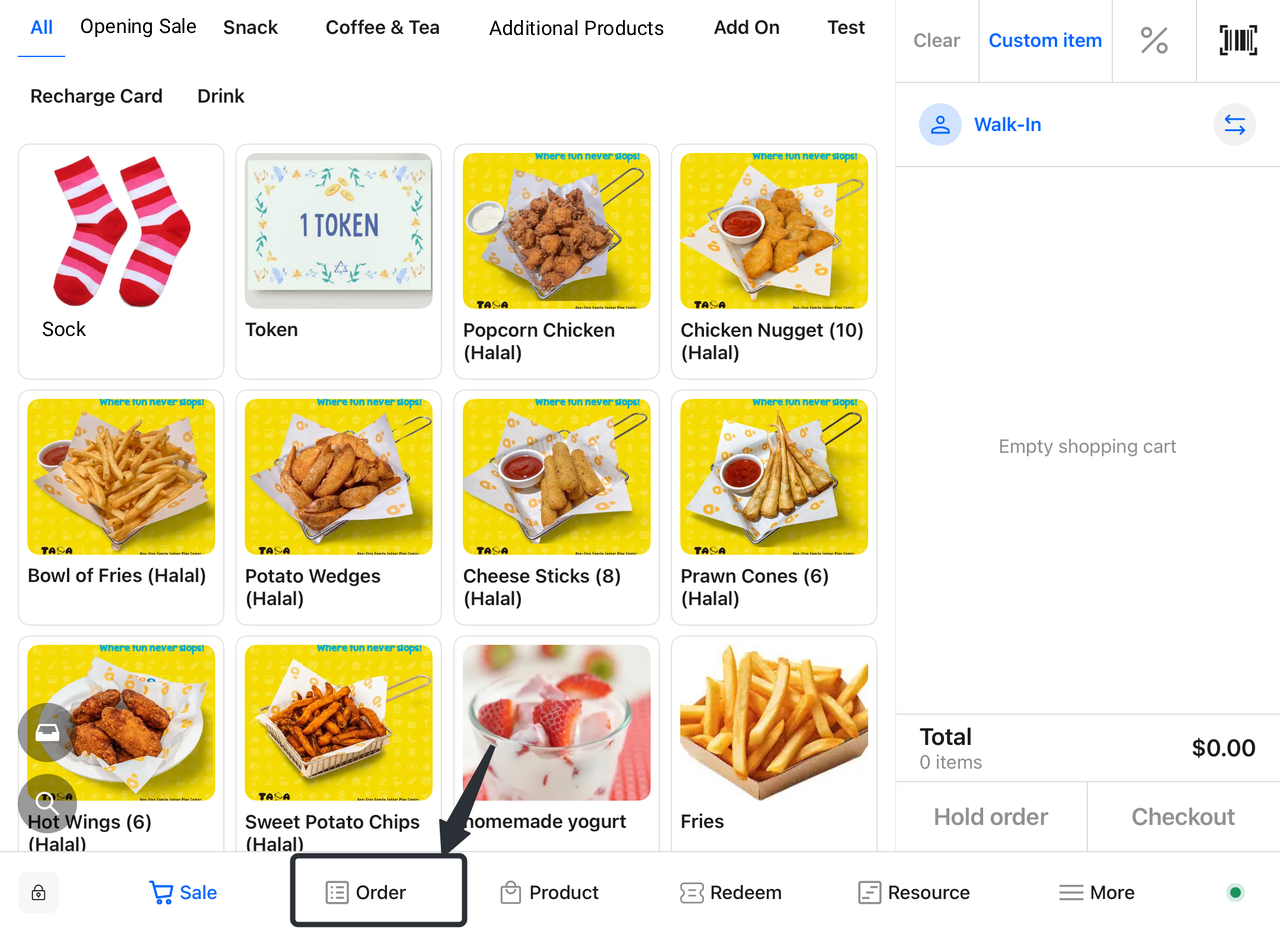
”Click "Orders".
-
Filter and find specific orders by order number, customer information, payment status, etc.
-
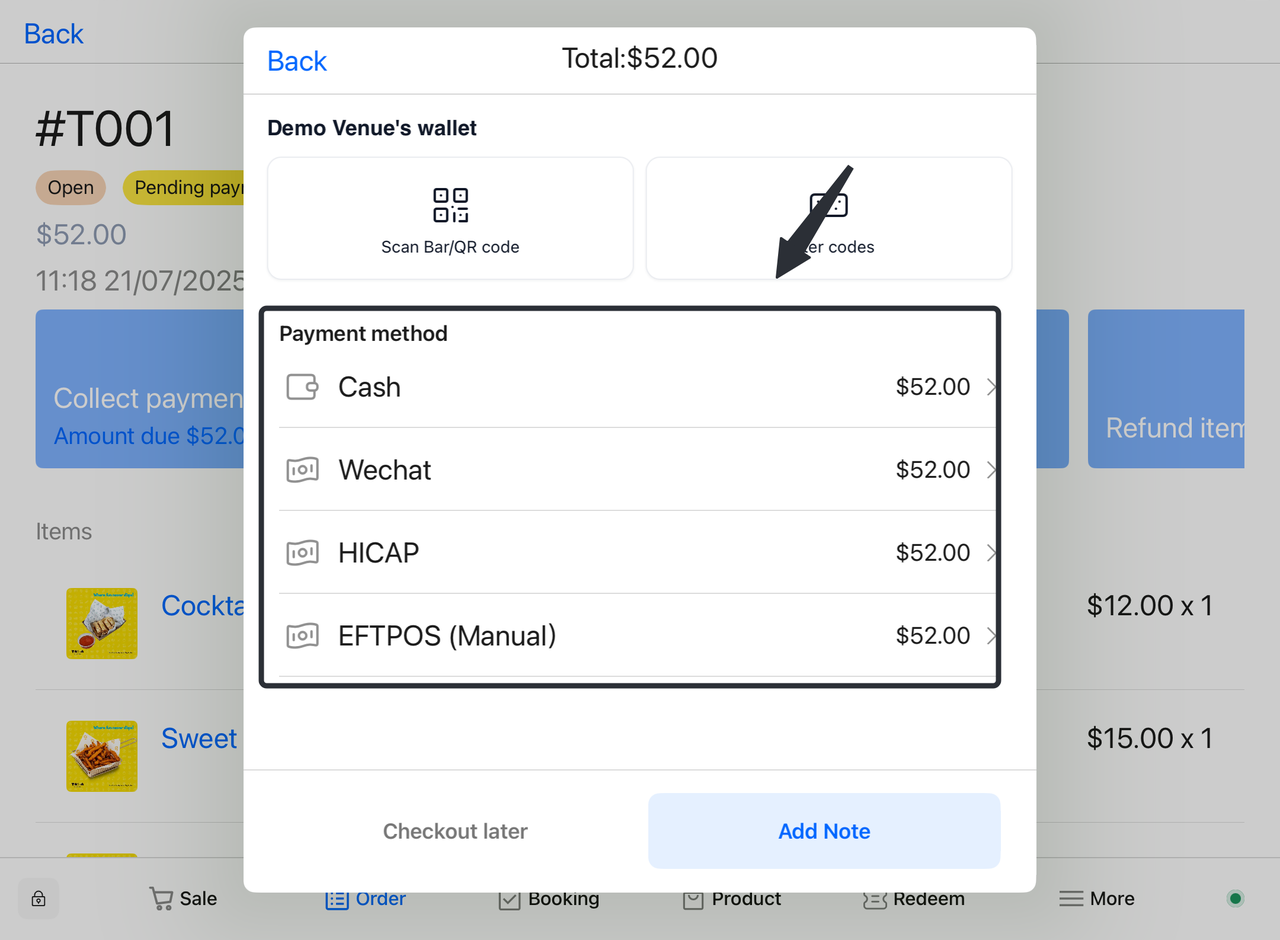
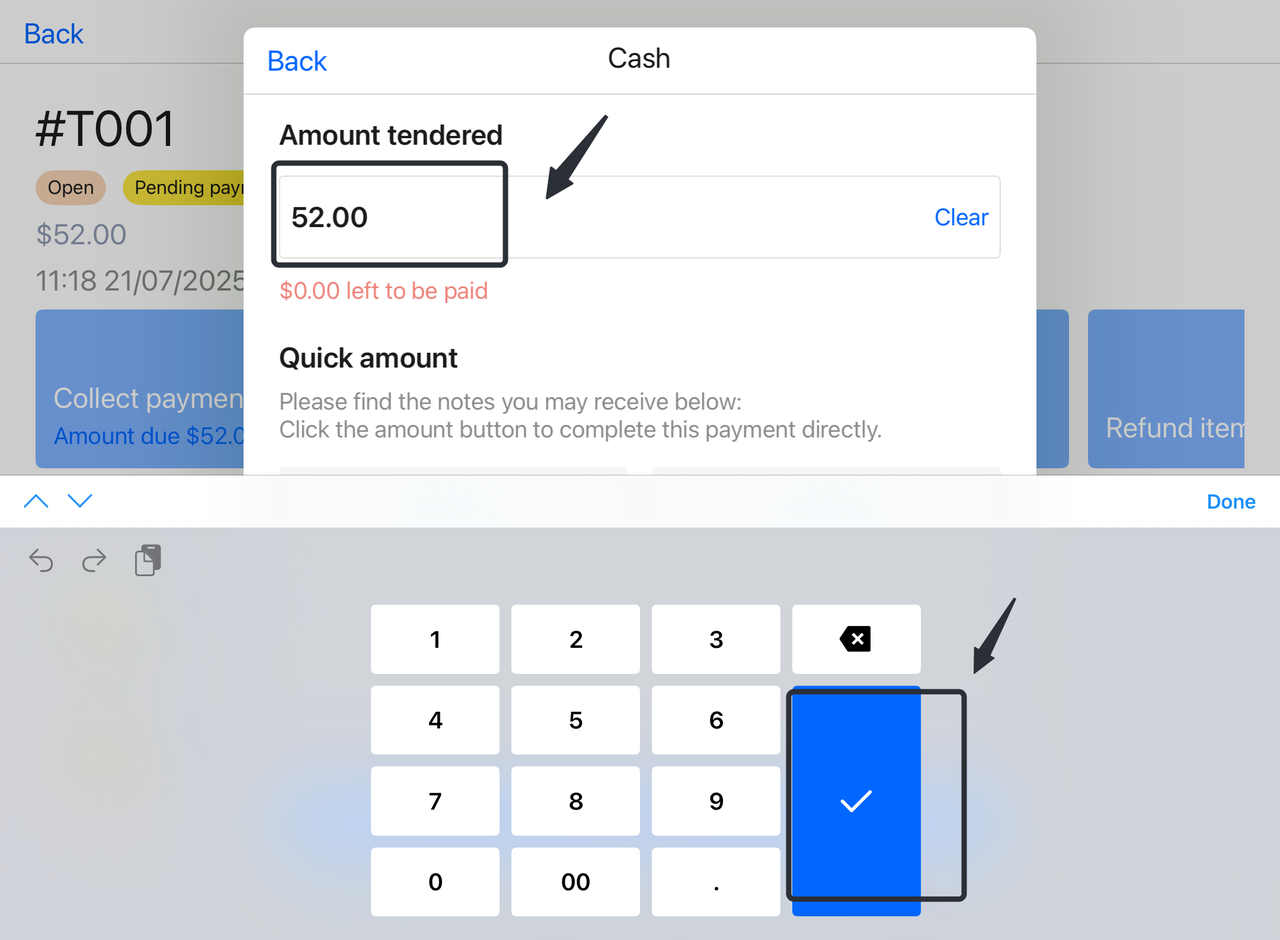
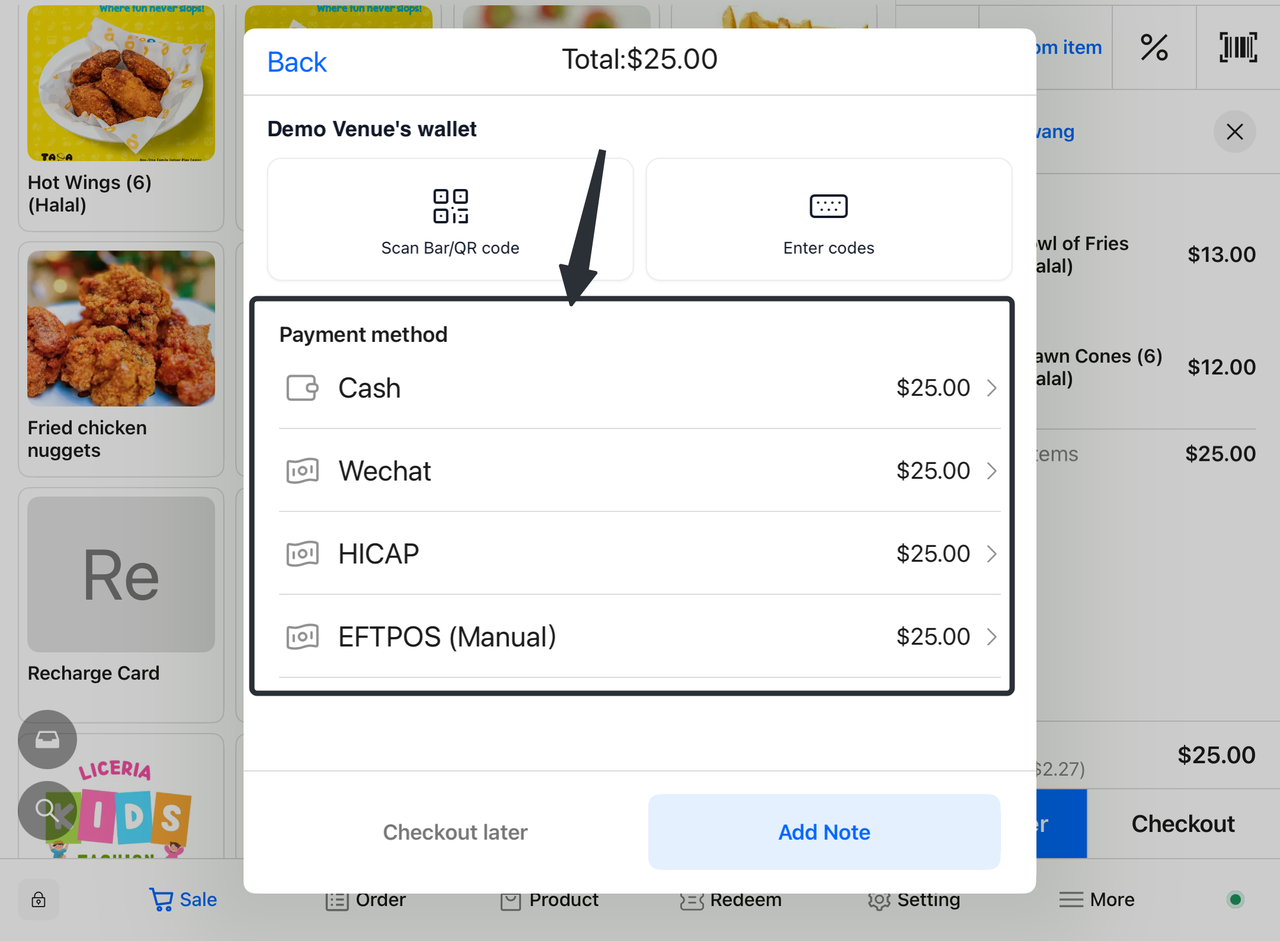
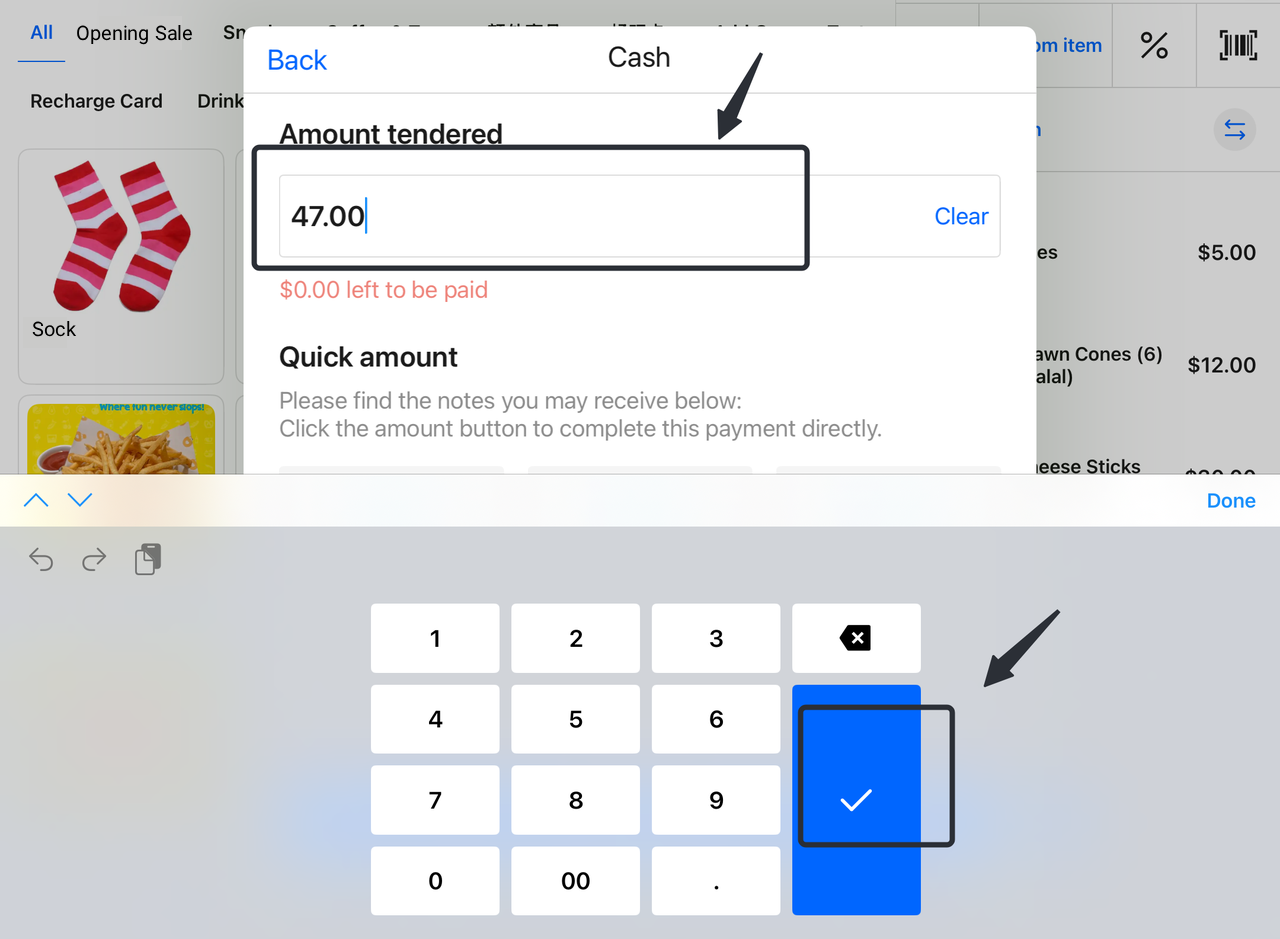
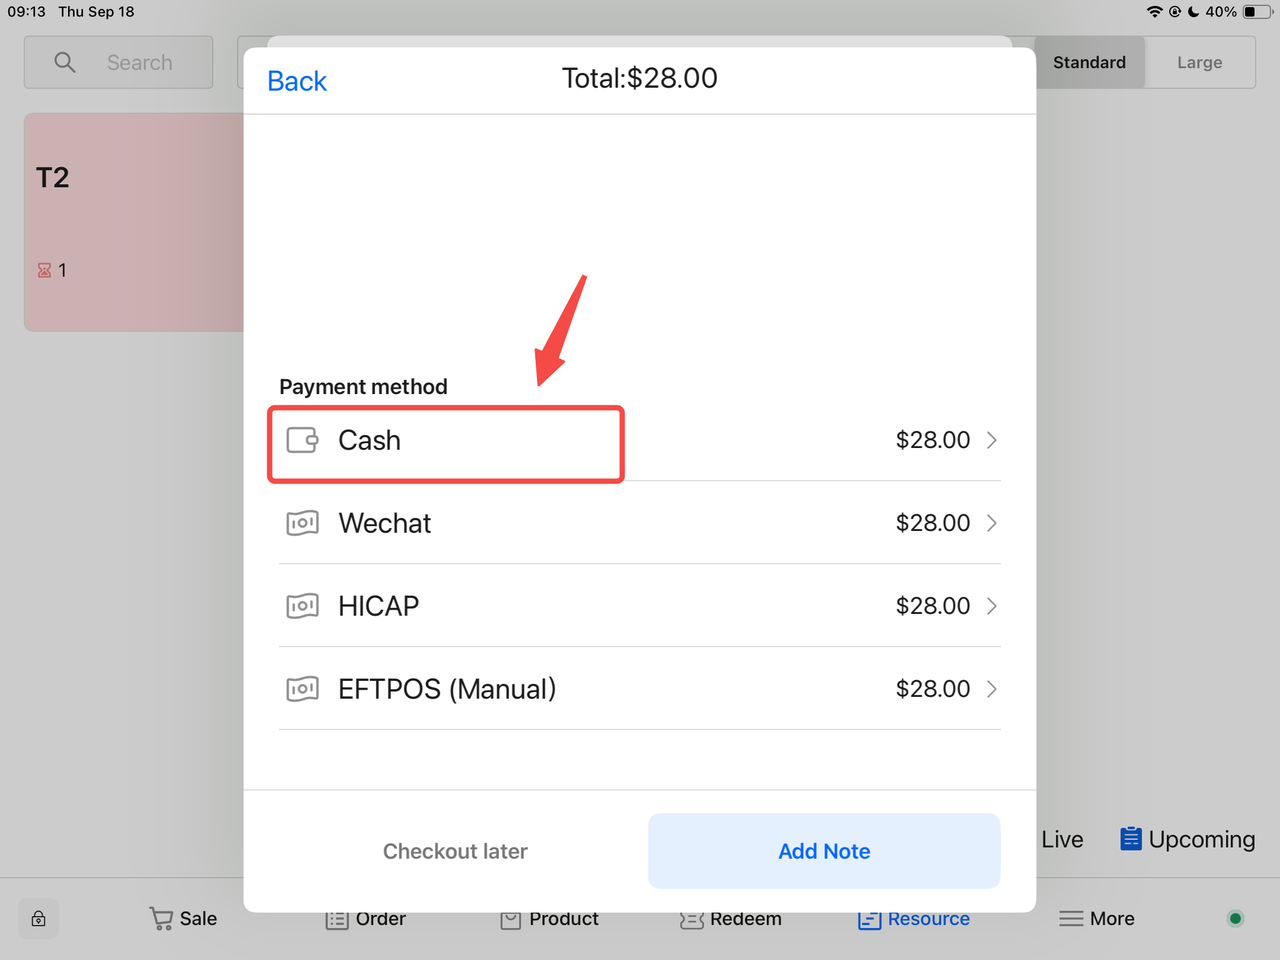
- Pay After Dining
-
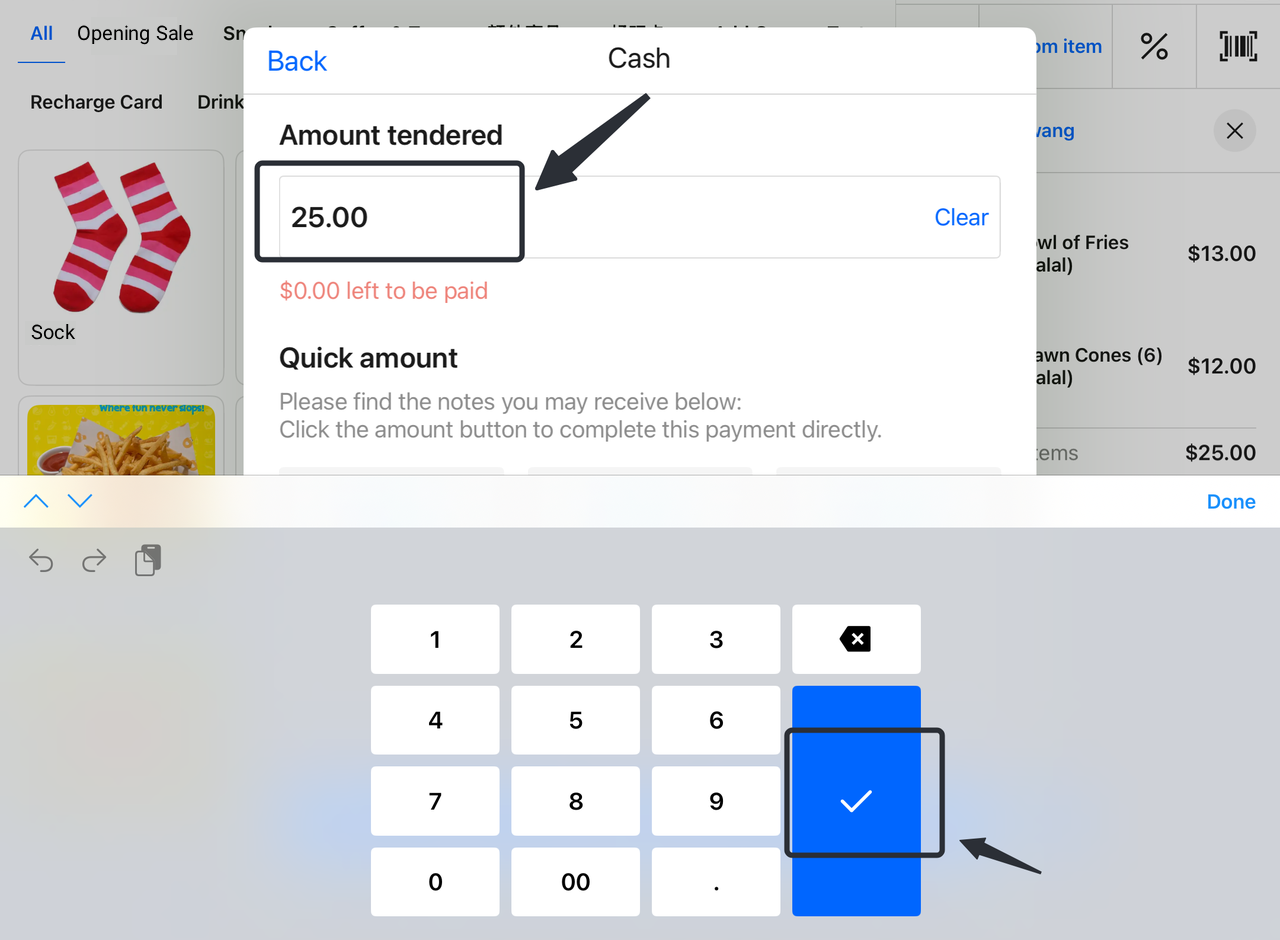
- Customers select a payment method (Cash, WeChat Pay, etc.) and enter the payment amount.
- Complete Payment
-
- Click "√" to confirm payment. The system will update the order status to "Paid".
1.2 Pay Before Dining
- Customer Places Order
-
-
Customers can place orders anonymously (walk-in) or bind an existing customer account for record-keeping.
-
Select desired dishes from the menu and click "Add to Cart".
-
- View Cart
-
- Click the cart icon in the upper right corner to check selected dishes and the total amount.
- Select Checkout
-
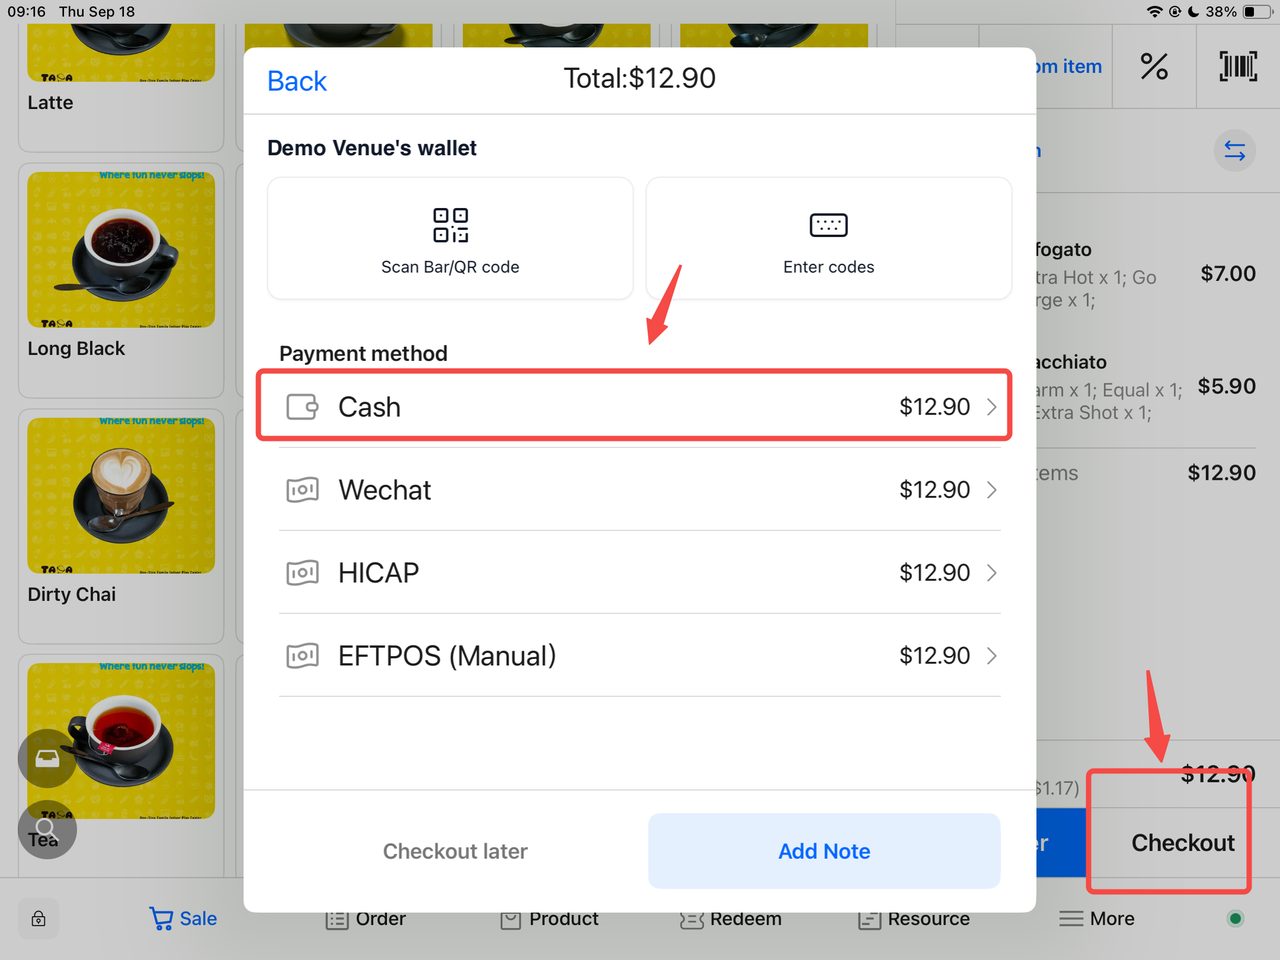
- On the cart page, choose the "Checkout" option.

- Select Customer's Payment Method
-
- Customers select a payment method (Cash, WeChat Pay, etc.) and verify the payment amount.
- Complete Payment
-
- Click "√" to confirm payment. The system will update the order status to "Paid".
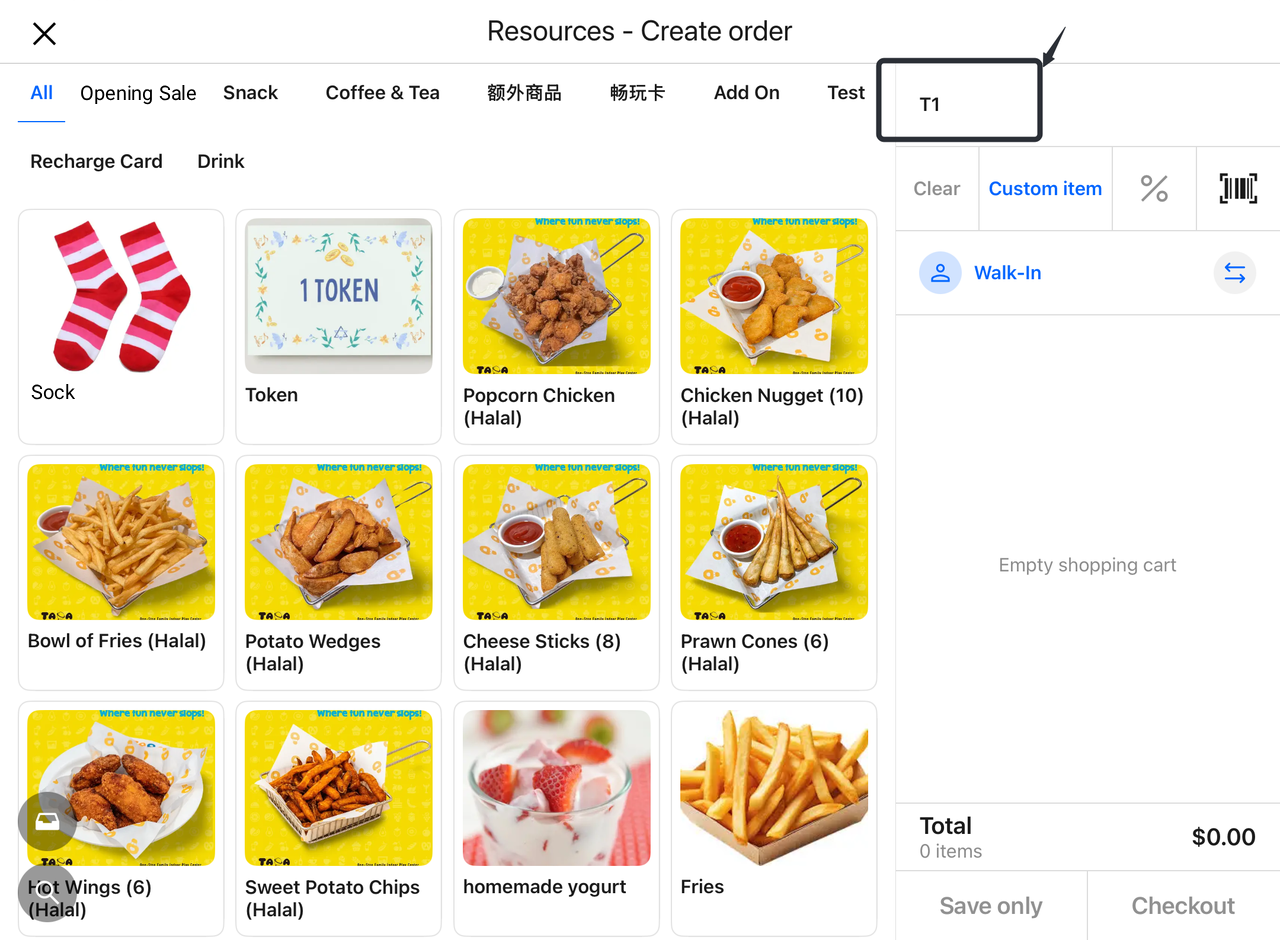
2. How to Place Orders on the Terminal Resource Page
2.1 Enable Resource View
- If the resource view is not visible on the Terminal interface, enable the function first. Ensure the resource view is placed in an easily accessible location for quick access.
How to enable Resource View:
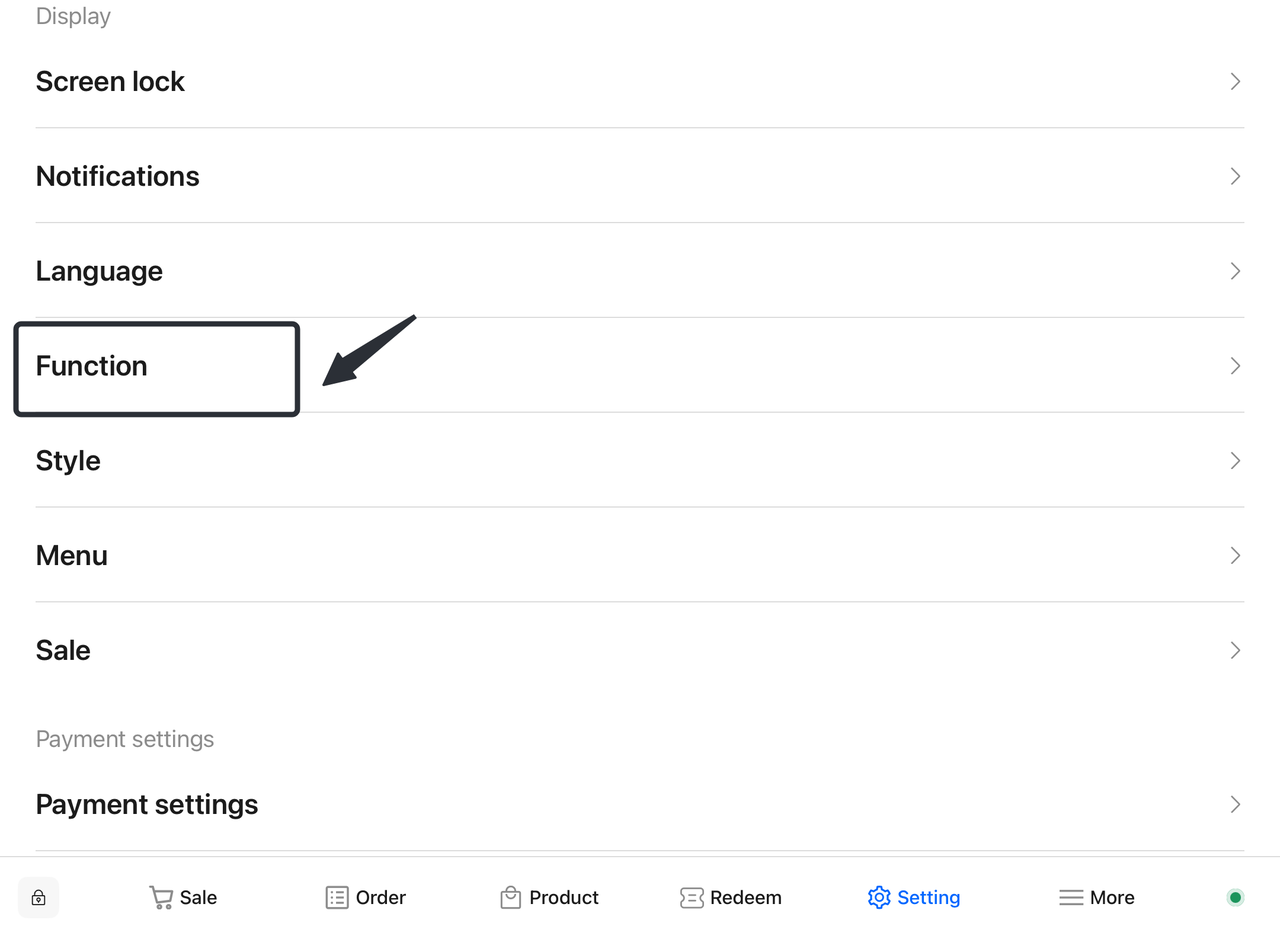
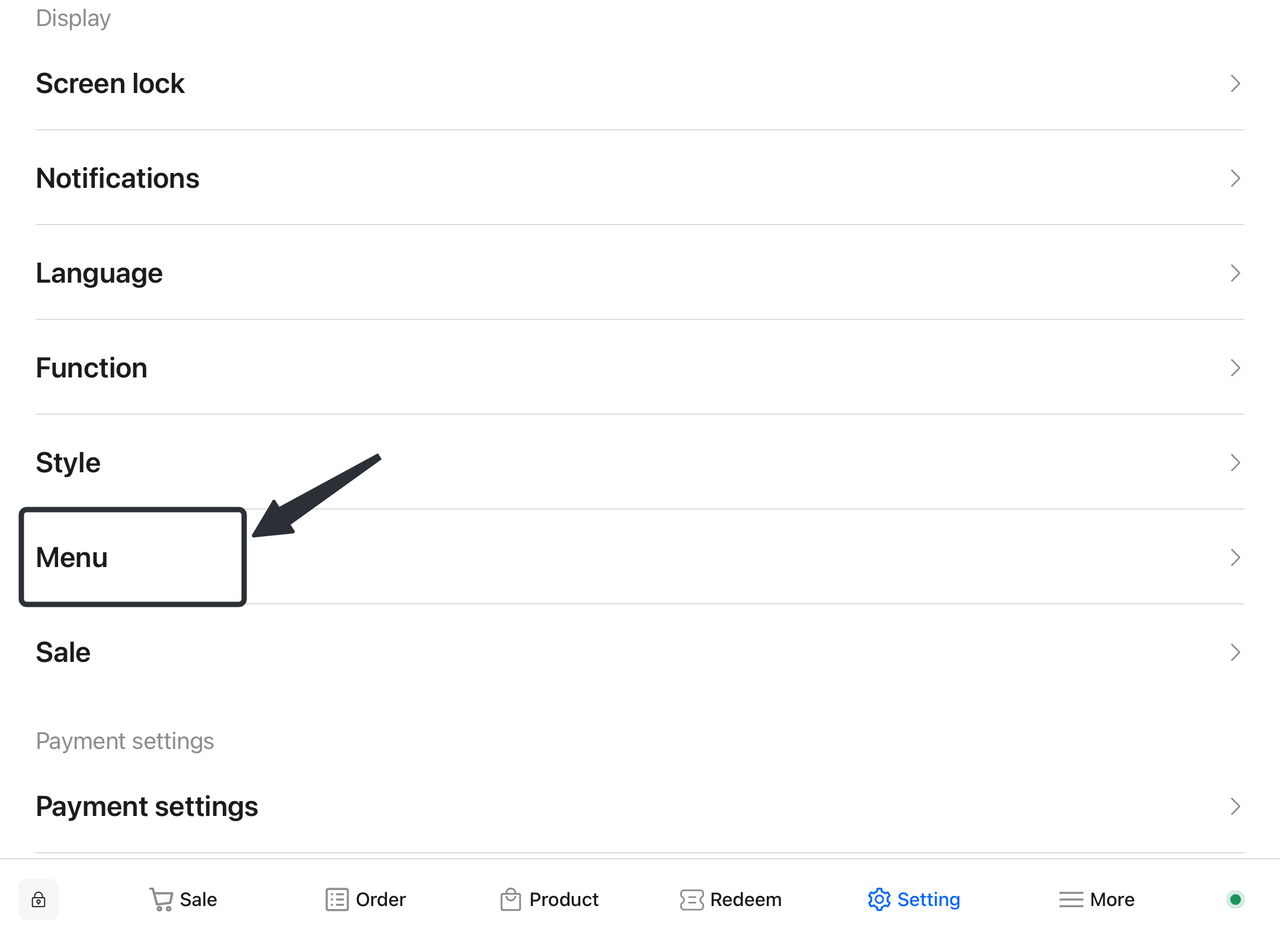
a. Access the Settings Interface
-
- On the home screen, find and click "Settings" or "Function Settings".
b. Select Function Settings
-
- In the Settings interface, find the "Function" option and click to enter.
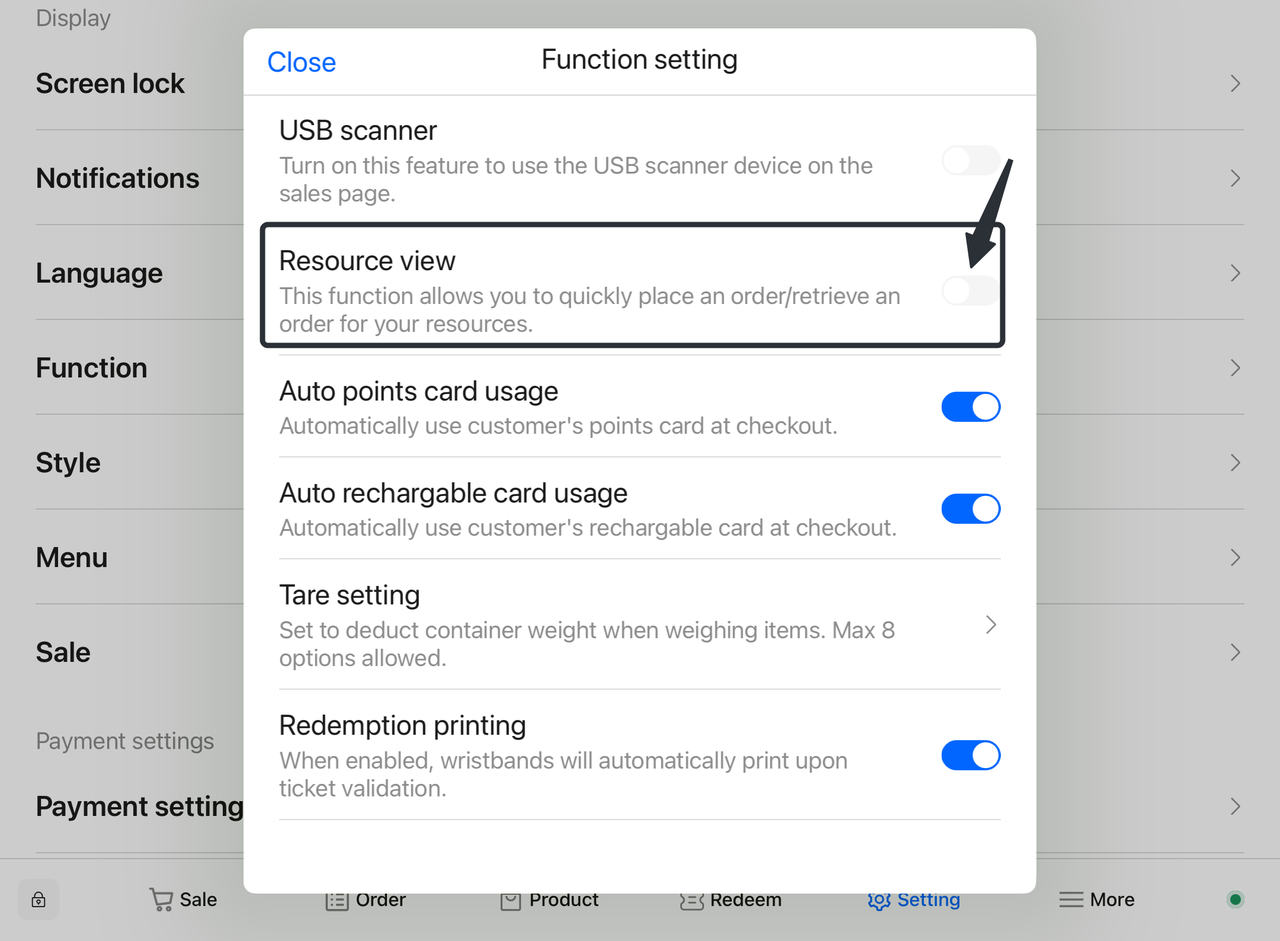
c. Enable Resource View
-
-
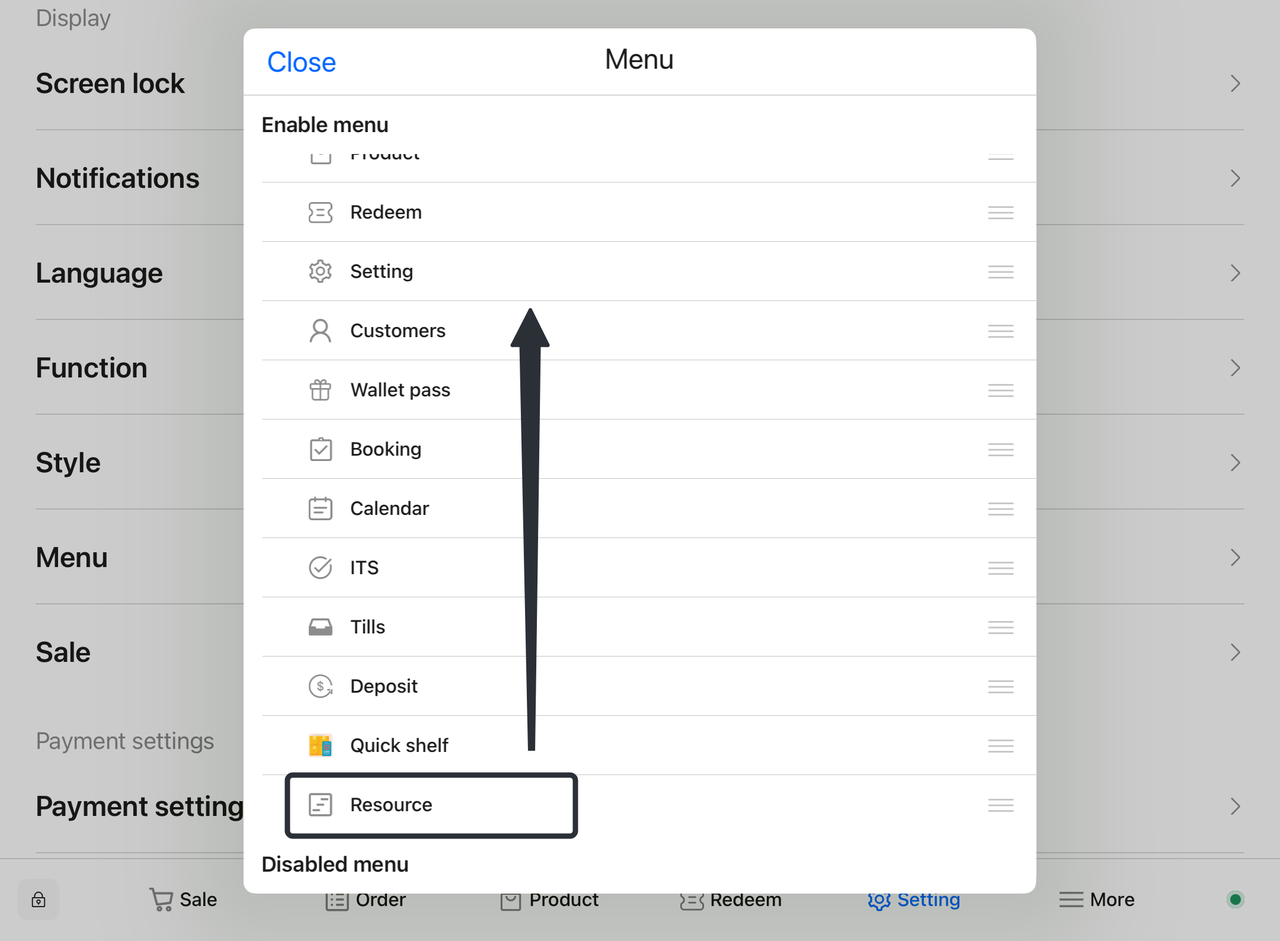
In Function Settings, locate the "Resources" option and ensure it is enabled. If not, toggle it to "Enable".
-
Move the resource view to a convenient location for operation.
-
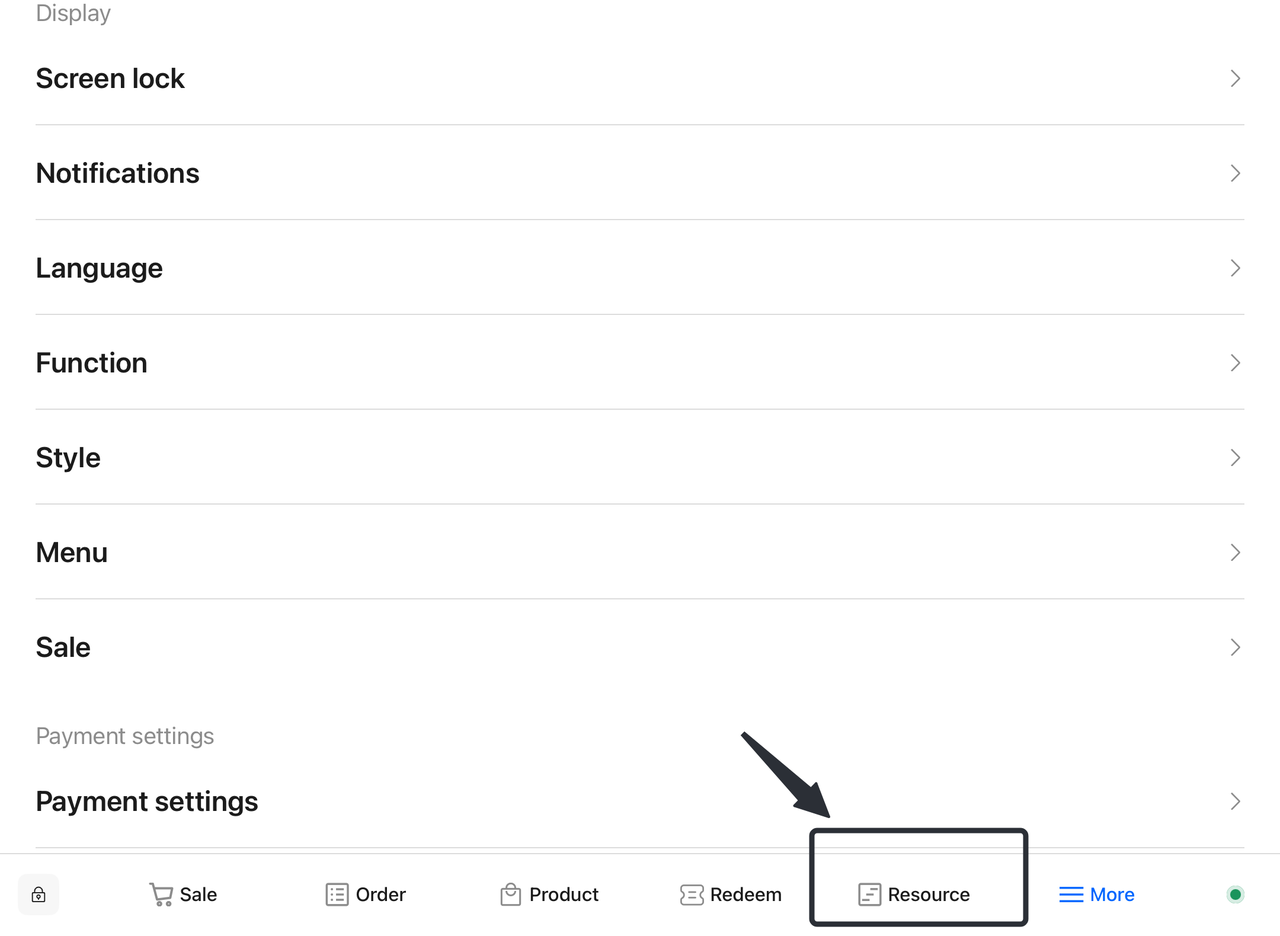
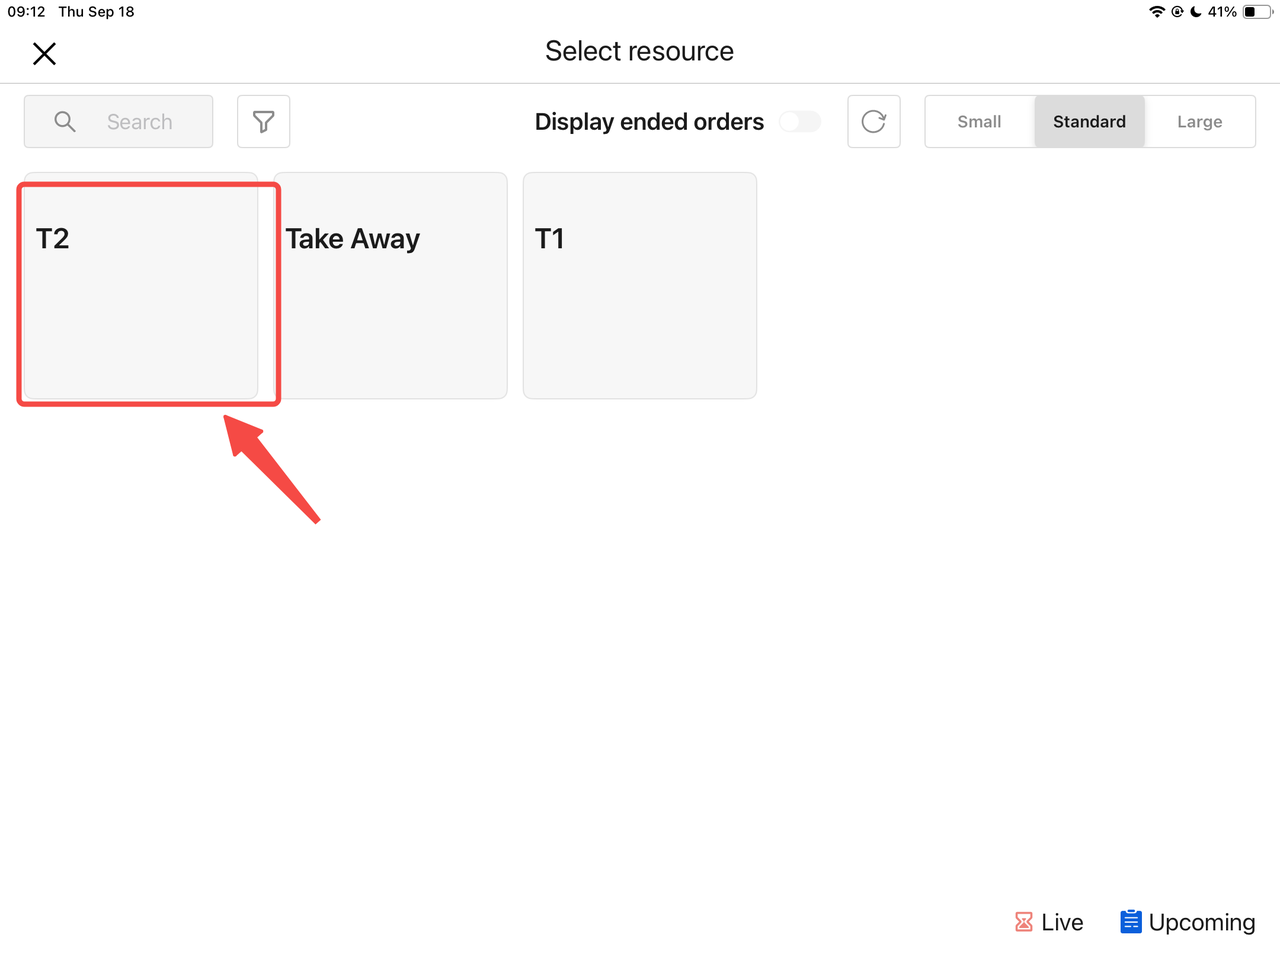
2.2 Select a Table
- Click the resource view and select the corresponding table where the customer is seated. The system will automatically redirect to the sales page.

2.3 View Orders
- On the sales page, you can view selected products, which the system will associate with the corresponding table.
2.4 Add Products
- Continue browsing the menu, select additional products, and add them to the cart.
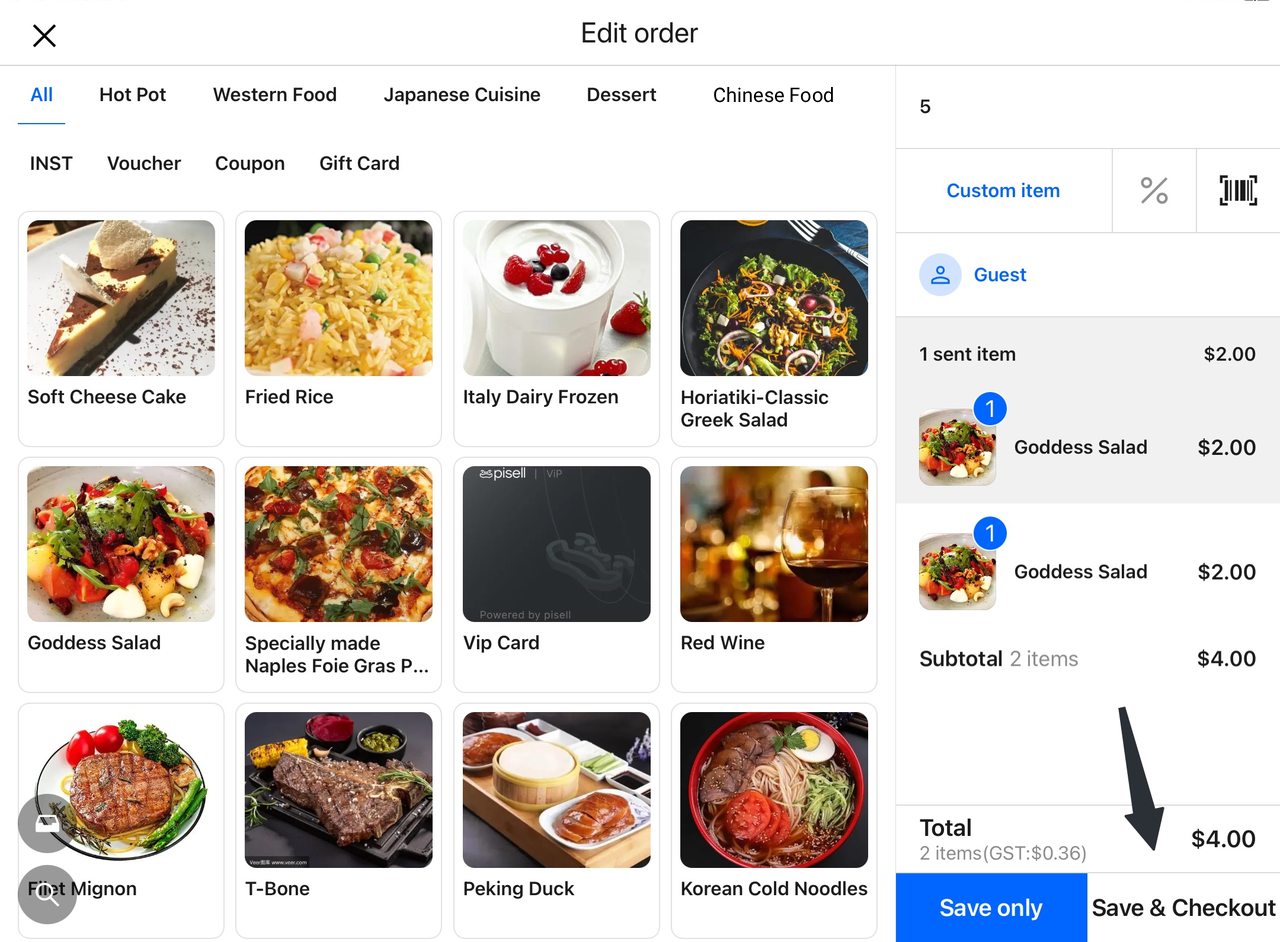
2.5 Save Order (Settle After Dining or On-Site)
-
Save Only: After adding products, select "Save Only" to settle later.
-
Checkout: If the customer intends to settle immediately, select "Checkout". The system will guide you through the payment process.


3. How to Place Orders on the Terminal Retail Page
3.1 Order for a Specific Table
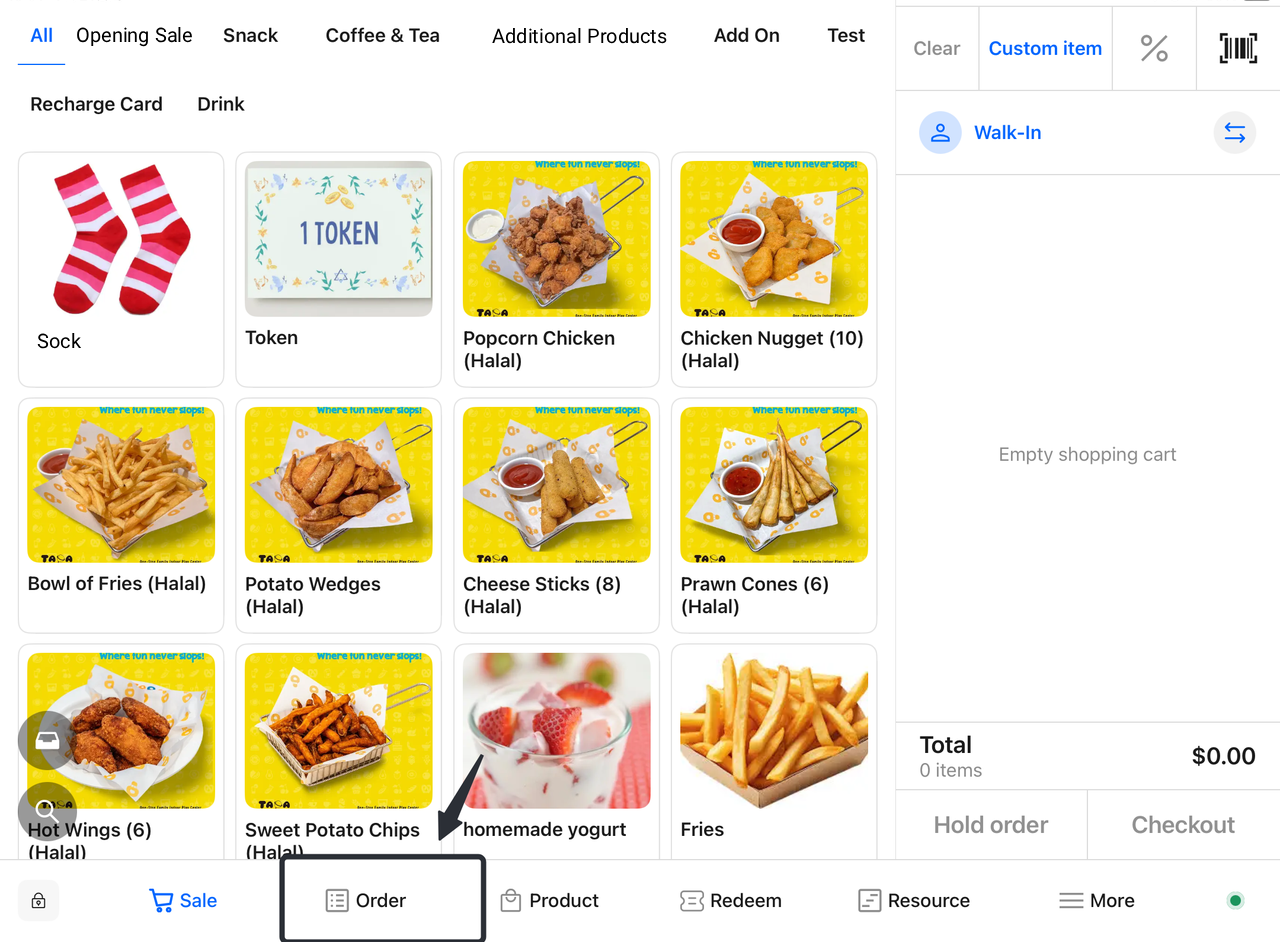
Open the Sales Page
Launch the Terminal's sales page to prepare for product additions.
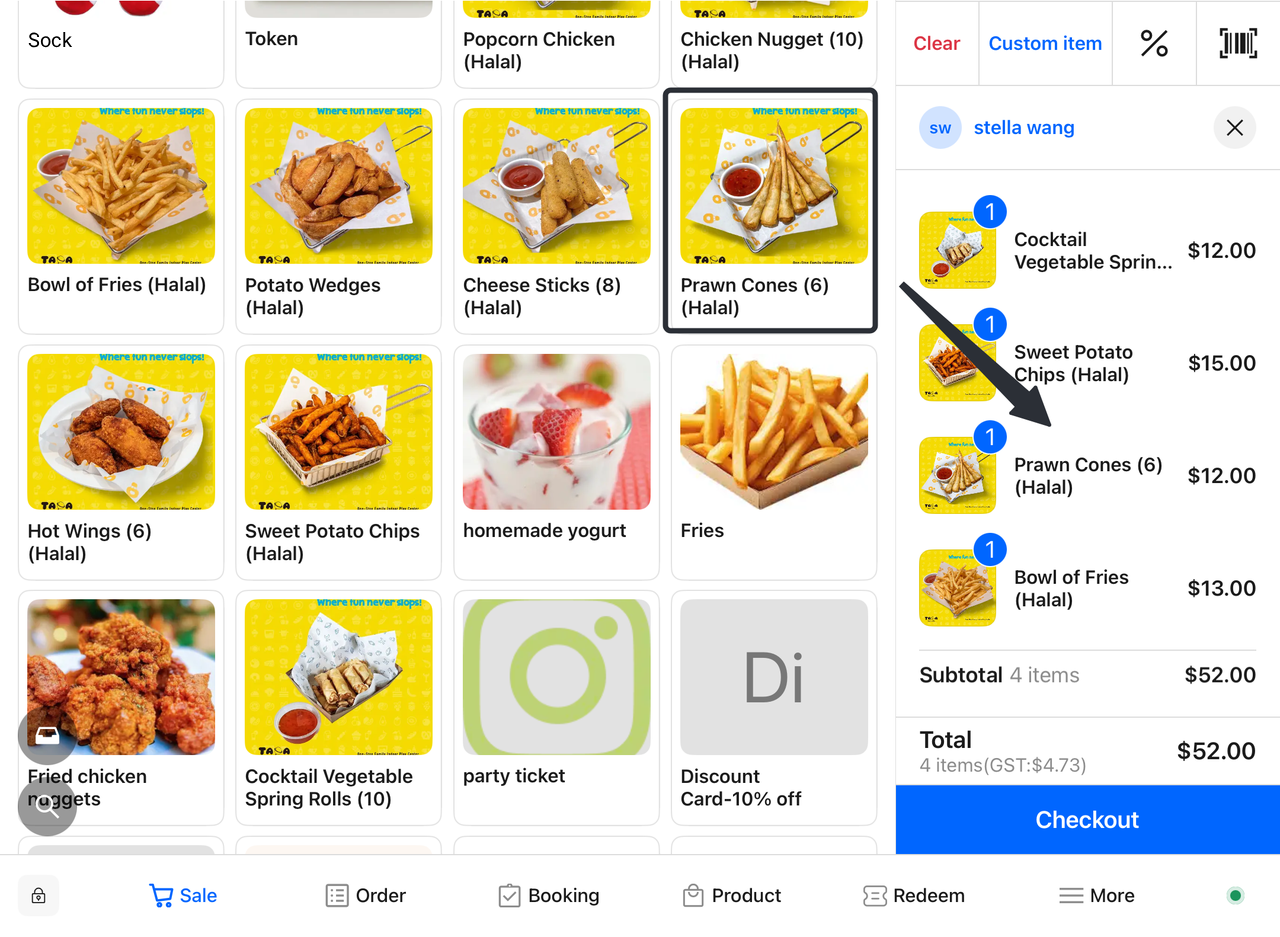
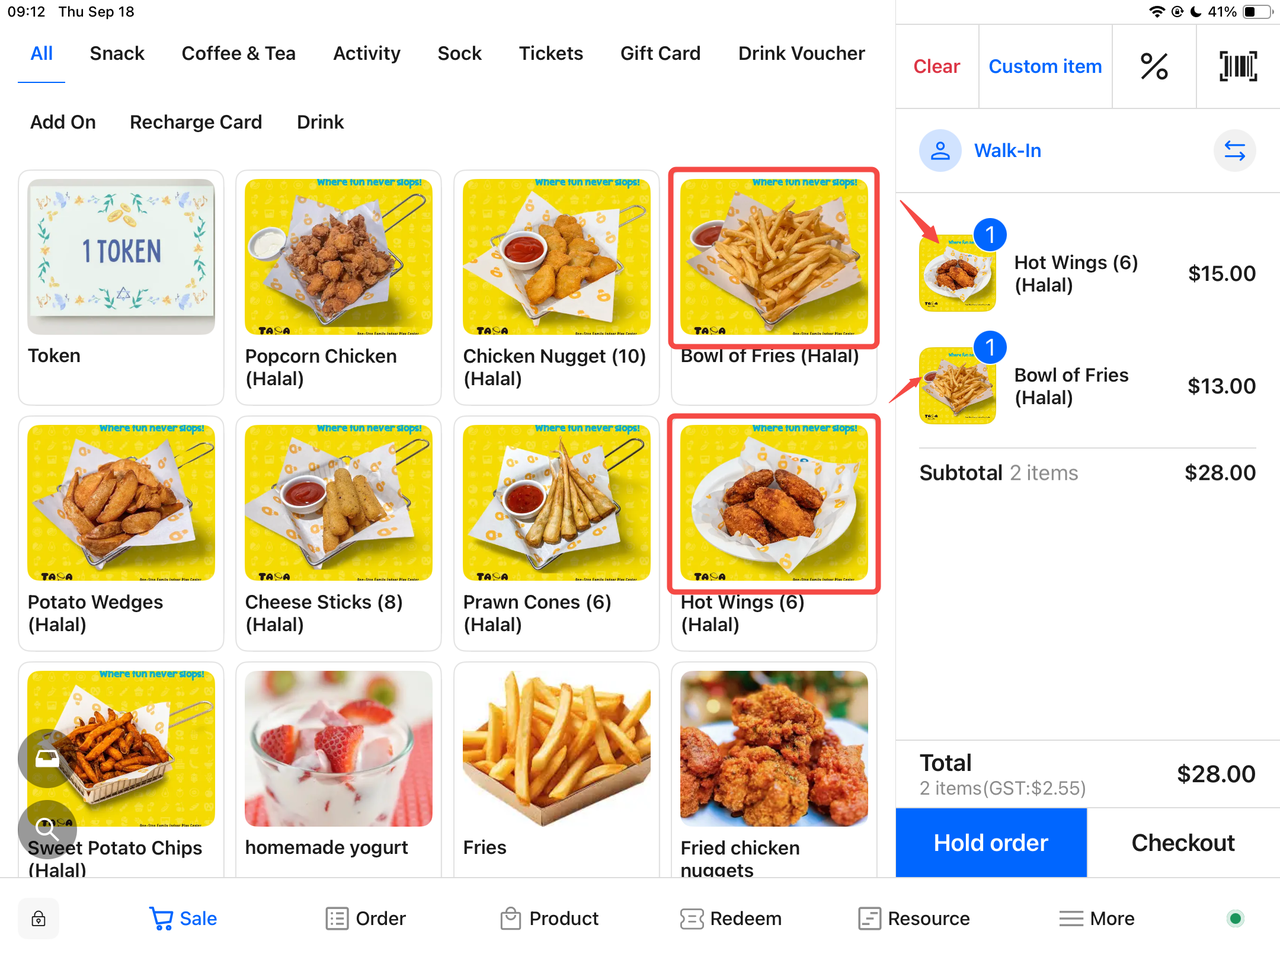
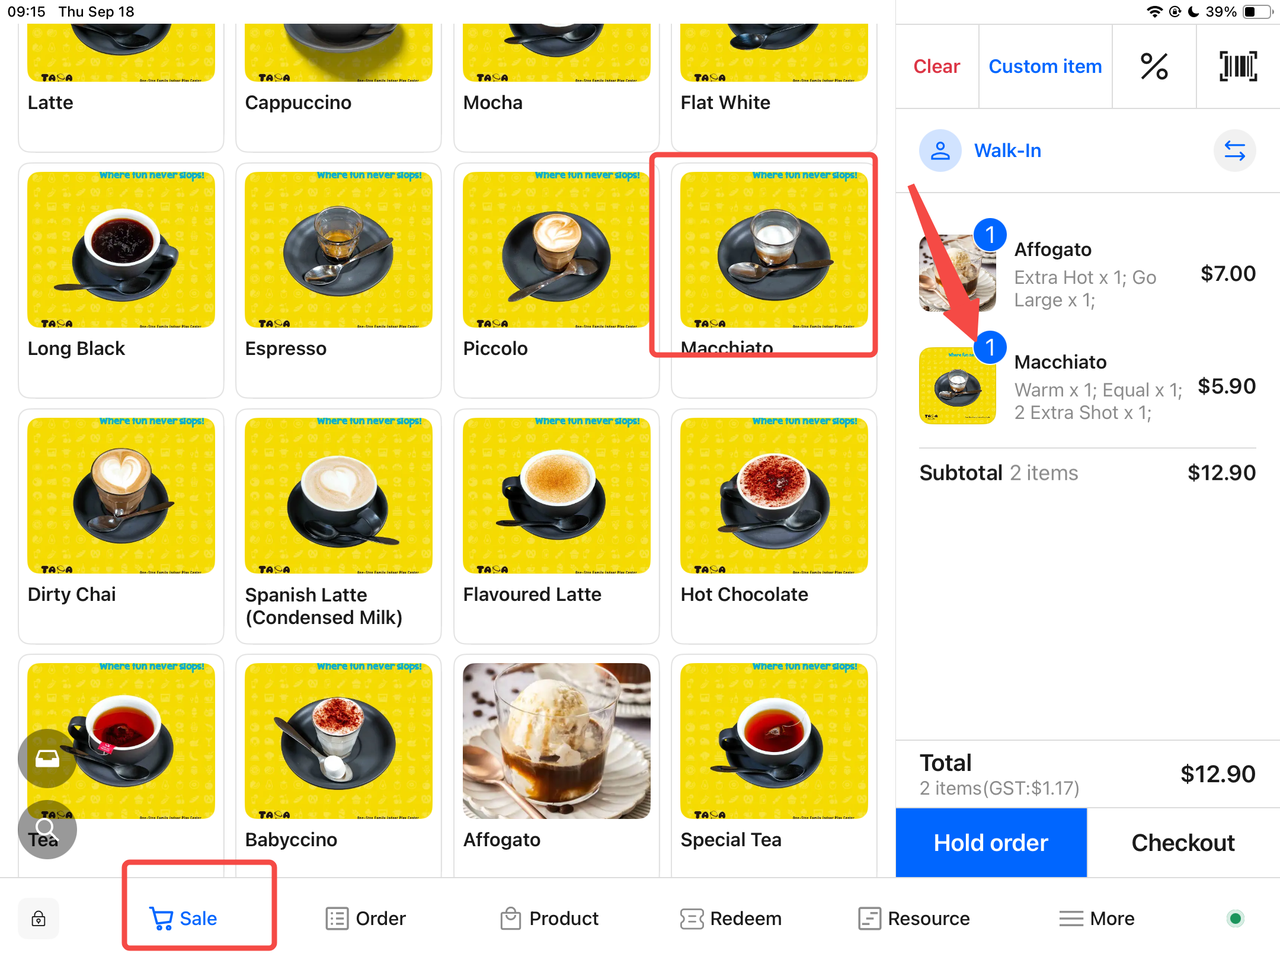
Select Products and Add to Cart
-
Browse the product list to find desired items.
-
Click the products the customer wants to add; they will appear in the cart on the right side of the page.
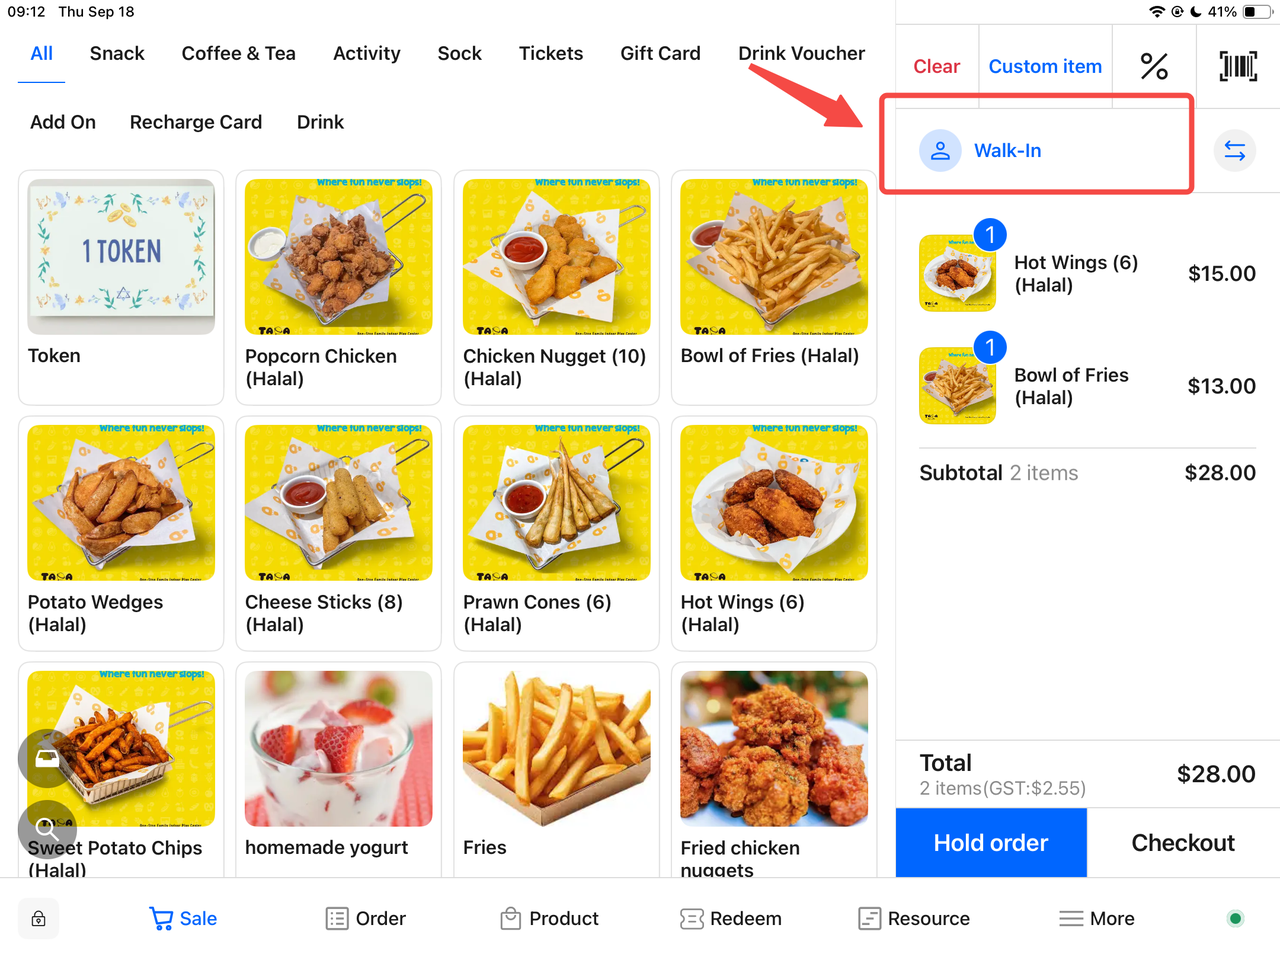
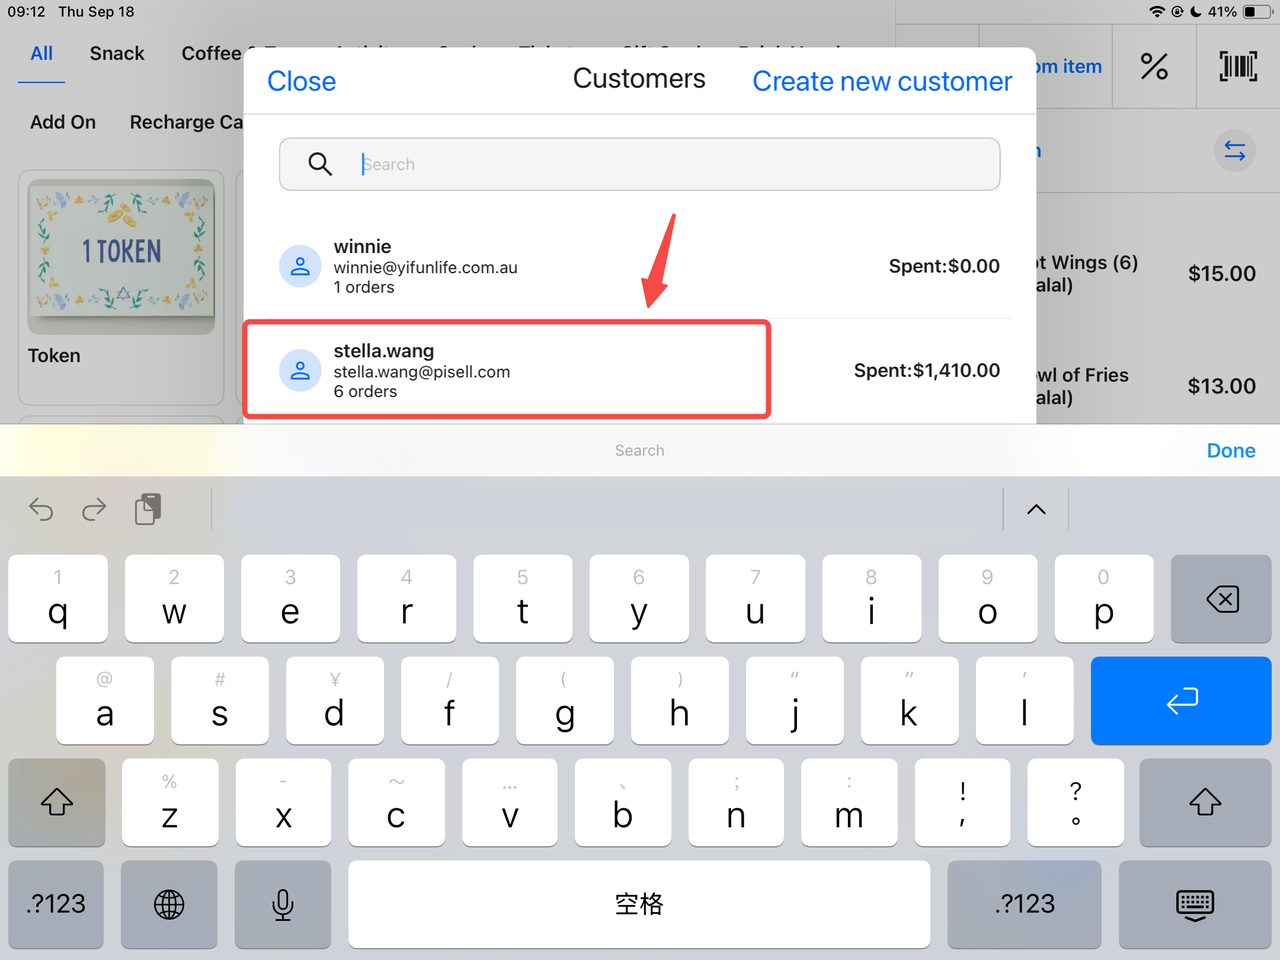
Bind Customer (If Needed)
-
Locate the Walk-in customer section in the cart.
-
Click and select the customer to bind.
Suspend Order
- Click the "Suspend Order" button in the lower left corner of the cart.
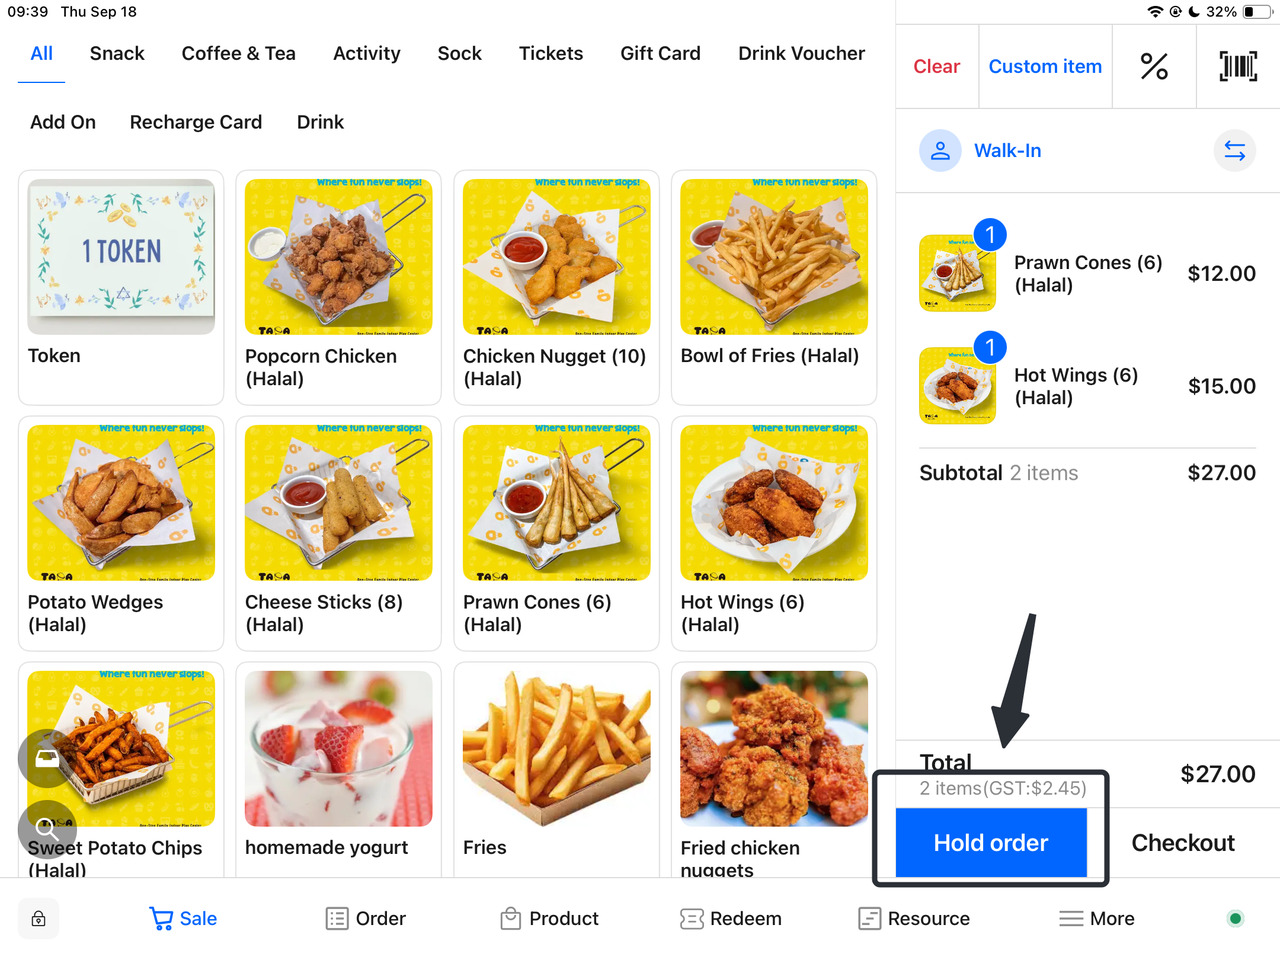
Select Table to Suspend Order
-
On the resource page, click the table where the order will be suspended.
-
The system will associate the cart order with the selected table.
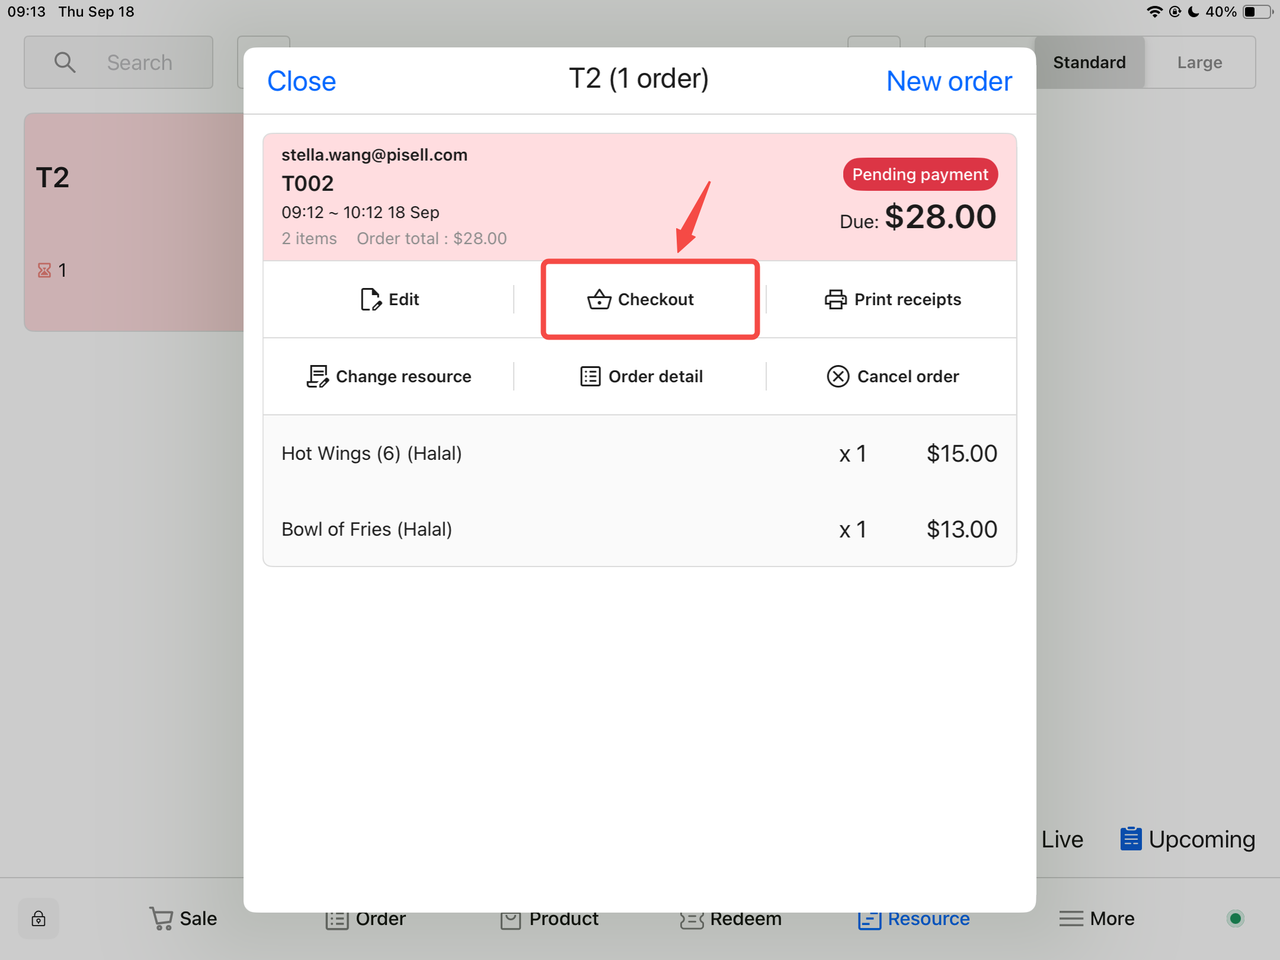
Checkout (If Immediate Settlement is Required)
-
On the resource page, select the table with the suspended order.
-
Click the "Checkout" button.
-
Choose the customer's payment method and complete the checkout.
3.2 Retail Orders
Open the Terminal Interface
Launch the sales page to prepare for product purchases.
Add Products to Cart
-
Browse the product list to find desired items.
-
Click the products; they will appear in the cart on the right side of the page.
Redirect to Checkout
-
Click the "Checkout" button in the cart.
-
The system will redirect to the payment method selection interface.
Select Payment Method and Complete Checkout
-
Choose the customer's payment method (e.g., Cash, Credit Card, or other options).
-
Complete the payment to finalize the order.
4. How to Return or Exchange Dishes
4.1 Refund/Return Dishes on the Order Page
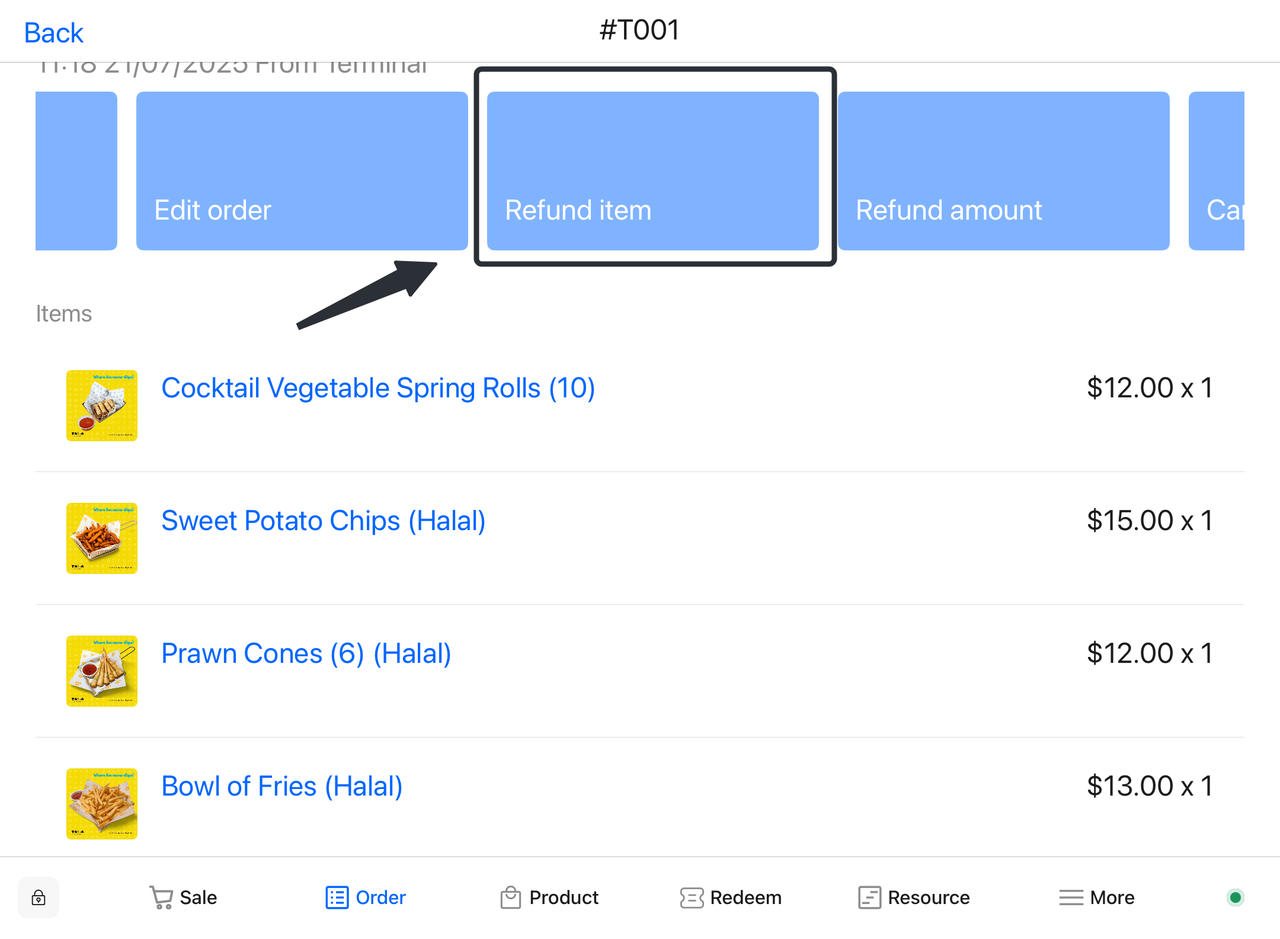
- Select Order:
-
- Open the app and navigate to the Orders page.
- Select the order to be refunded.
- Edit Order:
-
-
Click the "Return" button.
-
In the order details, view purchased products.
-
-
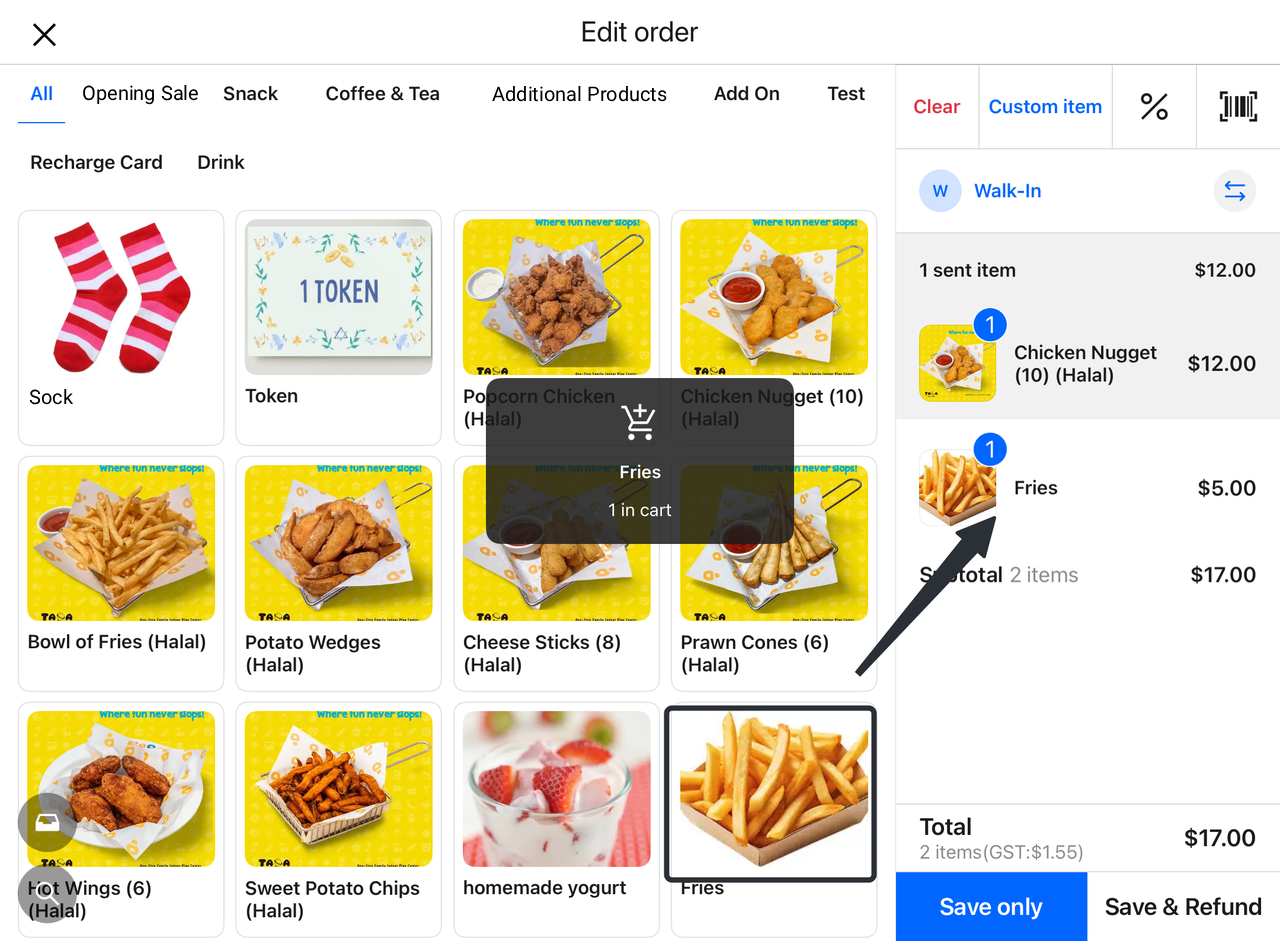
Select Refund Item:
-
-
Choose "Refund"; the system will redirect to find the item to be refunded (e.g., Prawn Cones).
-
Click the "Refund Item" button.
-
-
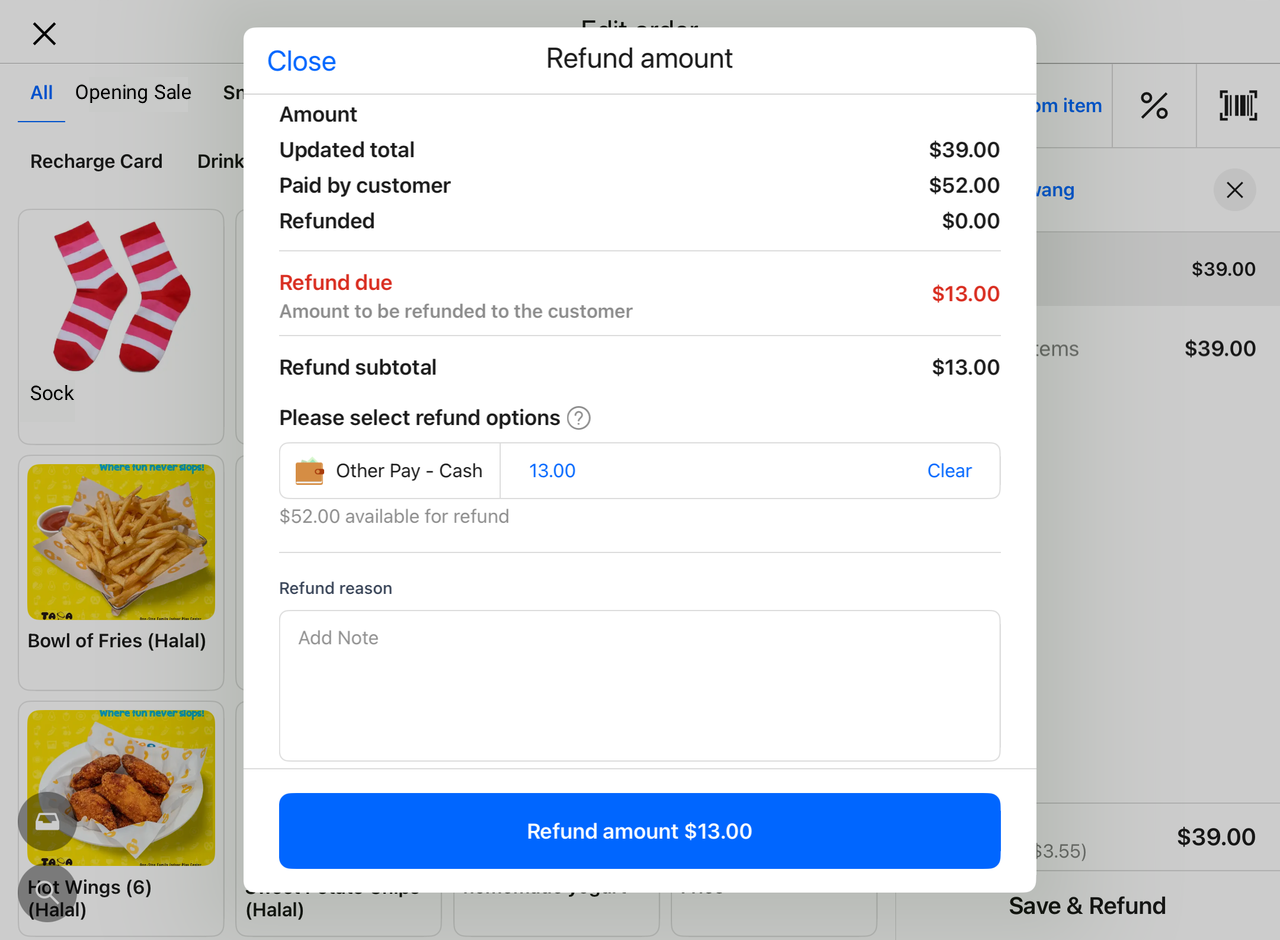
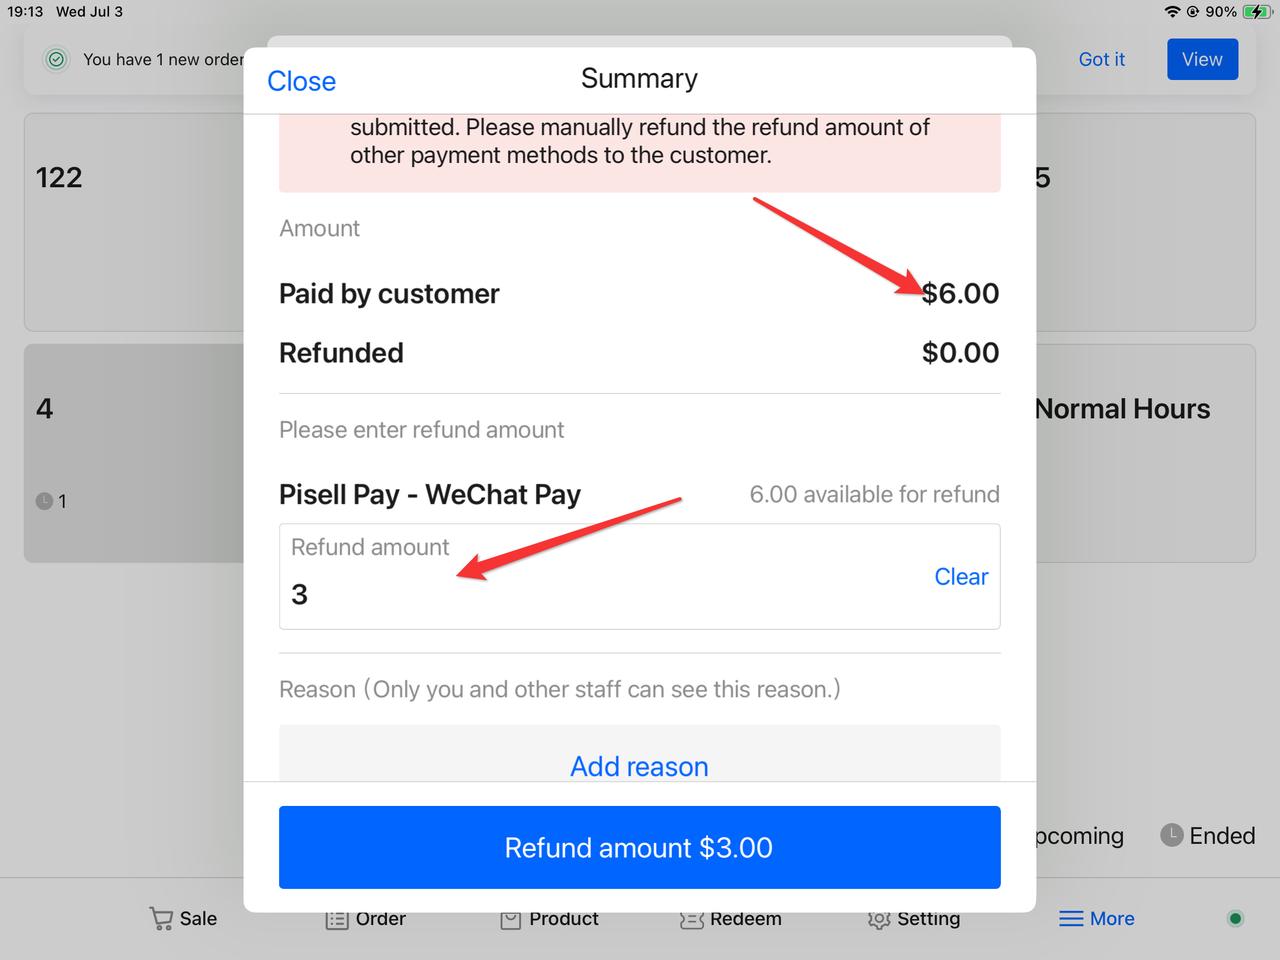
Confirm Refund Amount:
-
-
Enter the refund amount (e.g., $13.00).
-
Verify the updated total amount and paid amount.
-
- Select Refund Method:
-
-
Choose the refund payment method (e.g., Cash).
-
Add a refund note (optional).
-

- Complete Refund:
-
-
Click the "Refund Amount" button to confirm.
-
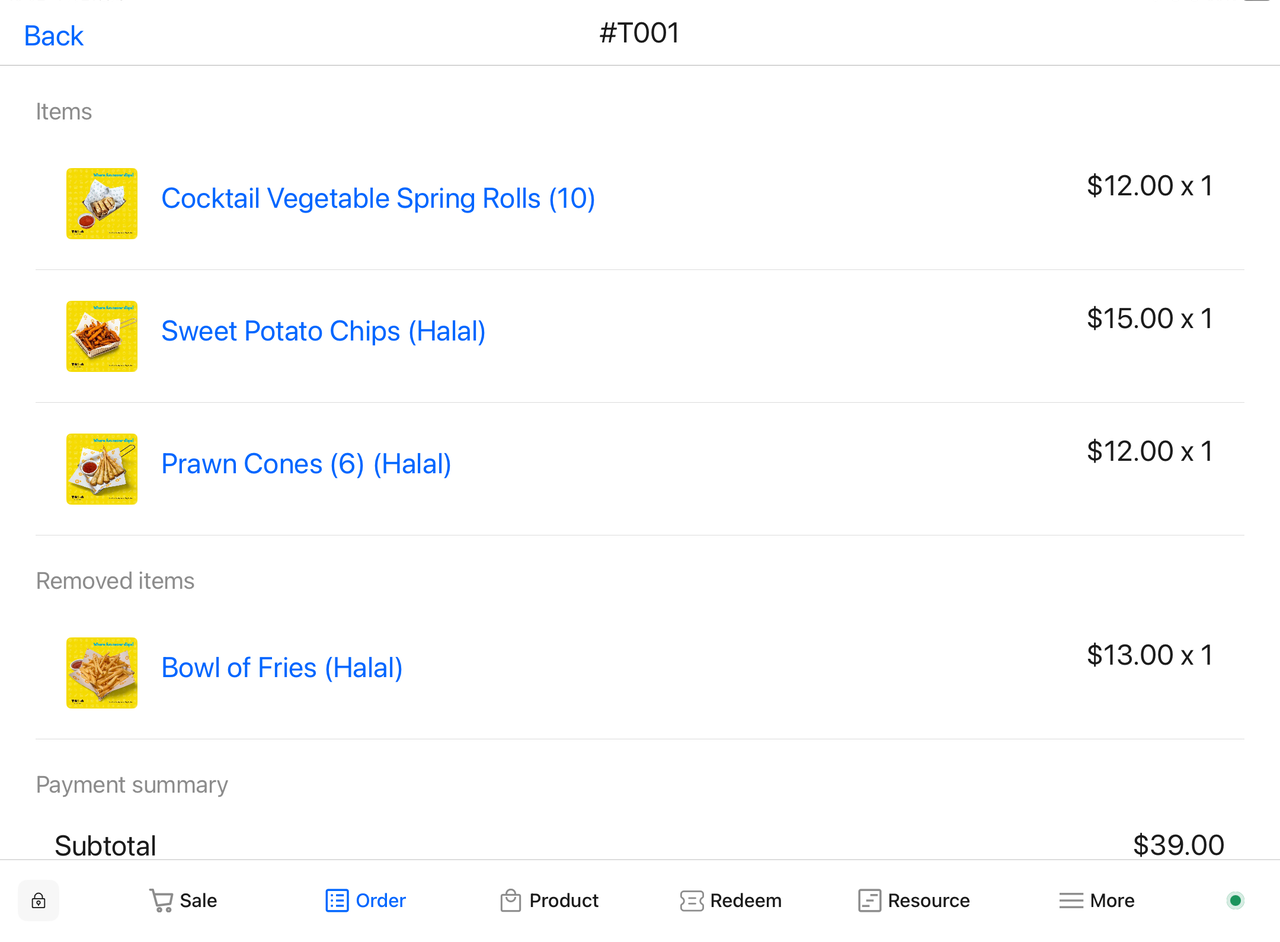
Return to the Orders page to view the removed item and refund summary.
-
4.2 Exchange Dishes on the Order Page
- Select Order:
-
-
Open the app and navigate to the "Orders" page.
-
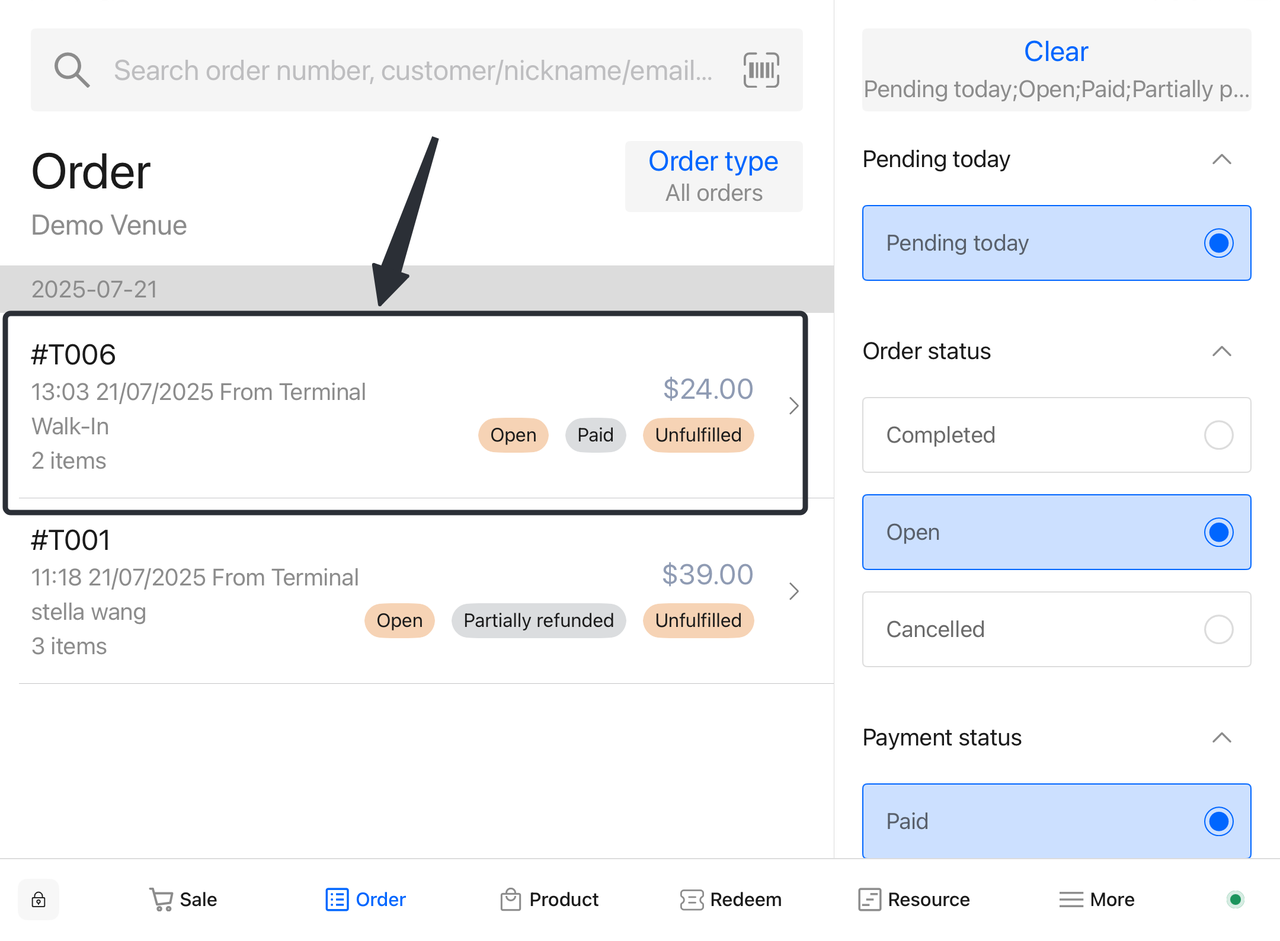
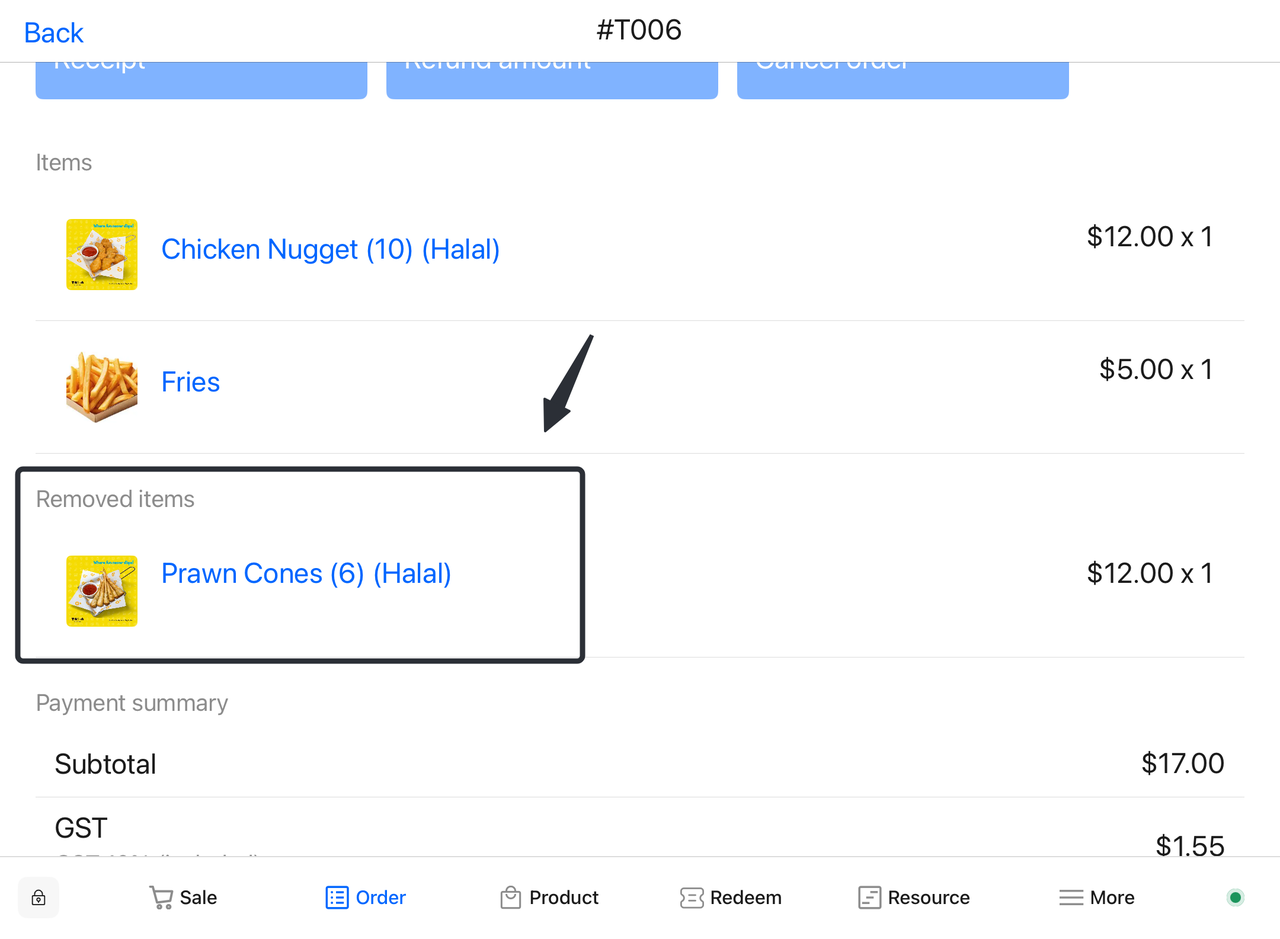
Find and select the order to be modified (e.g., #T006).
-
-
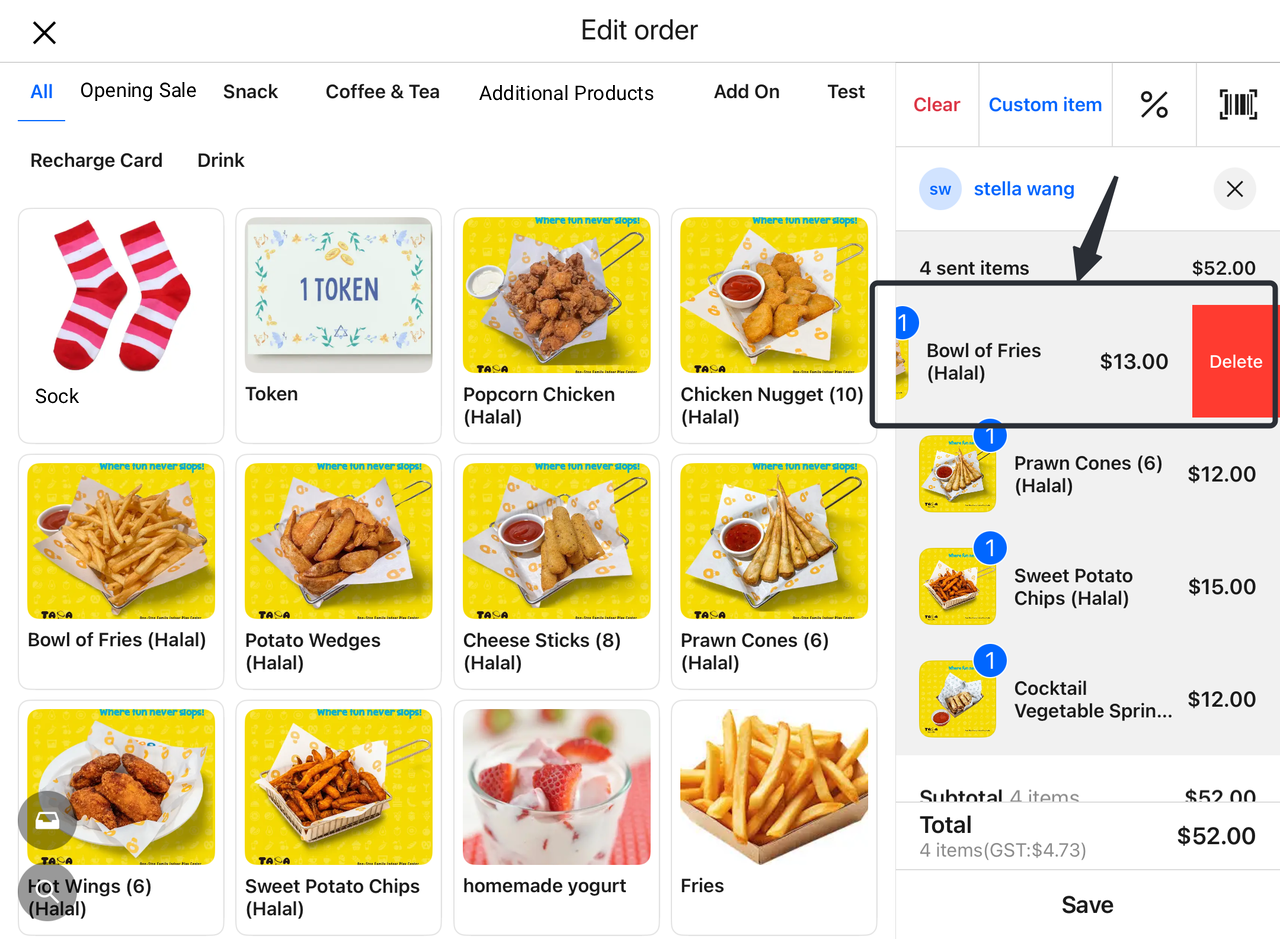
Edit Order:
-
-
Click the "Edit Order" button to access order details.
-
View current products in the order (e.g., Prawn Cones and Chicken Nugget).
-
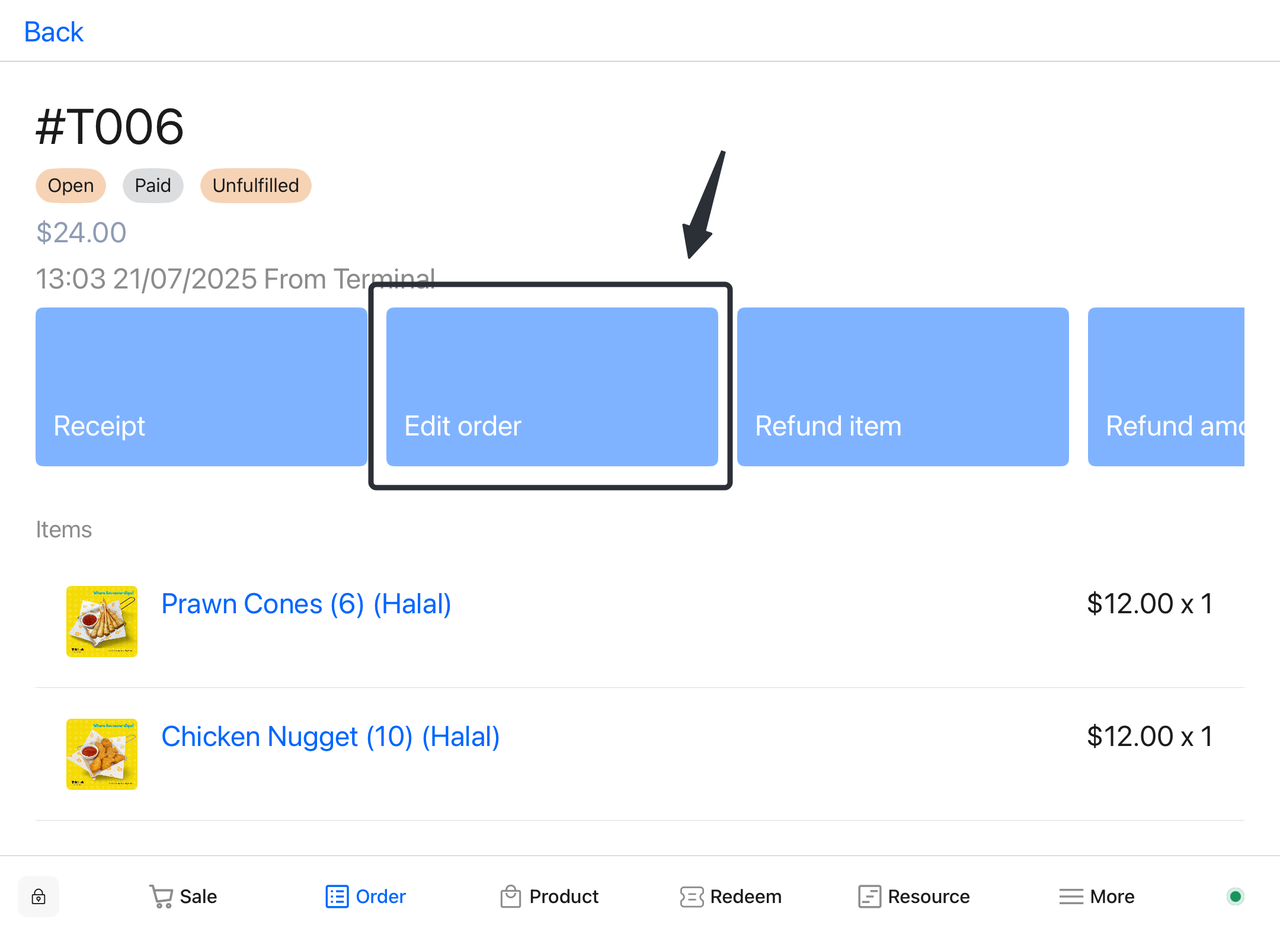
-
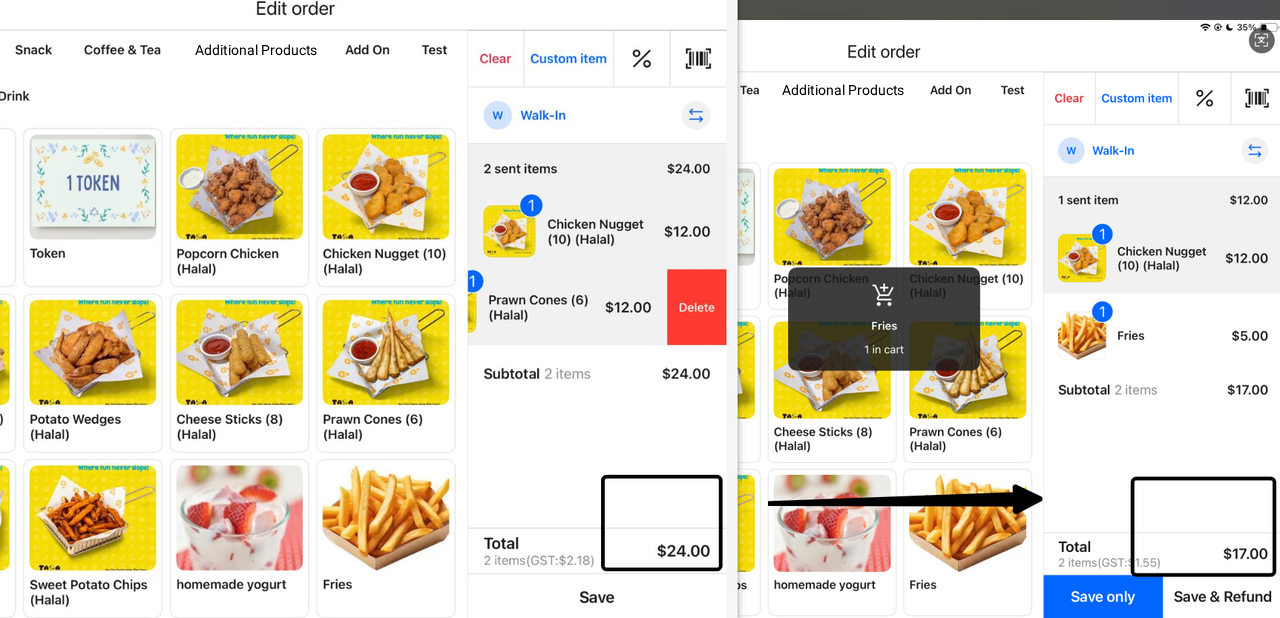
Select Refund Item:
-
-
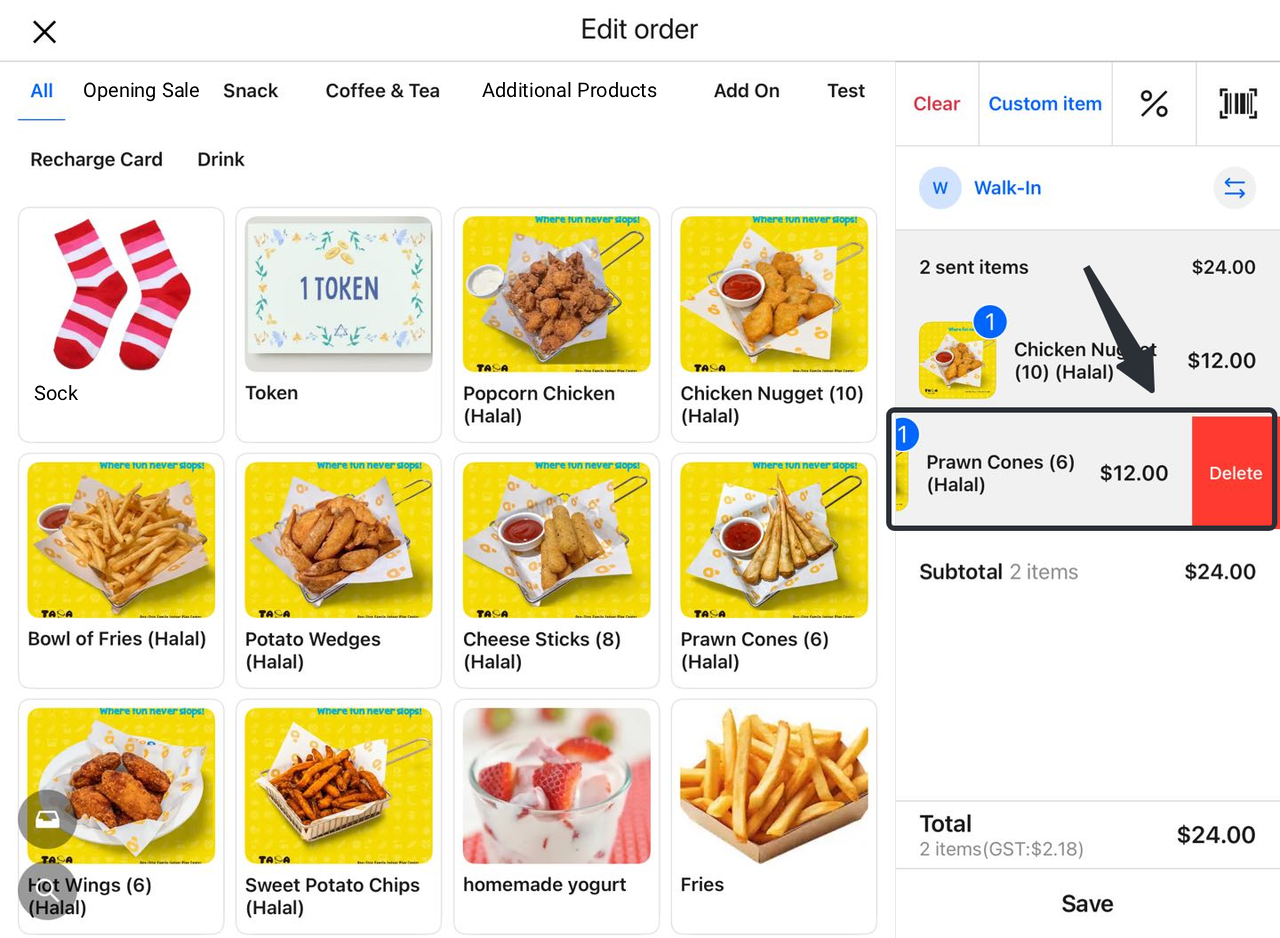
Locate the product to be returned (e.g., Prawn Cones).
-
Swipe right on the product and select "Delete".
-
-
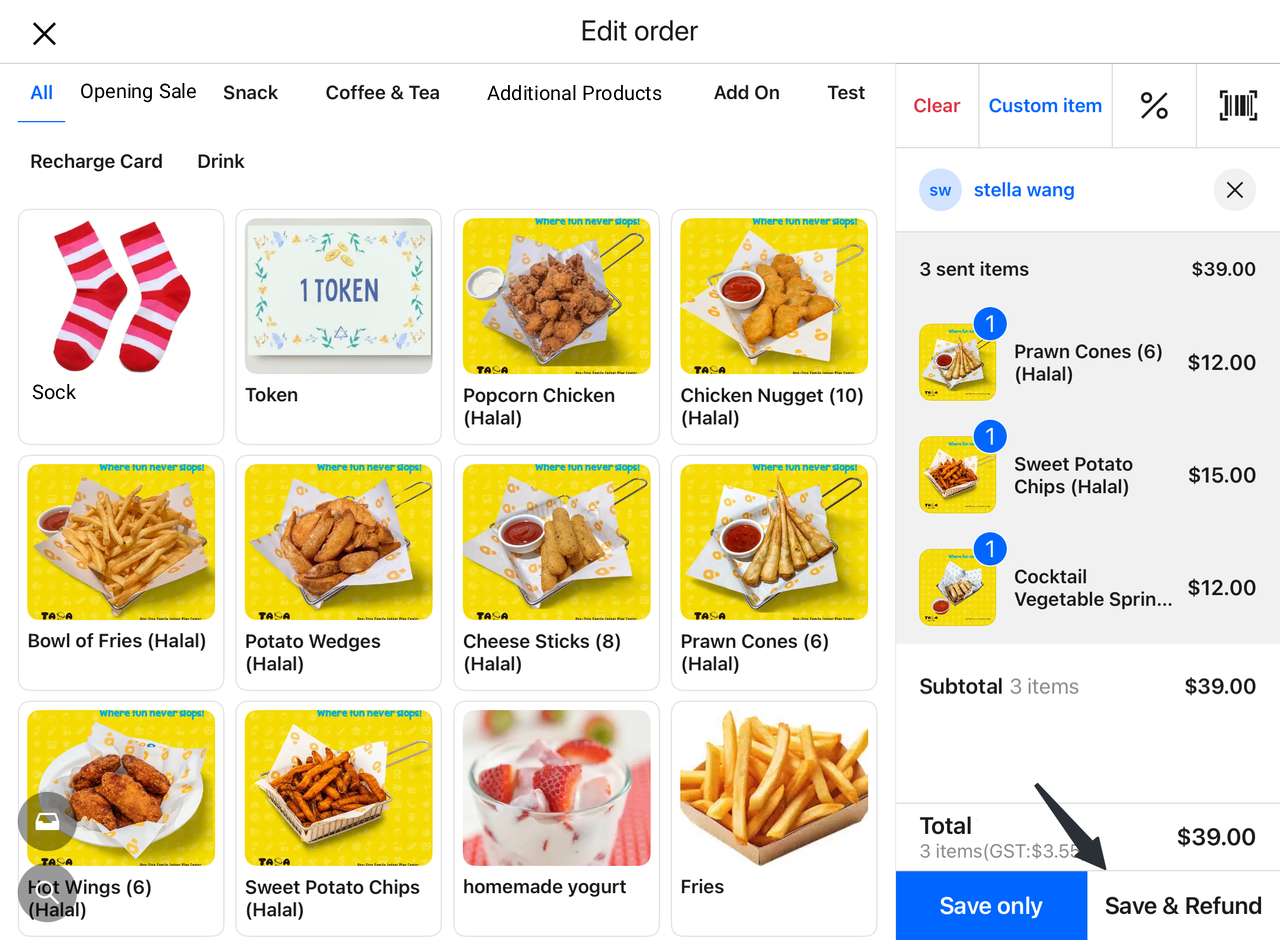
System Automatically Calculates Refund Amount:
-
-
The system will automatically compute the refund amount (e.g., $12.00).
-
View the updated total amount in the order (e.g., $24.00 minus $12.00 = new total of $17.00).
-
- Confirm Refund Amount:
-
- Verify that the system-calculated refund amount is correct.
- Select Refund Method:
-
- Choose the refund payment method (the system defaults to refunding to the original payment channel).
- Complete Refund:
-
-
Click the "Refund Amount" button to confirm.
-
Return to the Orders page to view the removed item and refund summary.
-
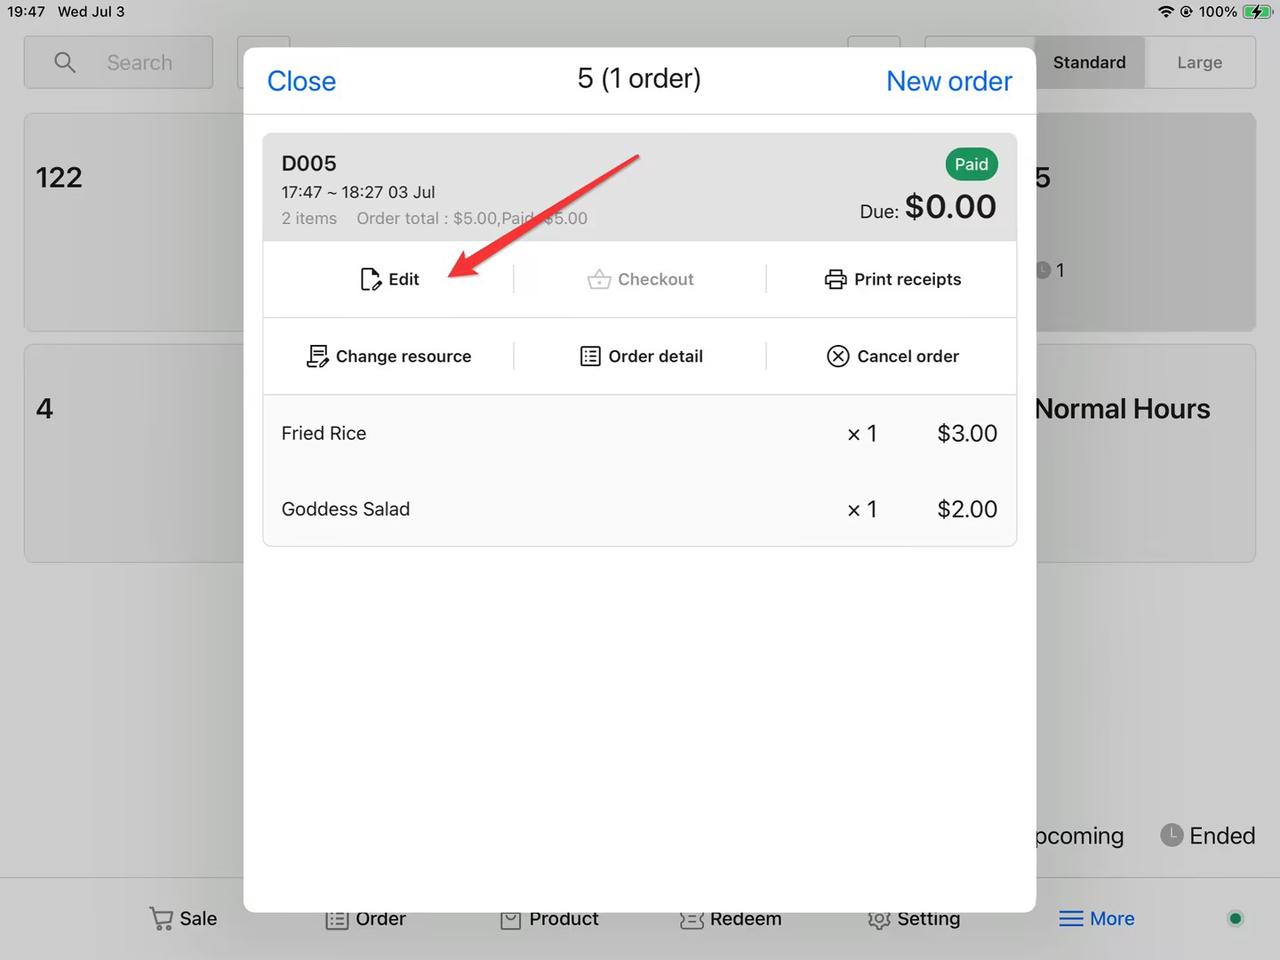
4.3 Return Dishes/Refund on the Resource Page (Table)
Refund Process for Online Paid Orders
Applicable Scenario: Customers have completed online payment but need to remove some dishes and receive a corresponding refund (e.g., out-of-stock items, temporary cancellation of dishes).
1. Access the System Backend
Click More → Resource → Table.

2. Find the Order
Locate the table with the order to be modified in the list and click to enter.
3. Enter the Edit Page
Find the corresponding order and click Edit to access the order editing page.

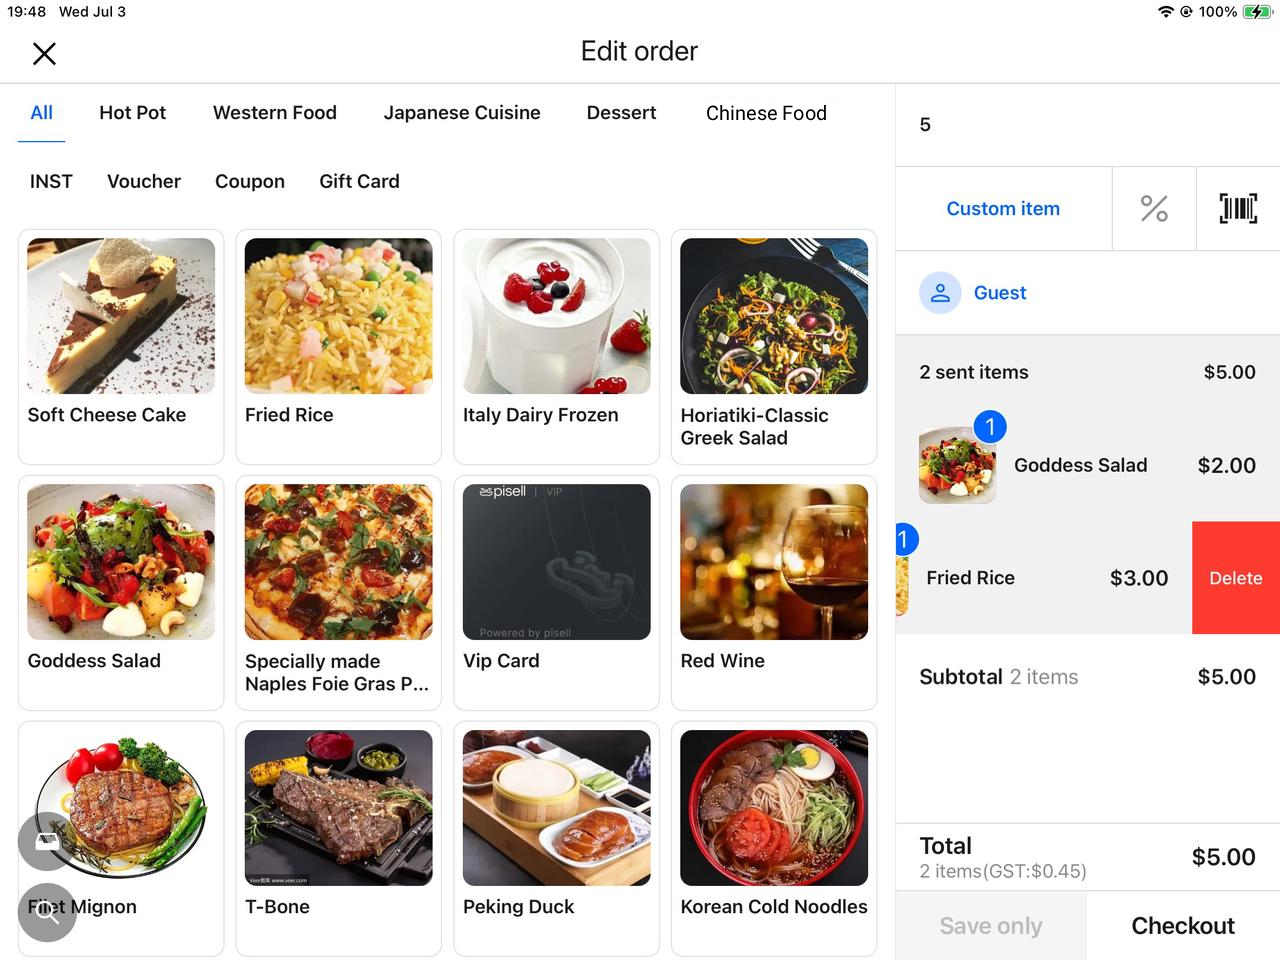
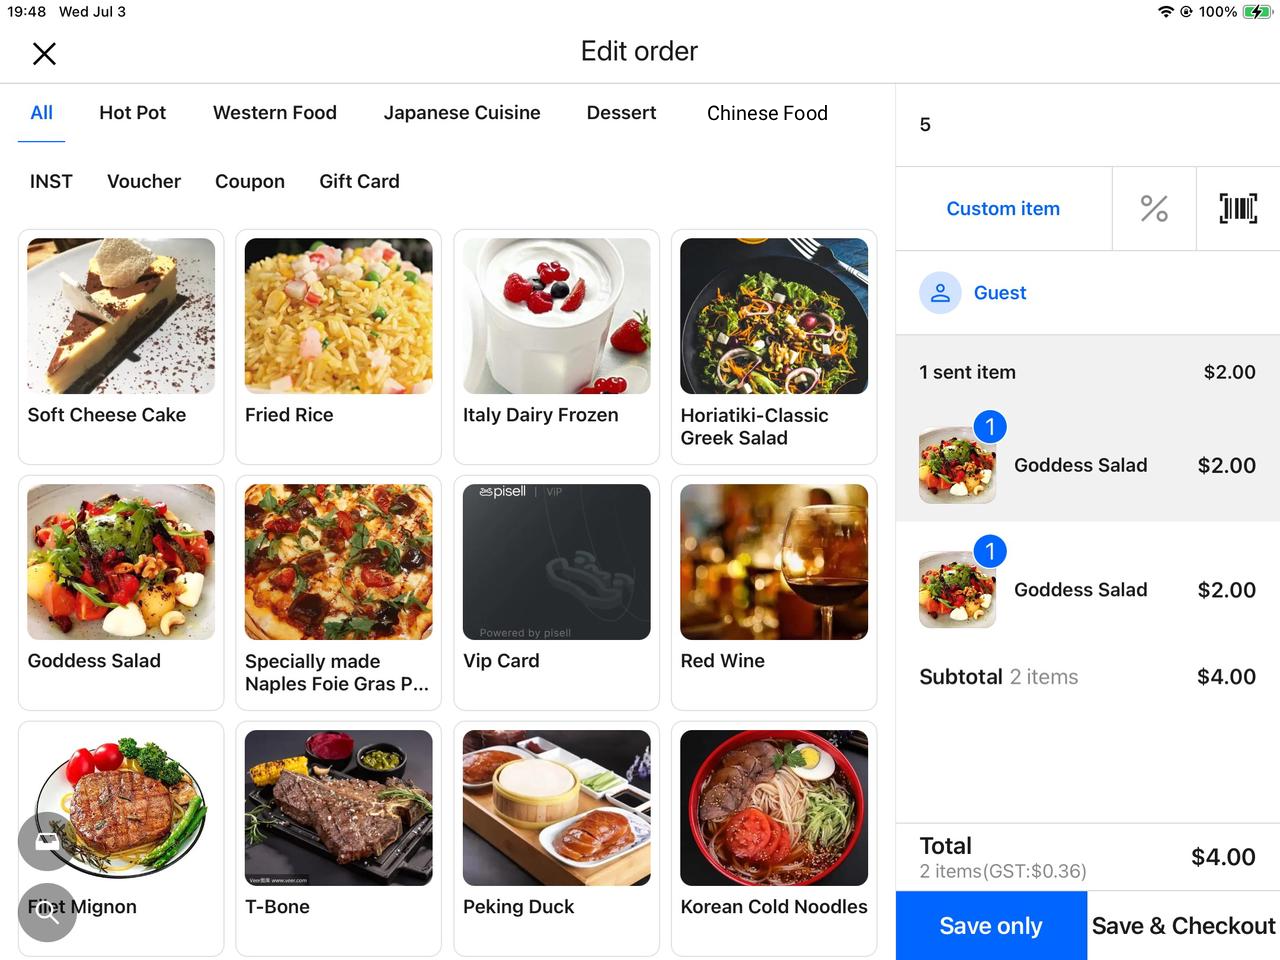
4. Delete Dishes
Expand the order content and delete unwanted dishes (swipe left on the dish to reveal the Delete button).

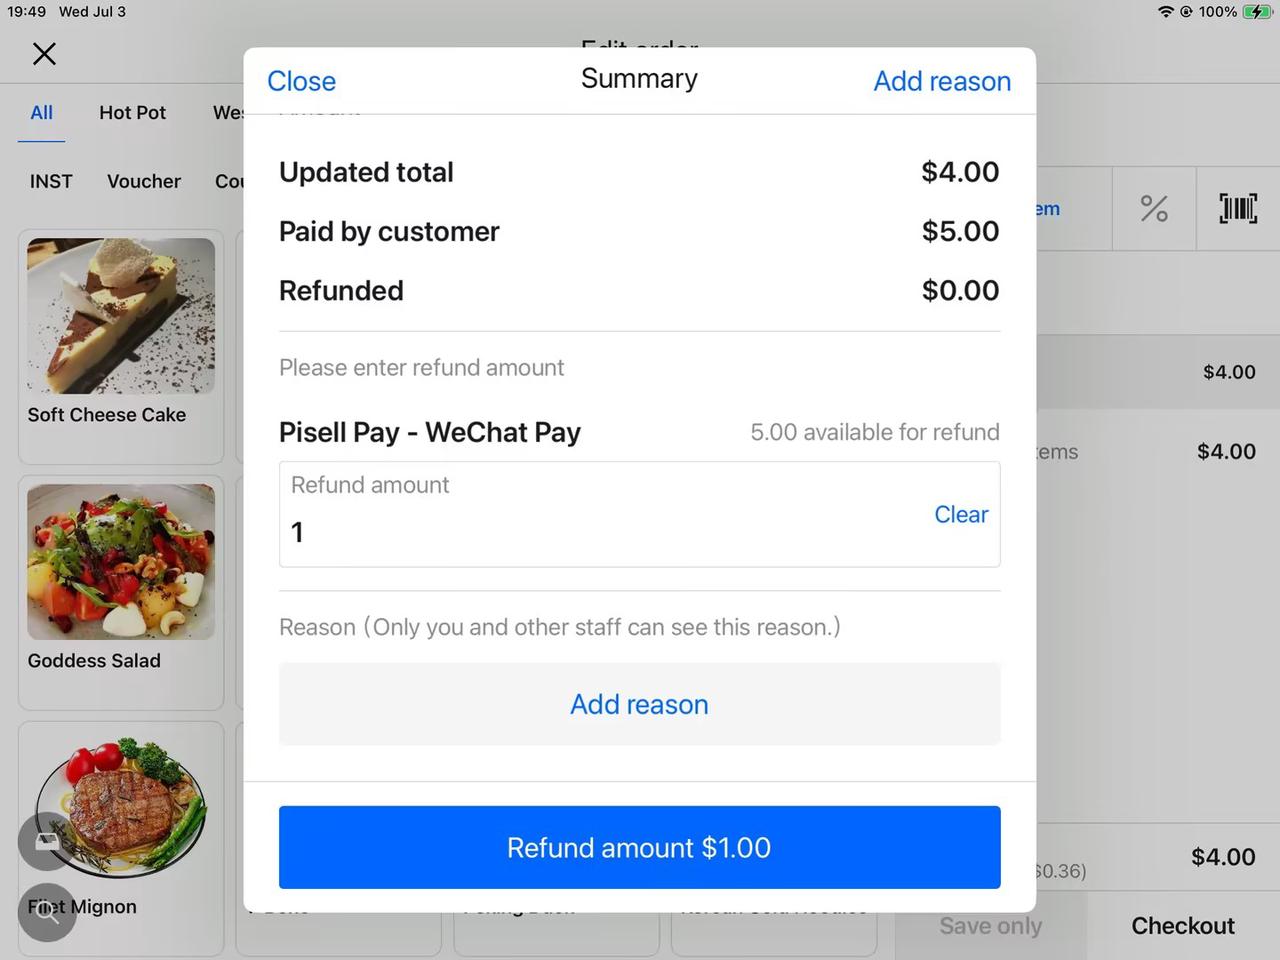
5. Save & Checkout
Click Save & Checkout,the system will automatically calculate the refund amount.
Refund Process on the Resource Page
1. Access the System Backend
On the cash register, click More → Resource.
2. Find the Corresponding Table
Locate the table requiring a refund in the list and click to enter.
3. Open Order Details
In the table, find the order to be refunded and click Order Details to view specifics.
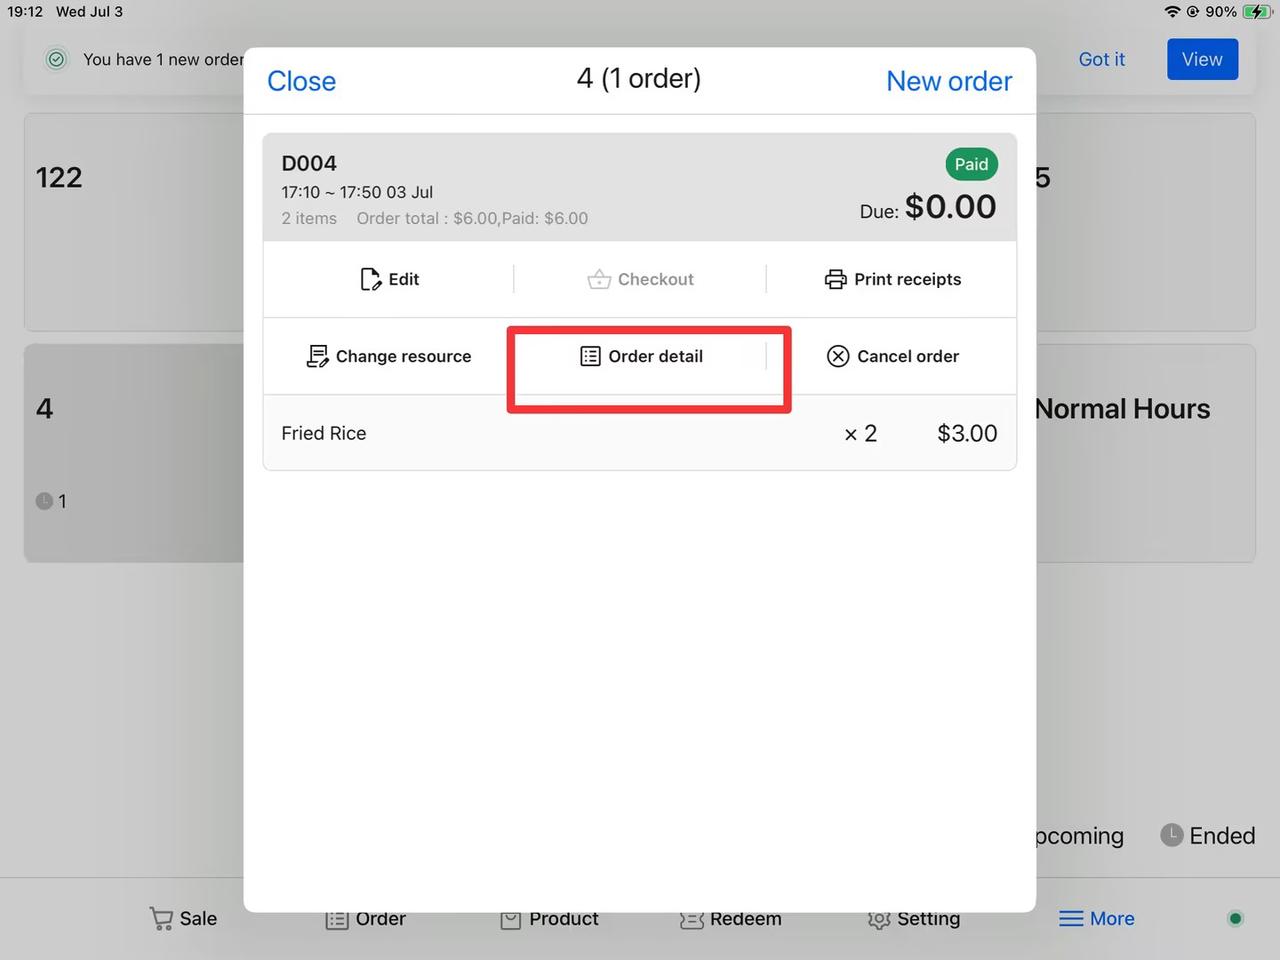
4. Perform Refund
Click the Refund button and confirm the refund.
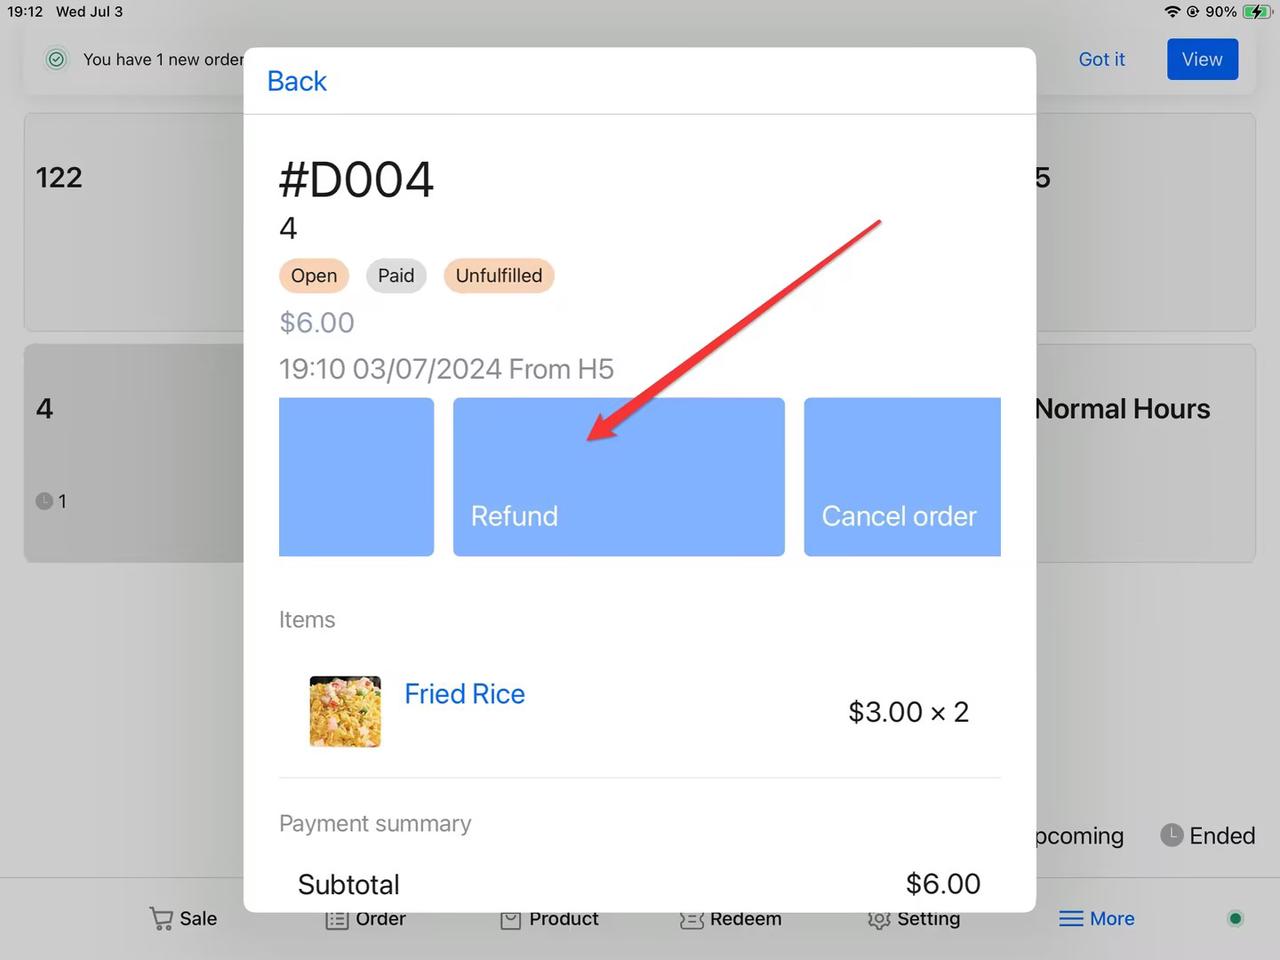

Tips: After processing the refund, the customer will receive the refund notification. This operation applies when staff and customers have agreed on a refund due to out-of-stock items or other reasons.
4.4 Exchange Dishes on the Resource Page (Table)
1. Access the System Backend
Click More → Resource → Table.
2. Find the Order
Locate the corresponding table, click to enter, and find the order to be modified.
3. Enter the Edit Page
Click Edit to access the order editing page.
4. Modify Order Content
-
-
Delete Unwanted Dishes: Expand the order and click to delete unwanted dishes.
-
Add New Dishes: Click products to add desired items to the cart.
-

5. Save & Settle
Click Save & Checkout to enter the settlement page.
6. Handle Price Difference (Refund or Supplement)
-
-
If the new order amount is less than the original: The system will automatically calculate the difference. Enter the refund amount and reason; the refund will be credited to the customer's original payment channel.
-
If the new order amount is greater than the original: Ask the customer to pay the difference.
-
5. How to Add Order Notes
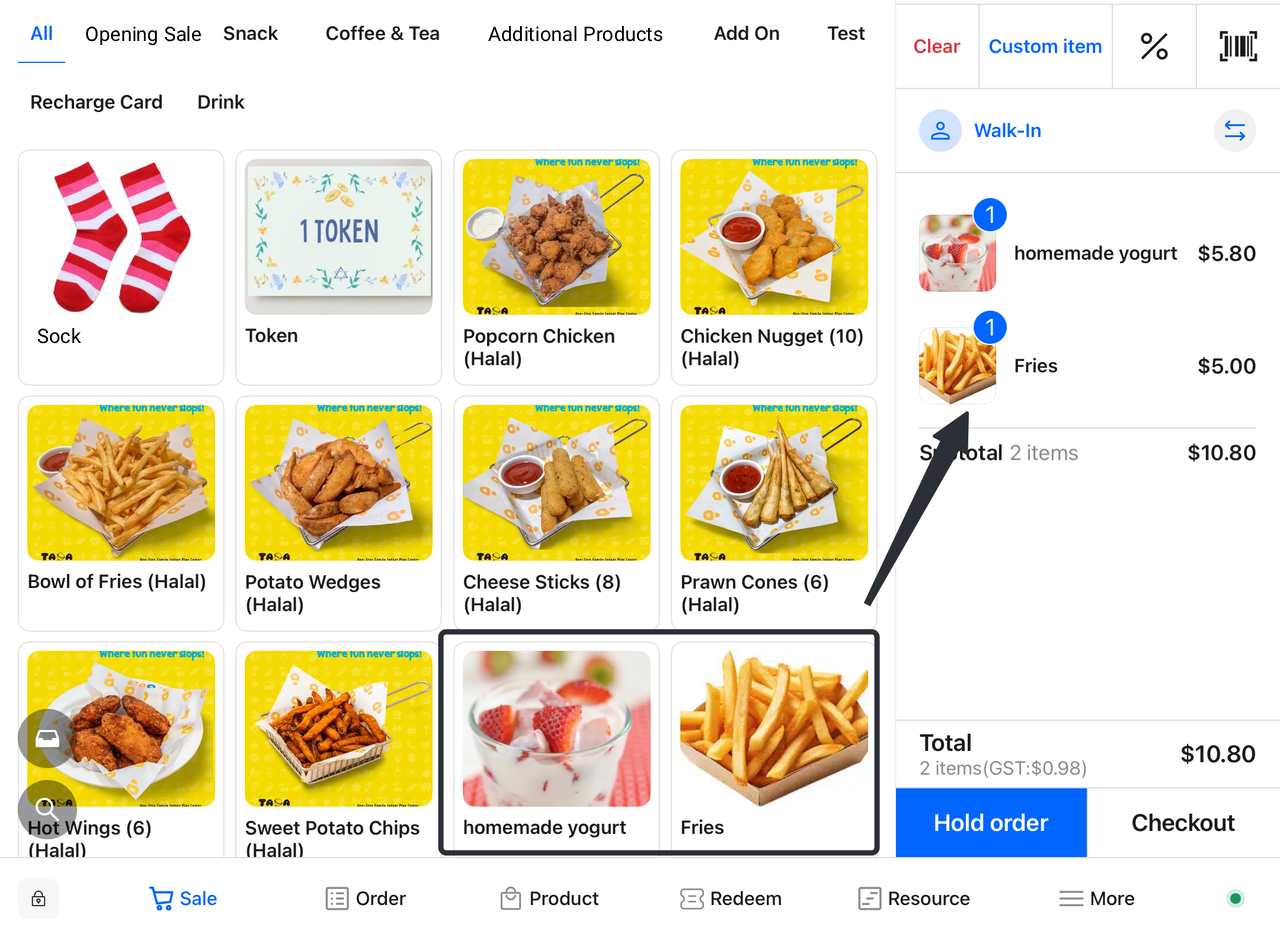
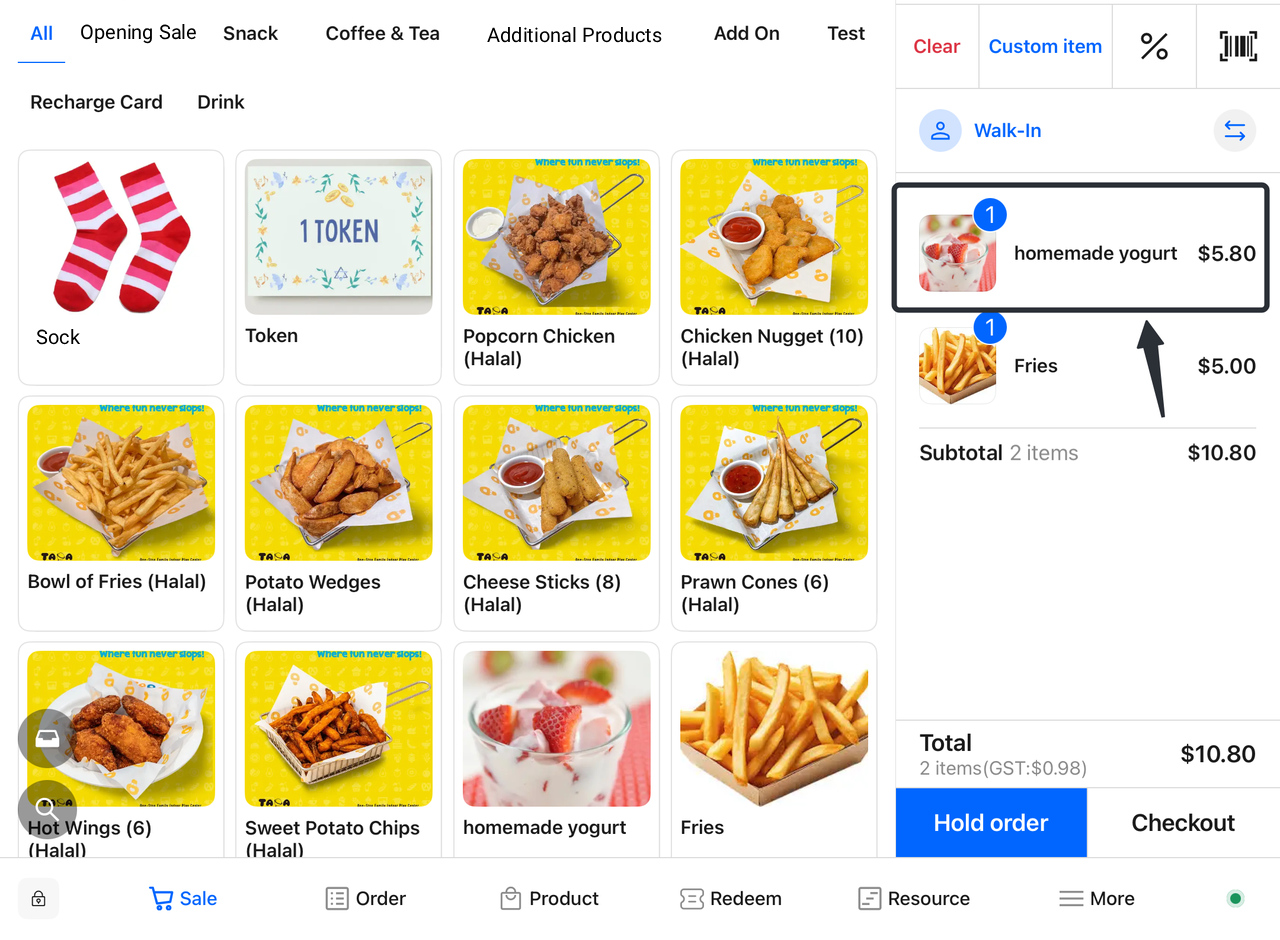
- Select Products:
-
- Choose desired products from the menu.
- Add Products to Order:
-
- Click the "Add to Order" button.
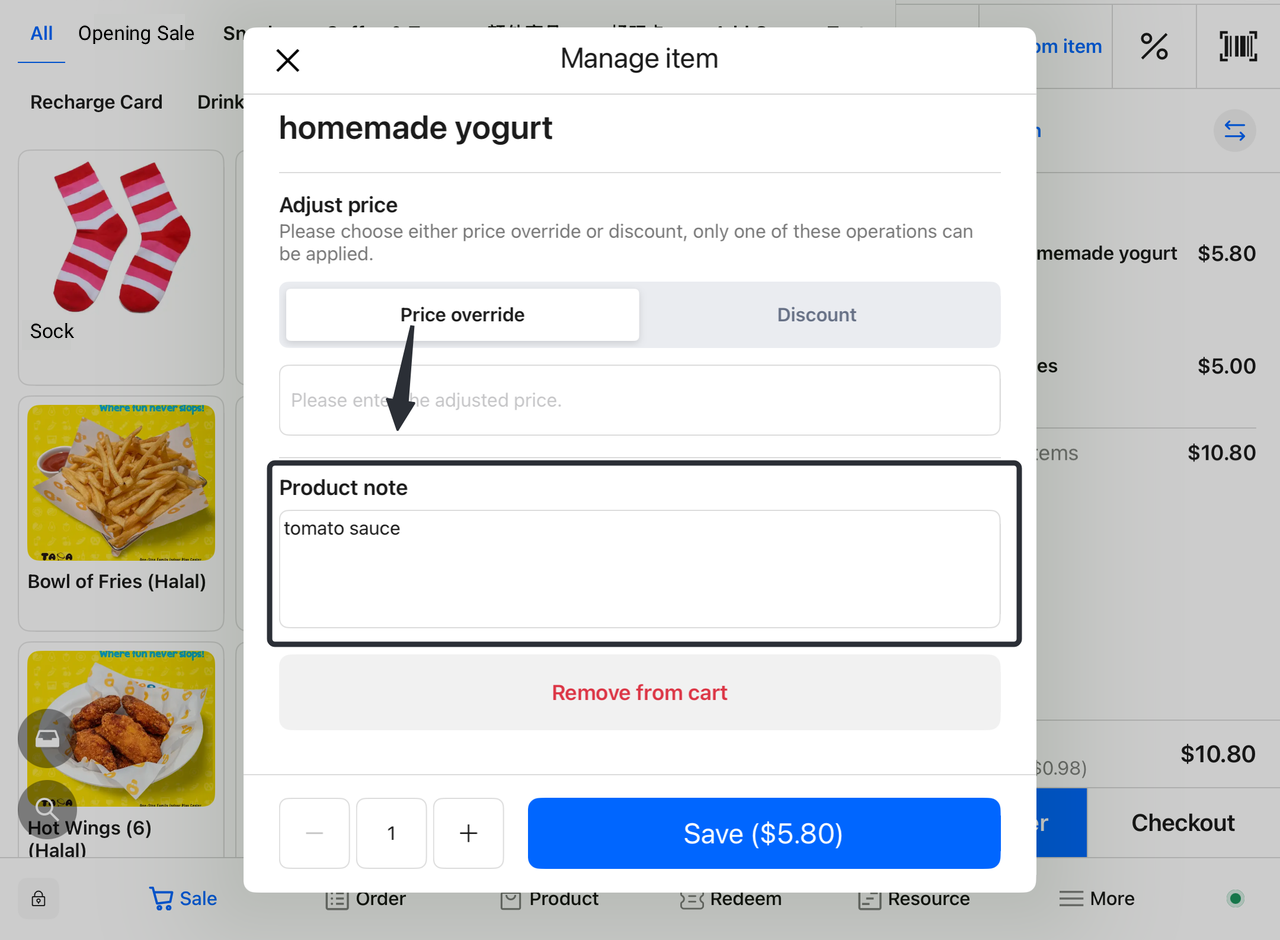
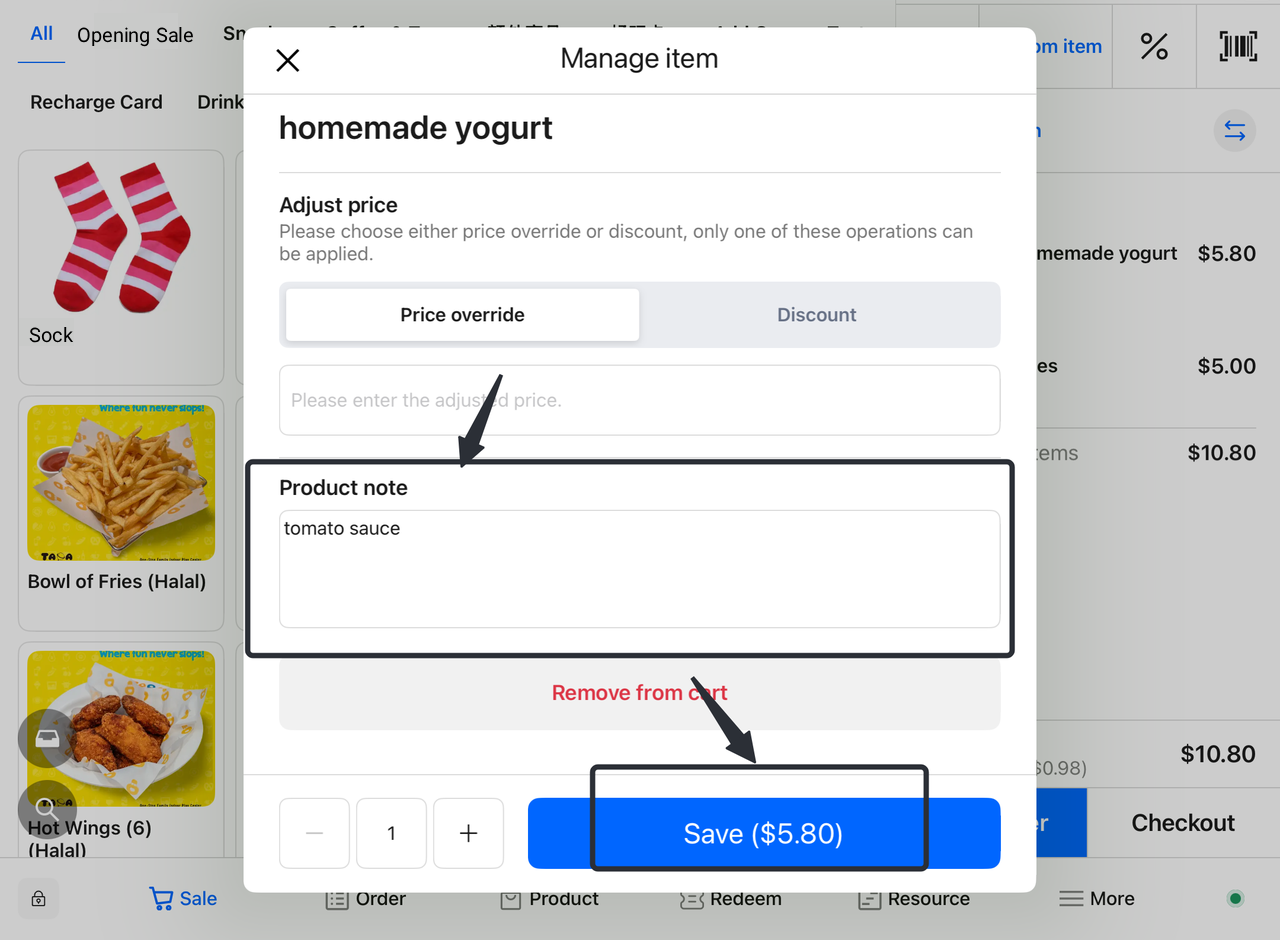
- Add Notes for Individual Products:
-
-
On the order page, click the product requiring notes.
-
Enter notes for the product (e.g., Sugar-free, Less Salt).
-
Click "Save" to confirm the product notes.
-
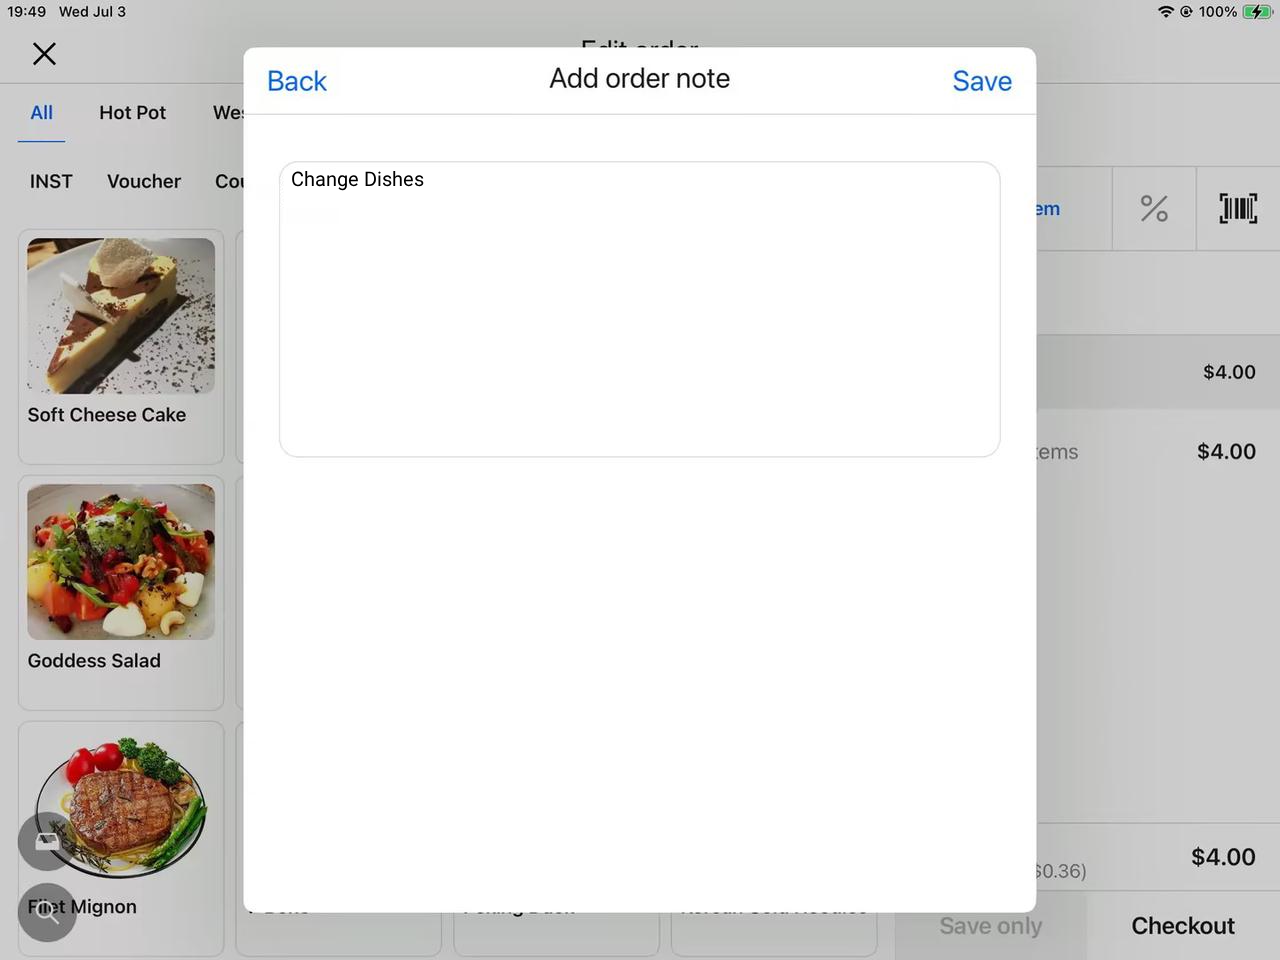
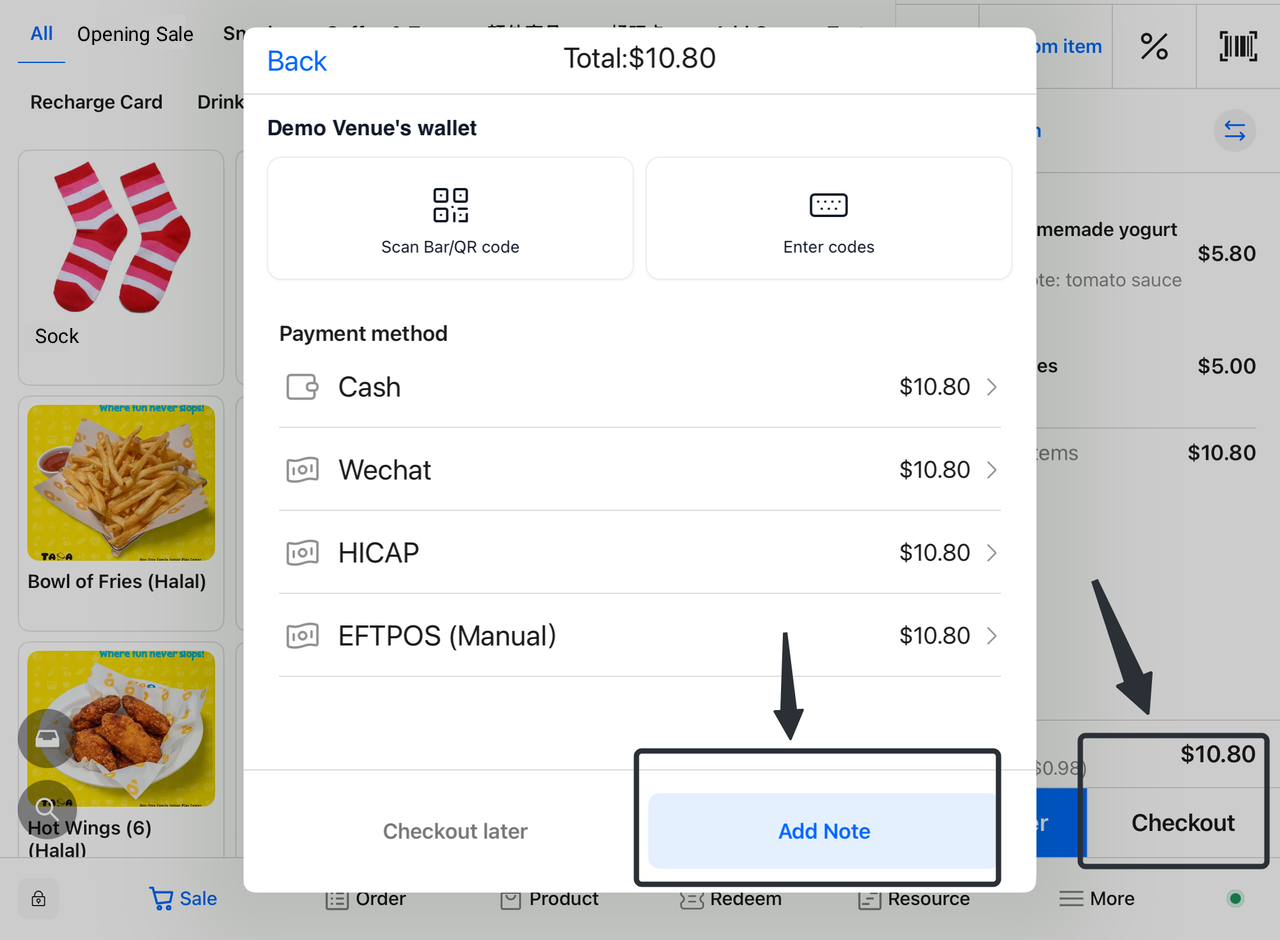
- Add Order-Level Notes:
-
-
On the order page, click "Checkout".
-
Enter notes for the entire order (e.g., Quick Processing, Delivery to Door).
-
Click "Save" to confirm the order-level notes.
-

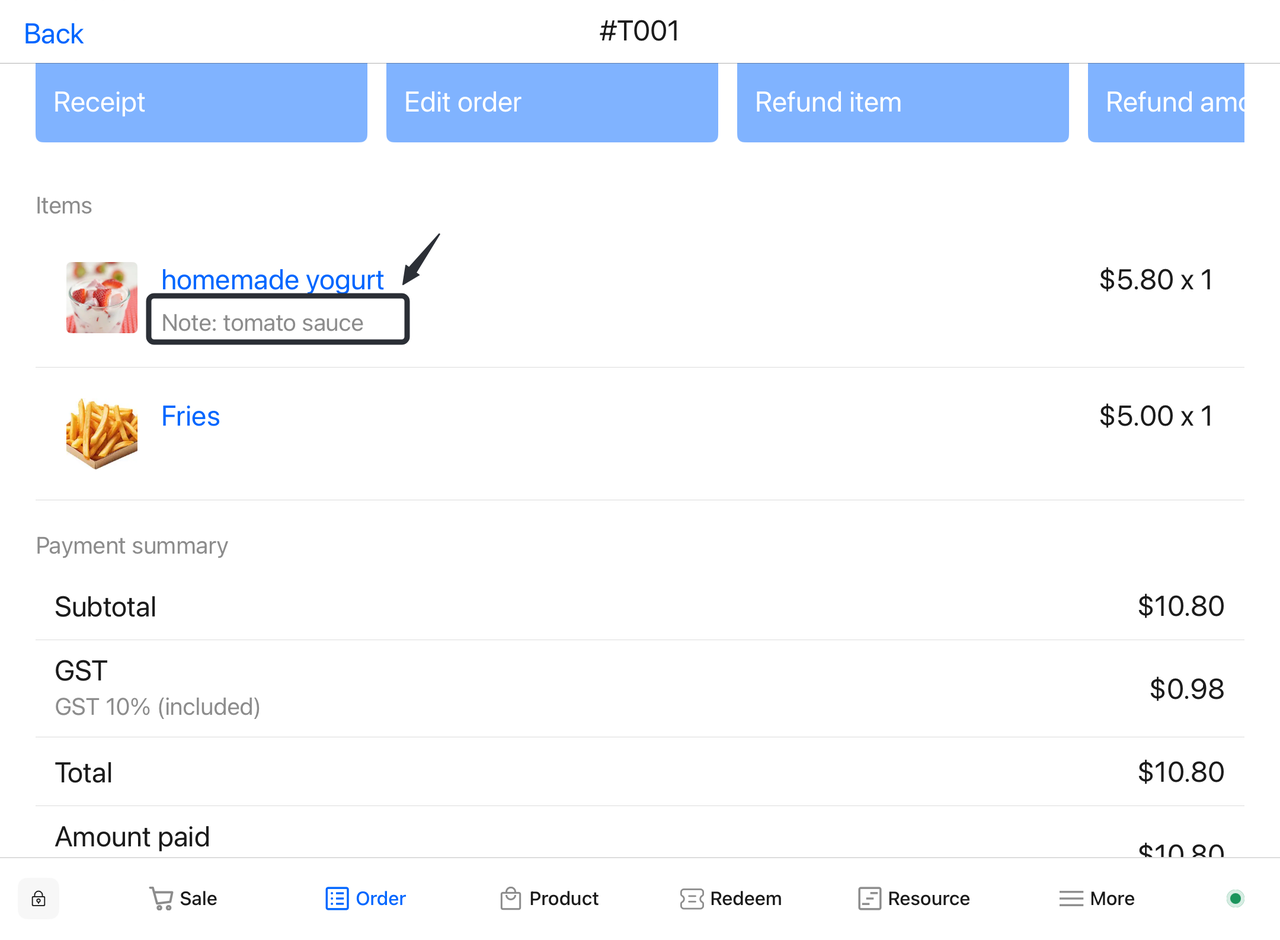
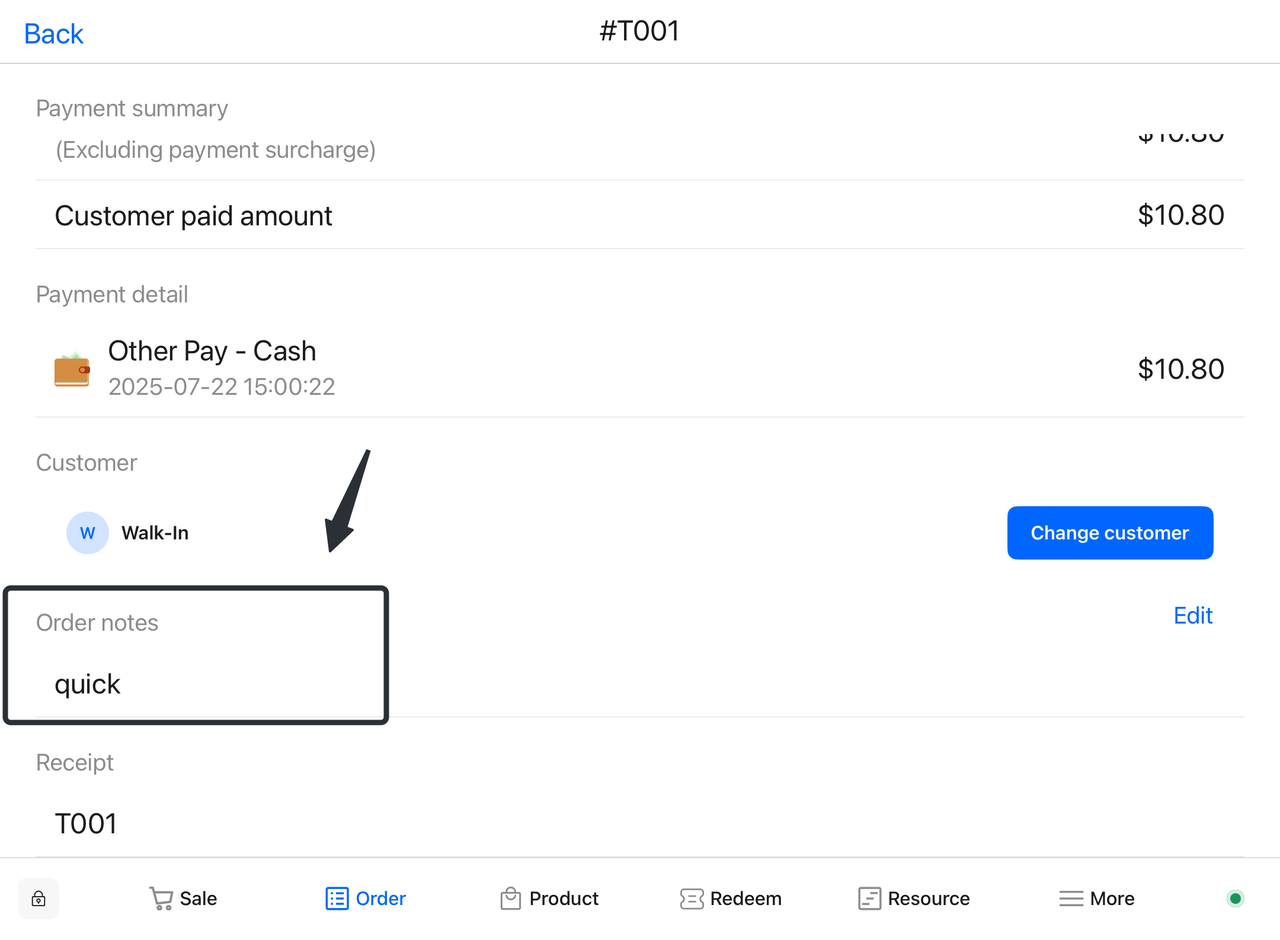
- Verify Order Information:
-
- View the corresponding order in the "Orders" interface to confirm all product and order-level notes are accurate.
- Proceed with Checkout:
-
- After completing other order details, continue with payment and settlement.
2905Family Restaurant Operation Guide - Terminal F&B System
 2705
2705Apple Pay Platform Web Merchant Terms and Conditions
 - Client-Side Booking for Parties and Tickets") 2912
2912Family-Friendly Restaurant User Guide (Operational Items) - Client-Side Booking for Parties and Tickets
 - Terminal Selling Tickets") 2438
2438Kids Cafe Usage Guide (Operational Items) - Terminal Selling Tickets
 2478
2478Family-Friendly Restaurant User Guide - Terminal for Booking Parties
![[Important Notice] Pisell Client Operations Team— Fixed Online Service Hours Pisell Support](https://file.mypisell.com/pisel/image/435/d7d250eb99c80ca34e3e7fc75c5b92cd2025_09_26_18_07_00_009_03613999964__2880_2112__.jpeg?x-oss-process=image/format,jpg/interlace,1,image/resize,w_1080/quality,Q_90/sharpen,90 "[Important Notice] Pisell Client Operations Team— Fixed Online Service Hours Pisell Support") 3323
3323[Important Notice] Pisell Client Operations Team— Fixed Online Service Hours Pisell Support
") 4223
4223Guidelines for Estimating Reserve (Merchant Self-Assessment Version)
 4097
4097Voluntary Withholding Funds & Reserve Explanation
 3676
3676Voluntary Withholding Funds
 4129
4129Online Payment 3DS Security Upgrade
 3640
3640Kids Playground Owners Beware: Your Payment System Might Be Charging You 3x More Than You Think
 6001
6001Manage Your Pisell Subscription
 5726
5726Pisell Payment Chargeback FAQ
 6014
6014Pisell Terminal Connecting to Cash Box
 5918
5918