
 - Terminal Selling Tickets")
Kids Cafe Usage Guide (Operational Items) - Terminal Selling Tickets
VENUE Booking & F&B Usage Guide
1. Terminal Ticket Sales
1.1 How do I sell tickets on a separate sales ticket page?
-
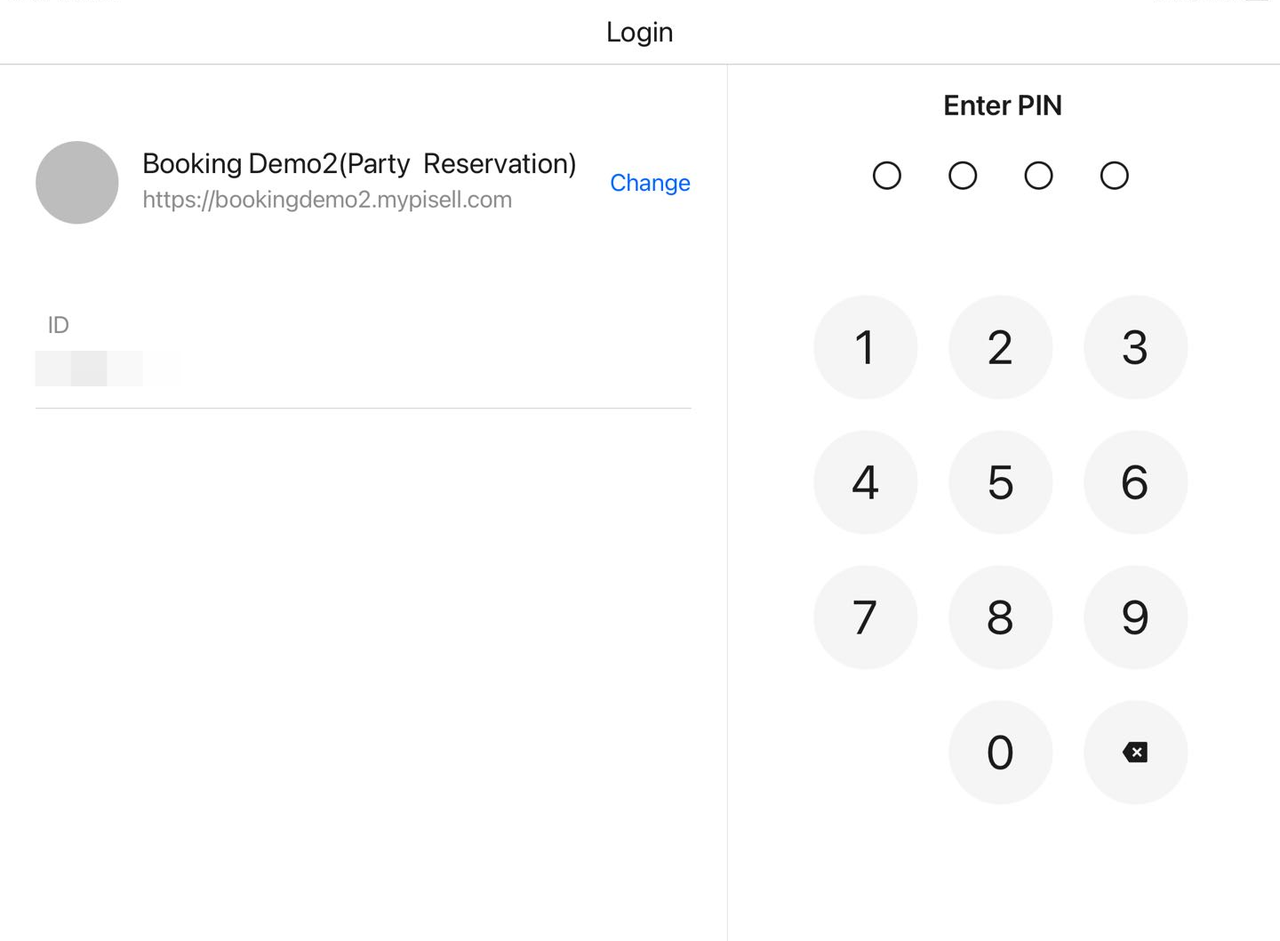
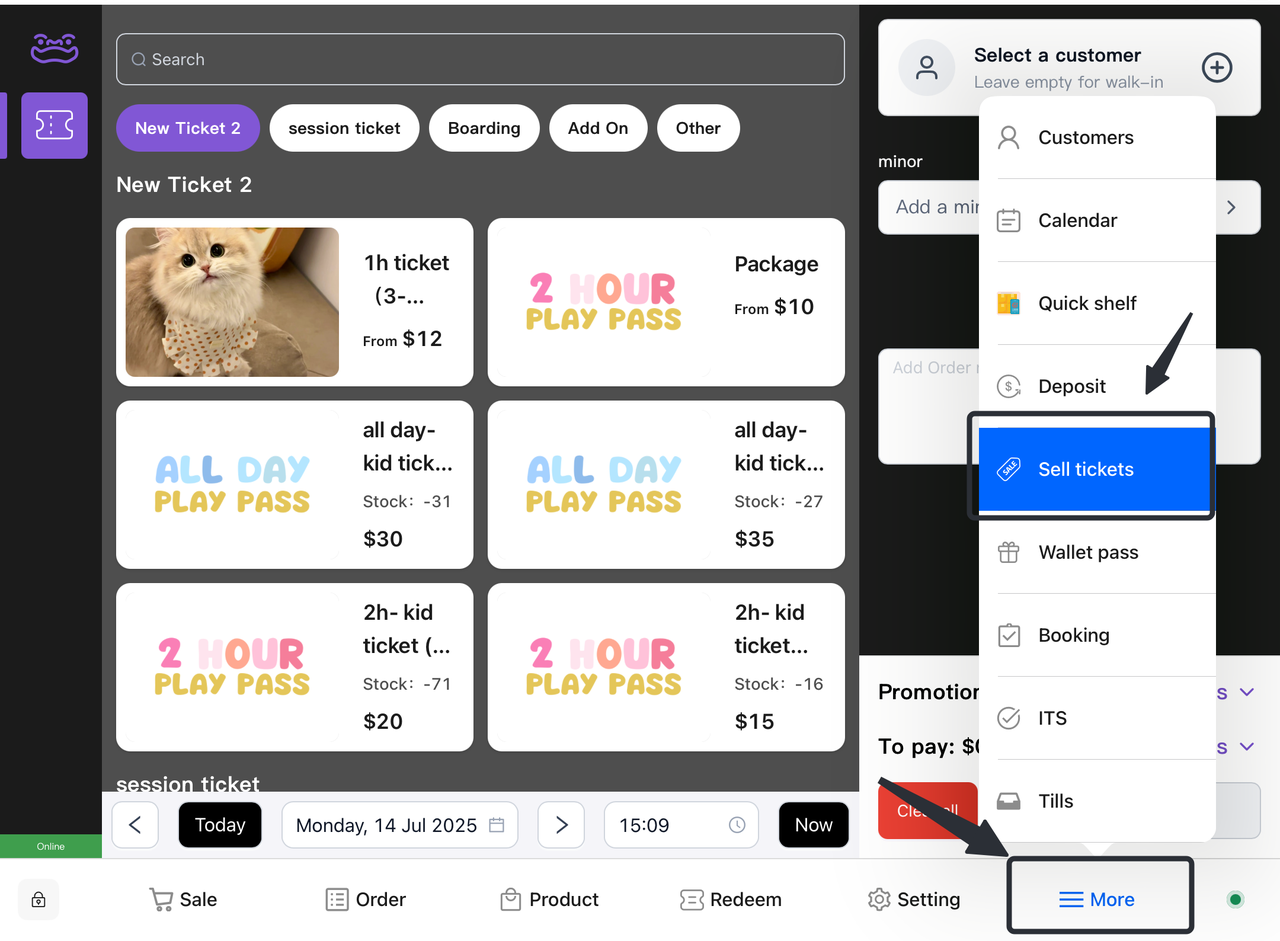
Open the Terminal App and log in to the corresponding account.
-
Enter your PIN and ID.
-
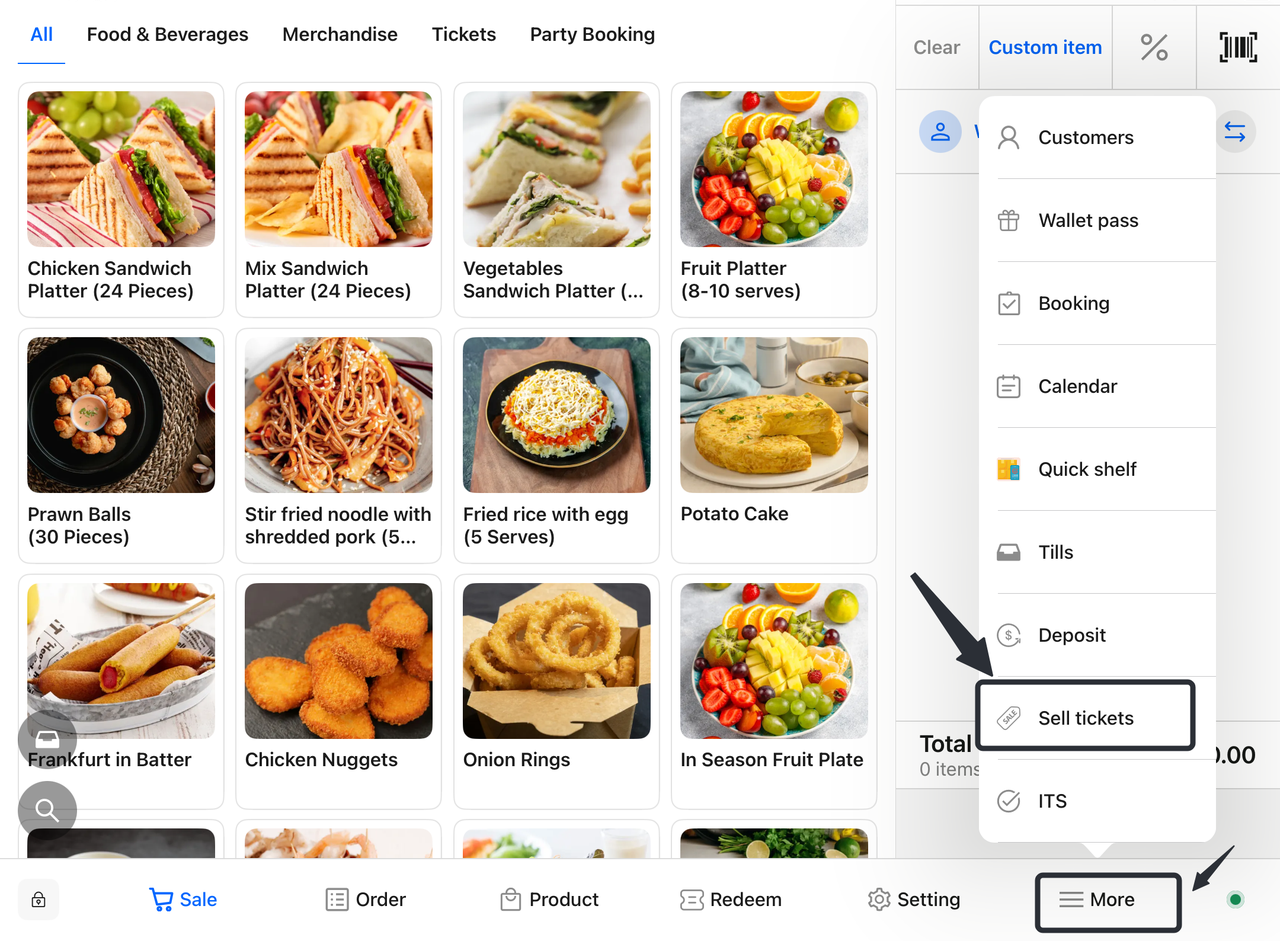
Tap on the "More" option.
-
Select "Sell Tickets" to switch to the "Sell Tickets" page.
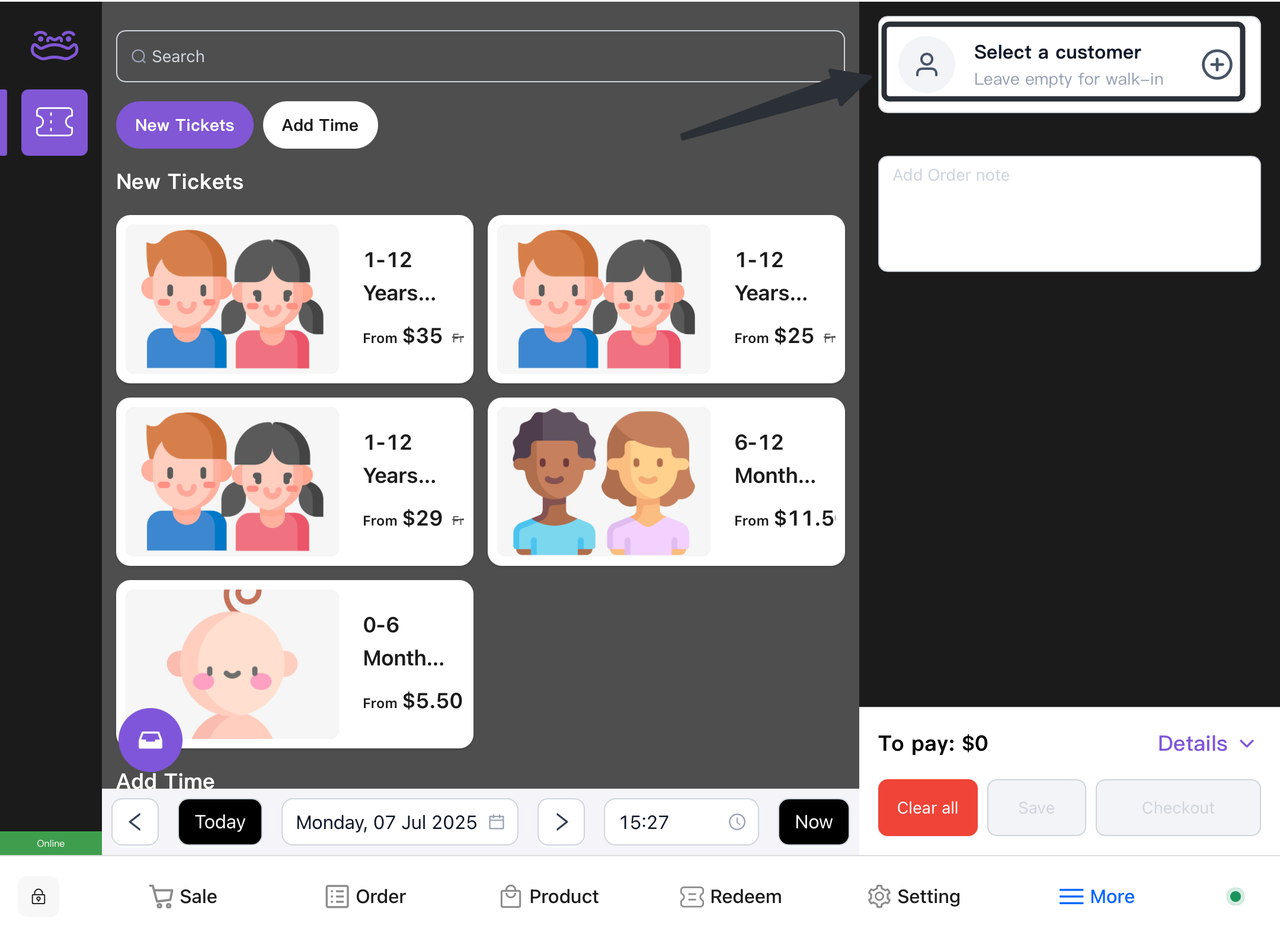
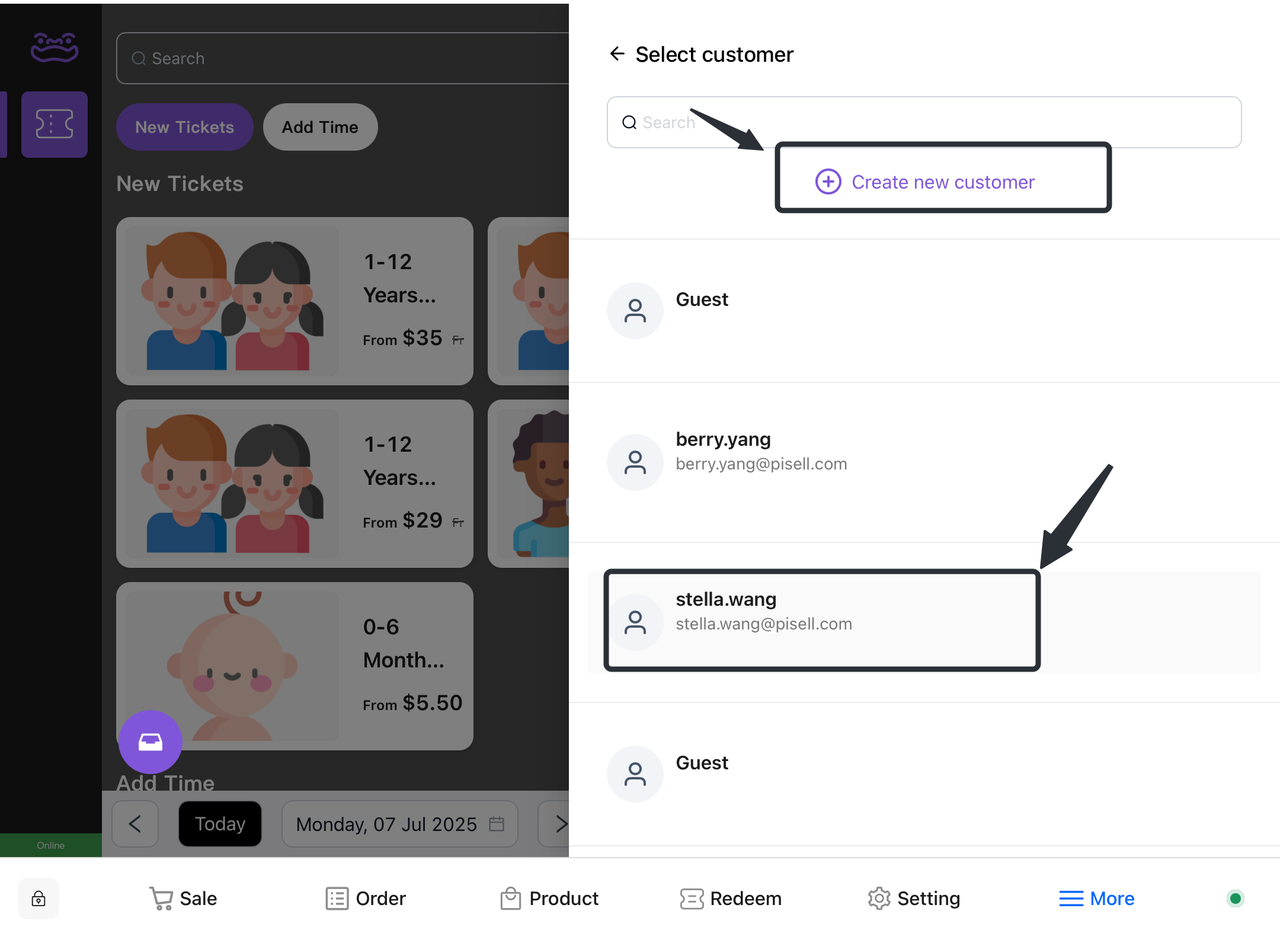
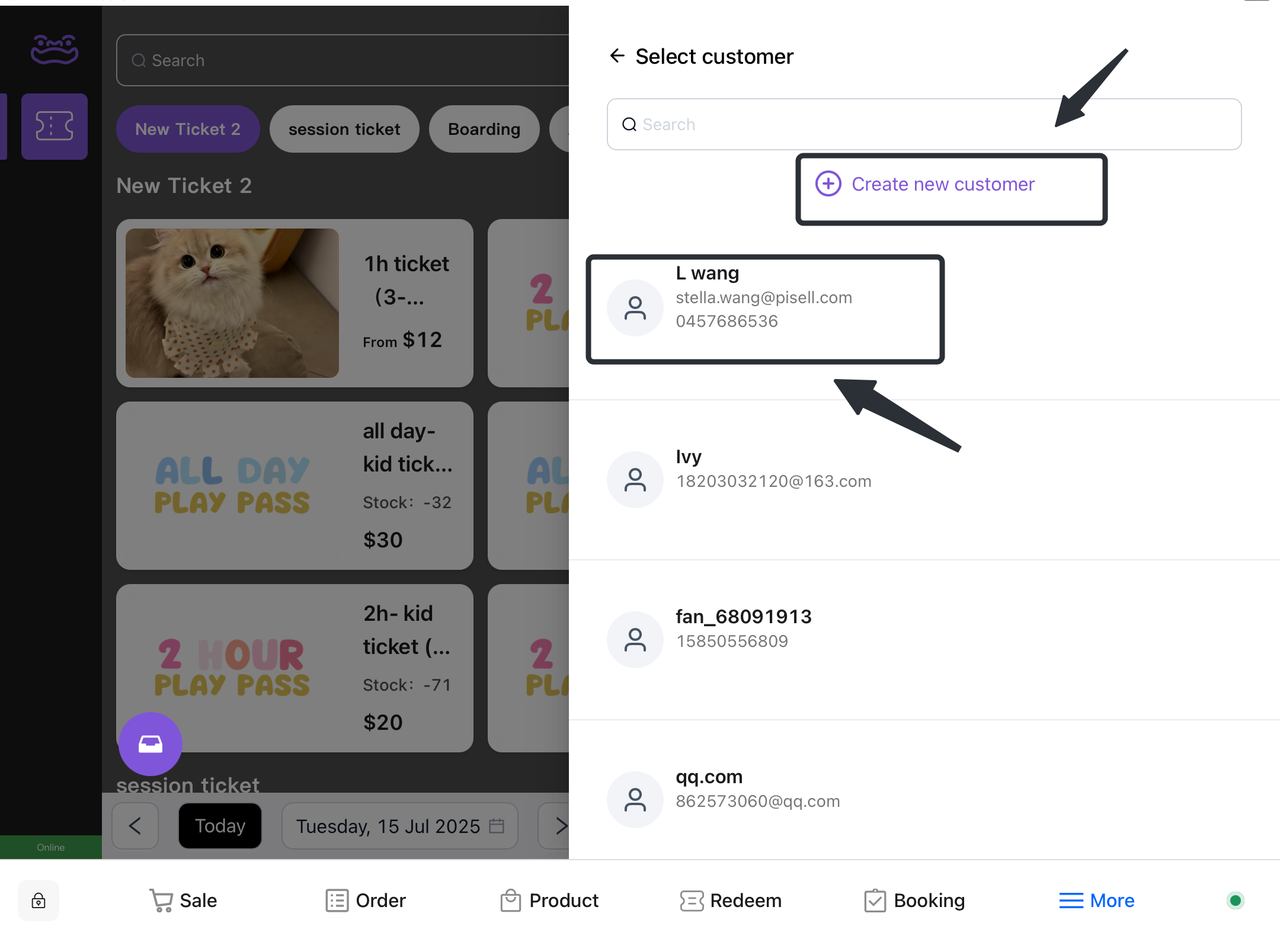
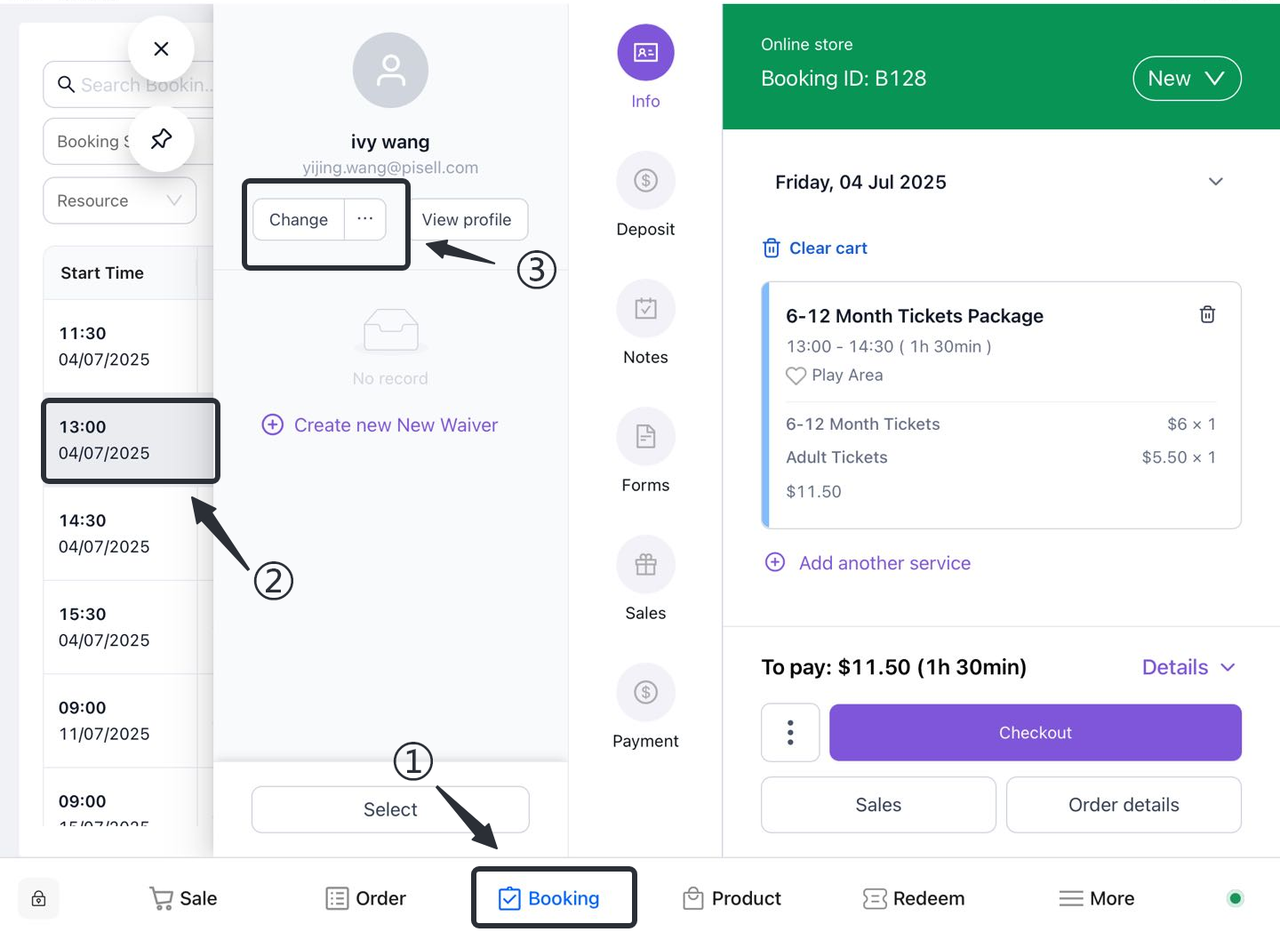
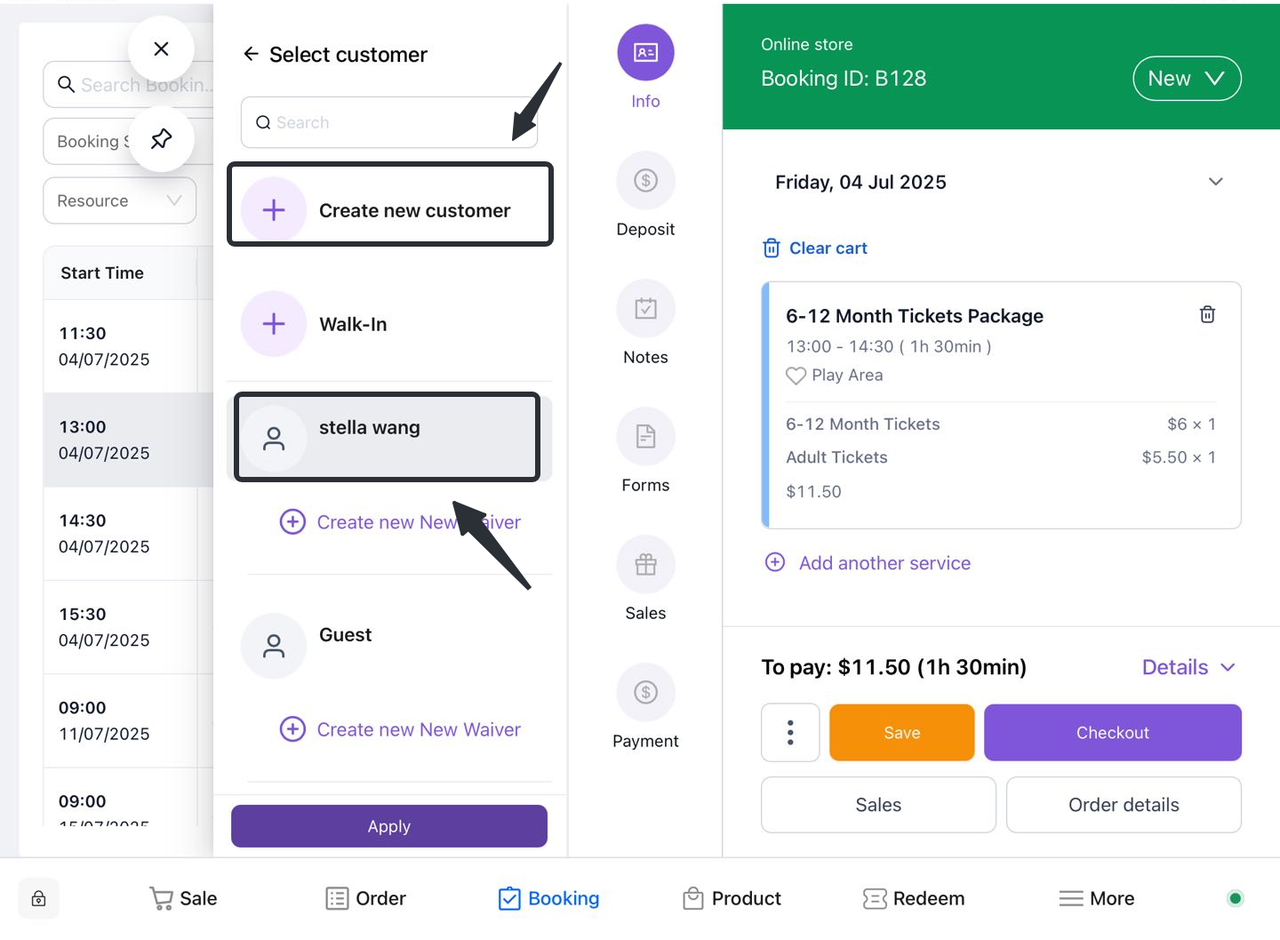
- Select "Bind existing customers" or "Create new information for customers".
-
-
If you select Bind existing customers, find and select the desired customer in the list.
-
If you select Create new customer, enter information about the customer.
-
-
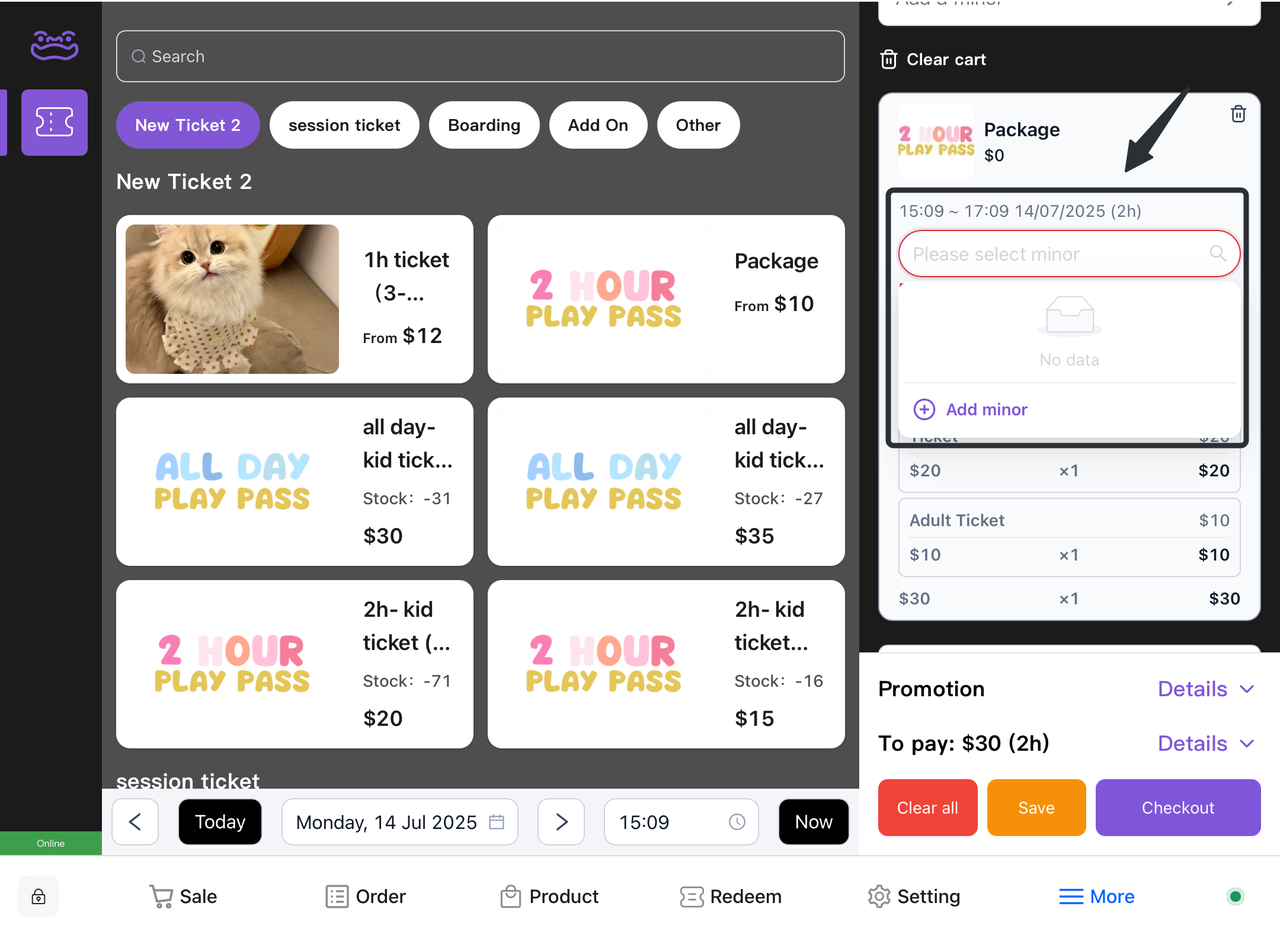
Tickets are purchased based on the current time by default, but future time can also be reserved according to customer needs.
-
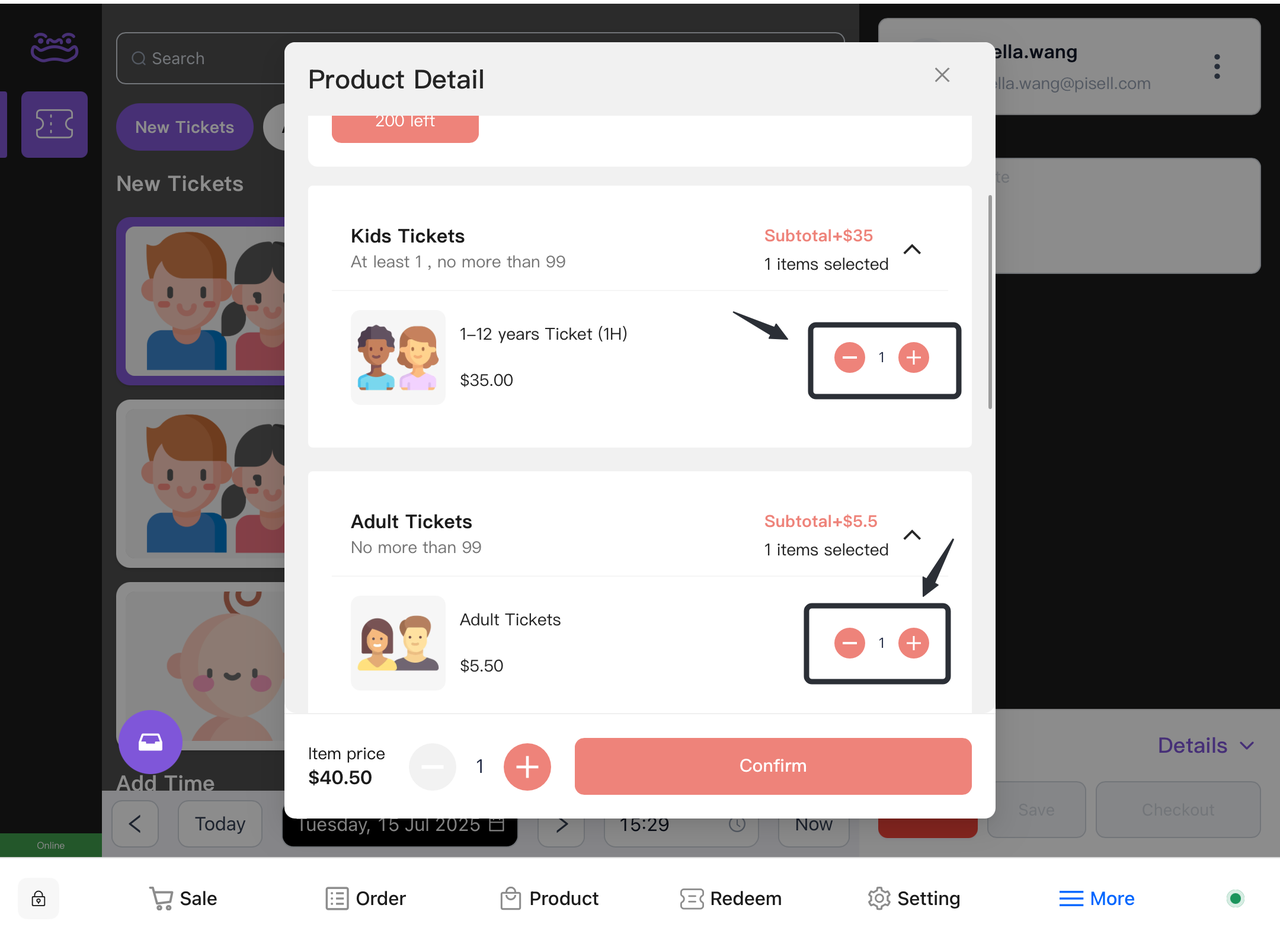
According to the actual situation of the customer, choose the corresponding ticket product. At the same time, the page supports the sale of retail goods, and customers can make additional purchases according to their needs.
- Add the desired ticket package and related items to the cart.
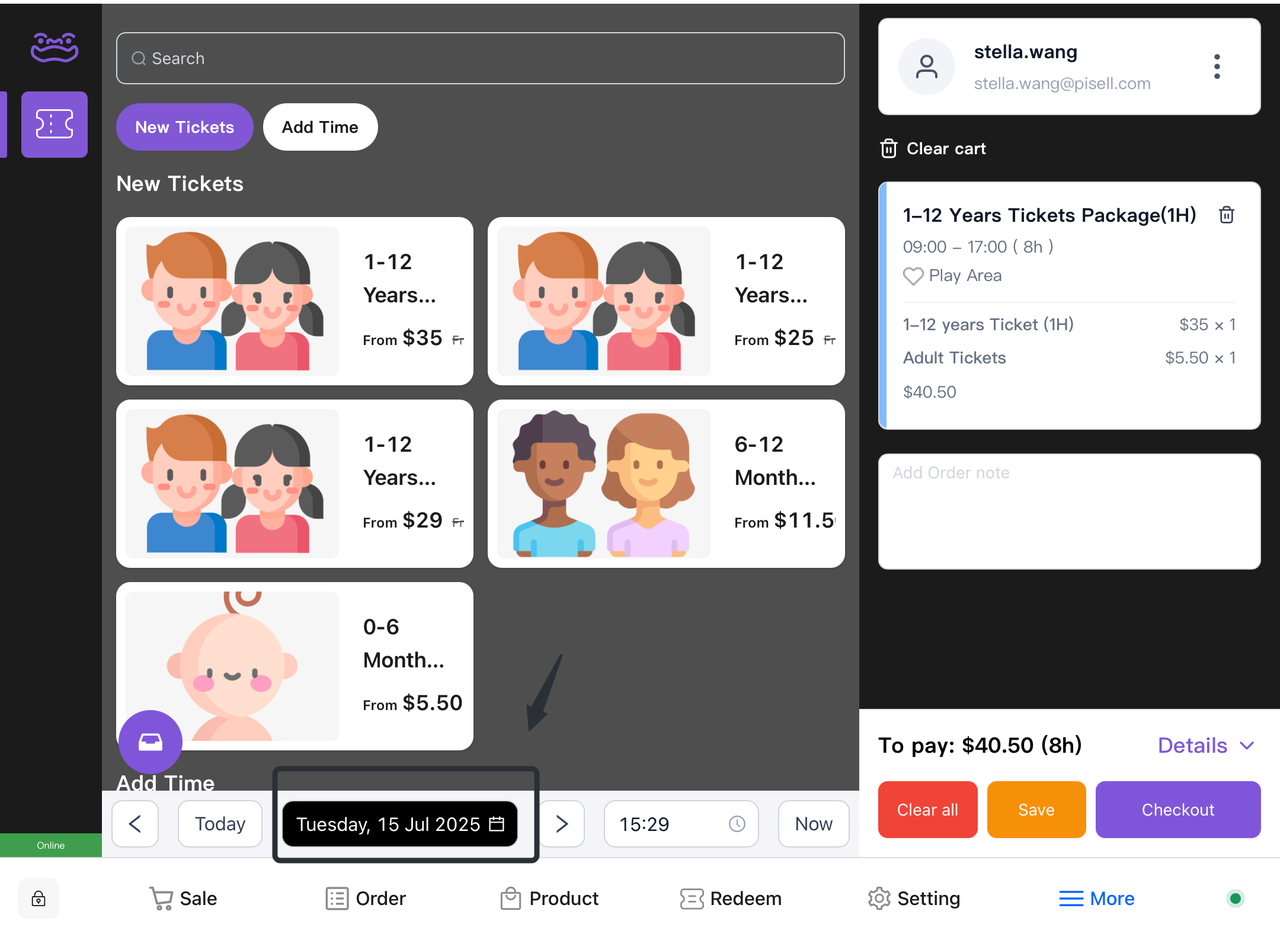
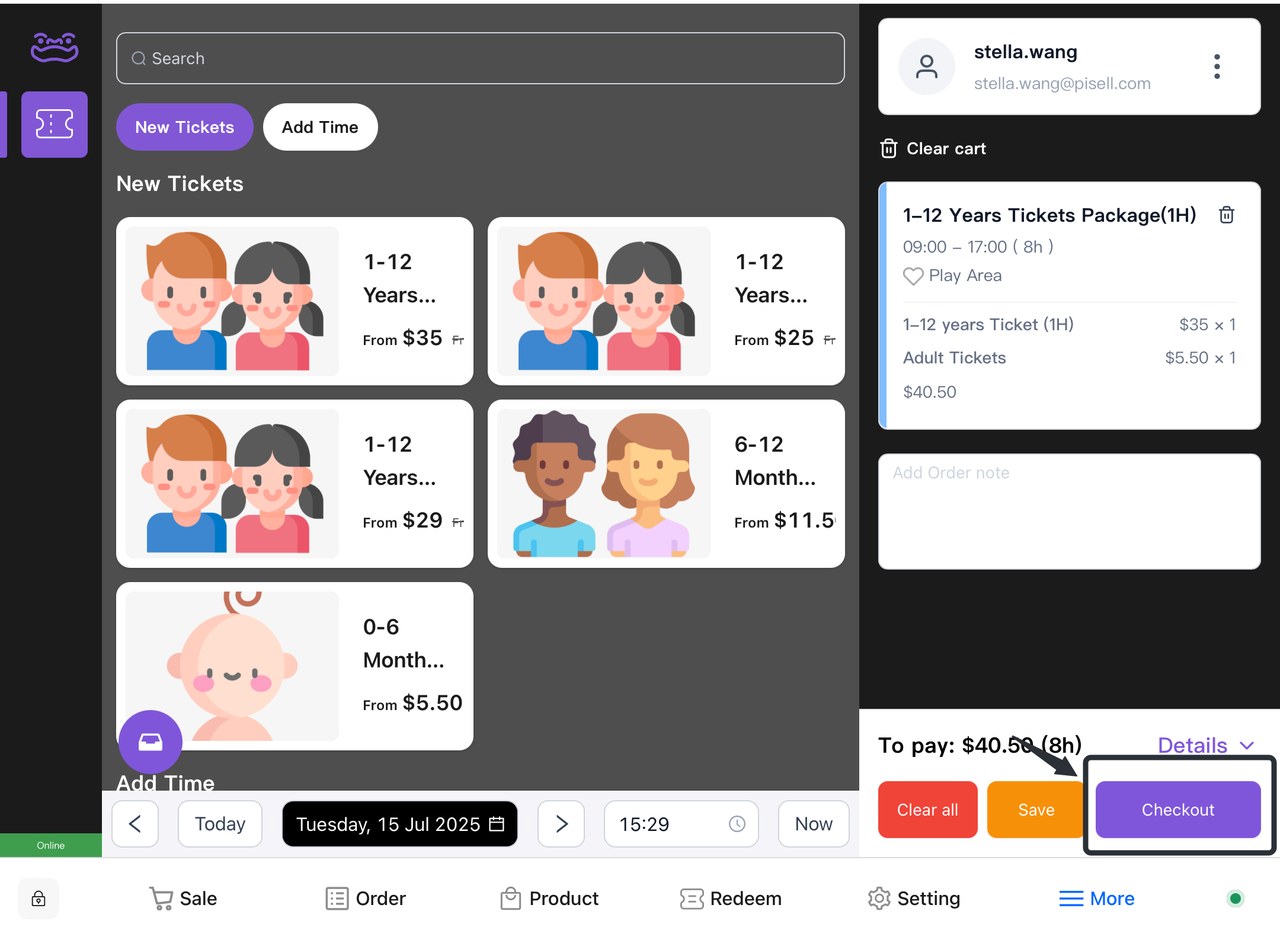
- Click the "Checkout" button and select the customer's preferred payment method from the pop-up payment options to complete the payment.

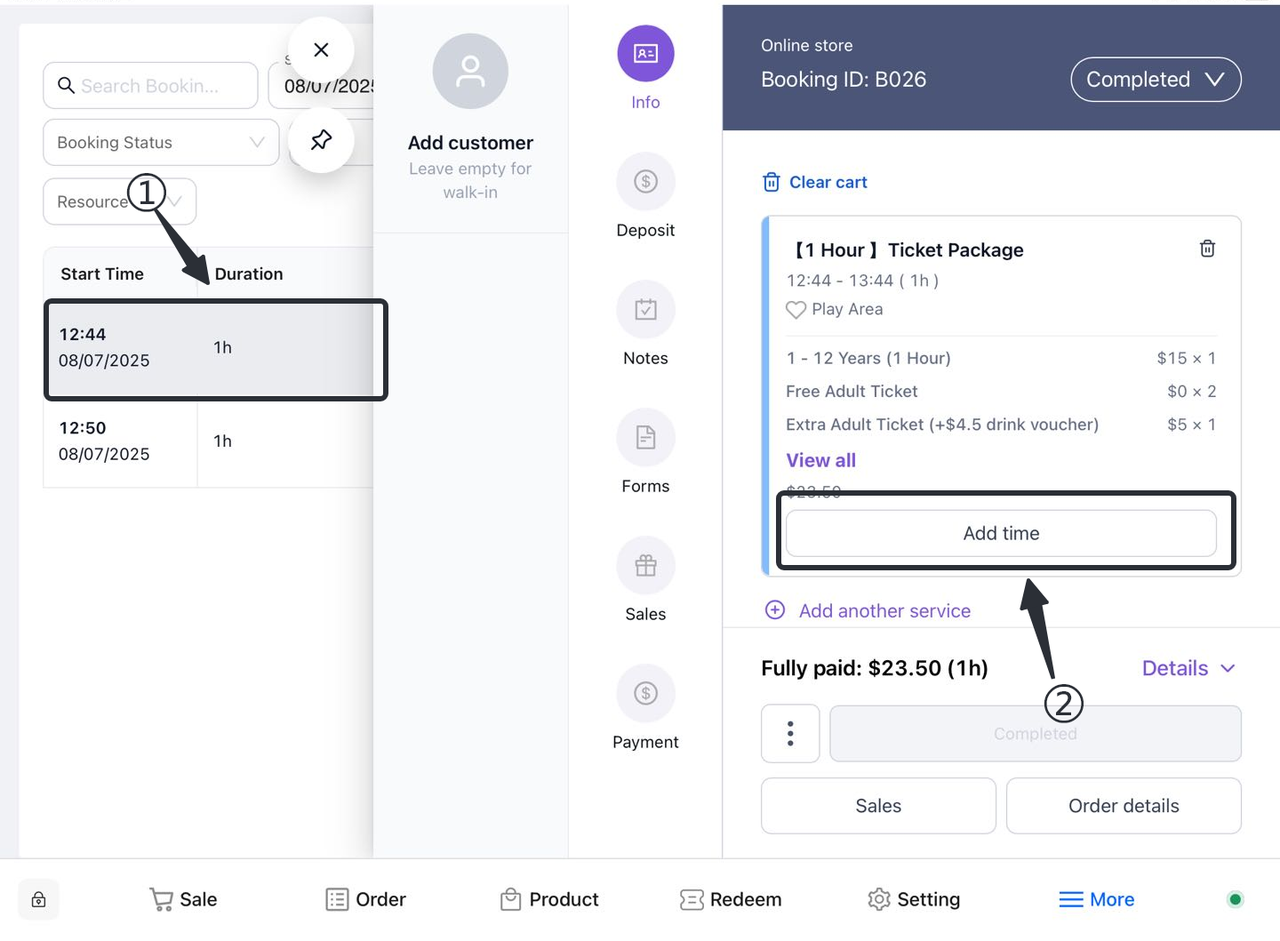
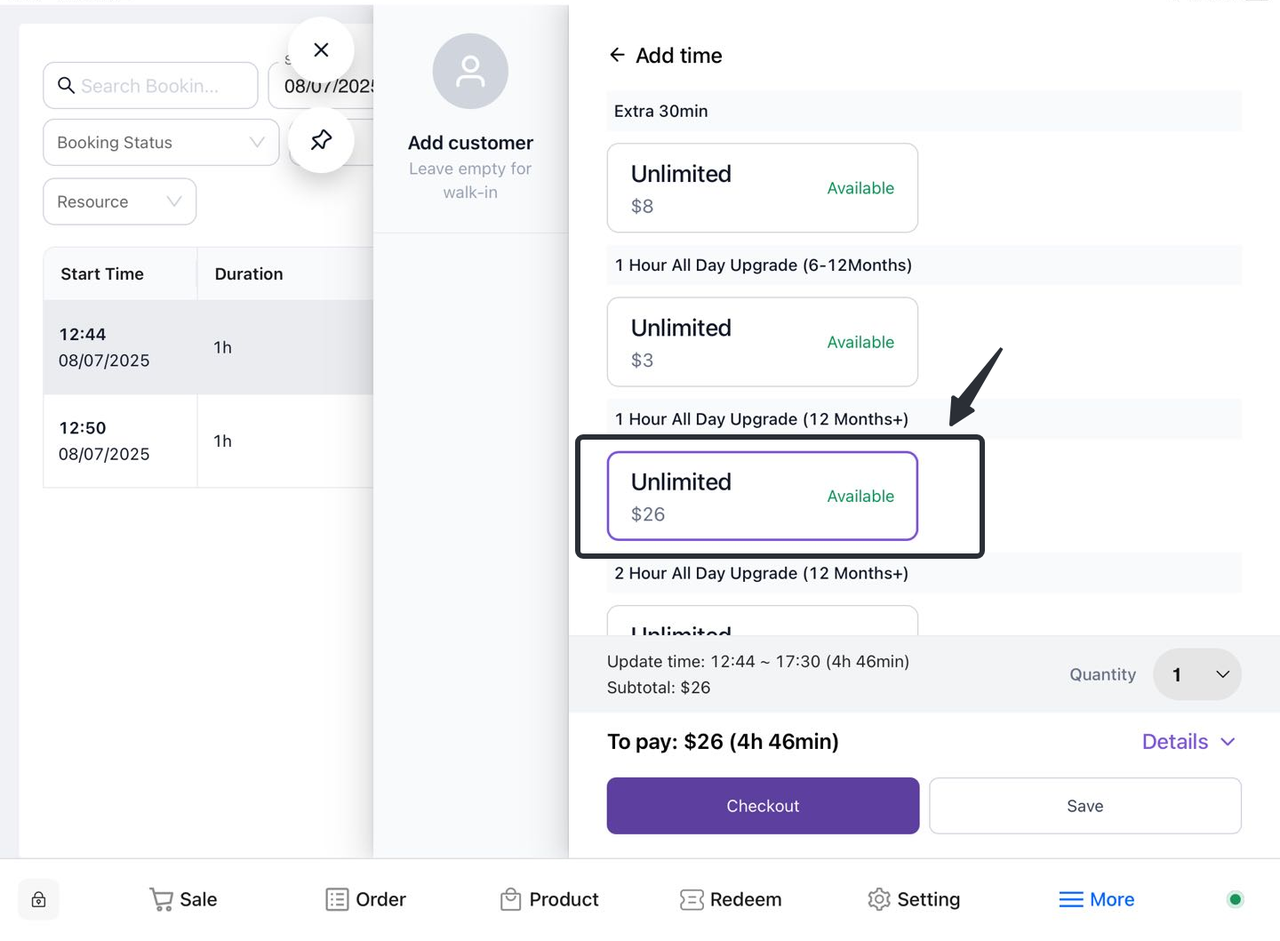
1.2 How do I give a guest an order overtime?
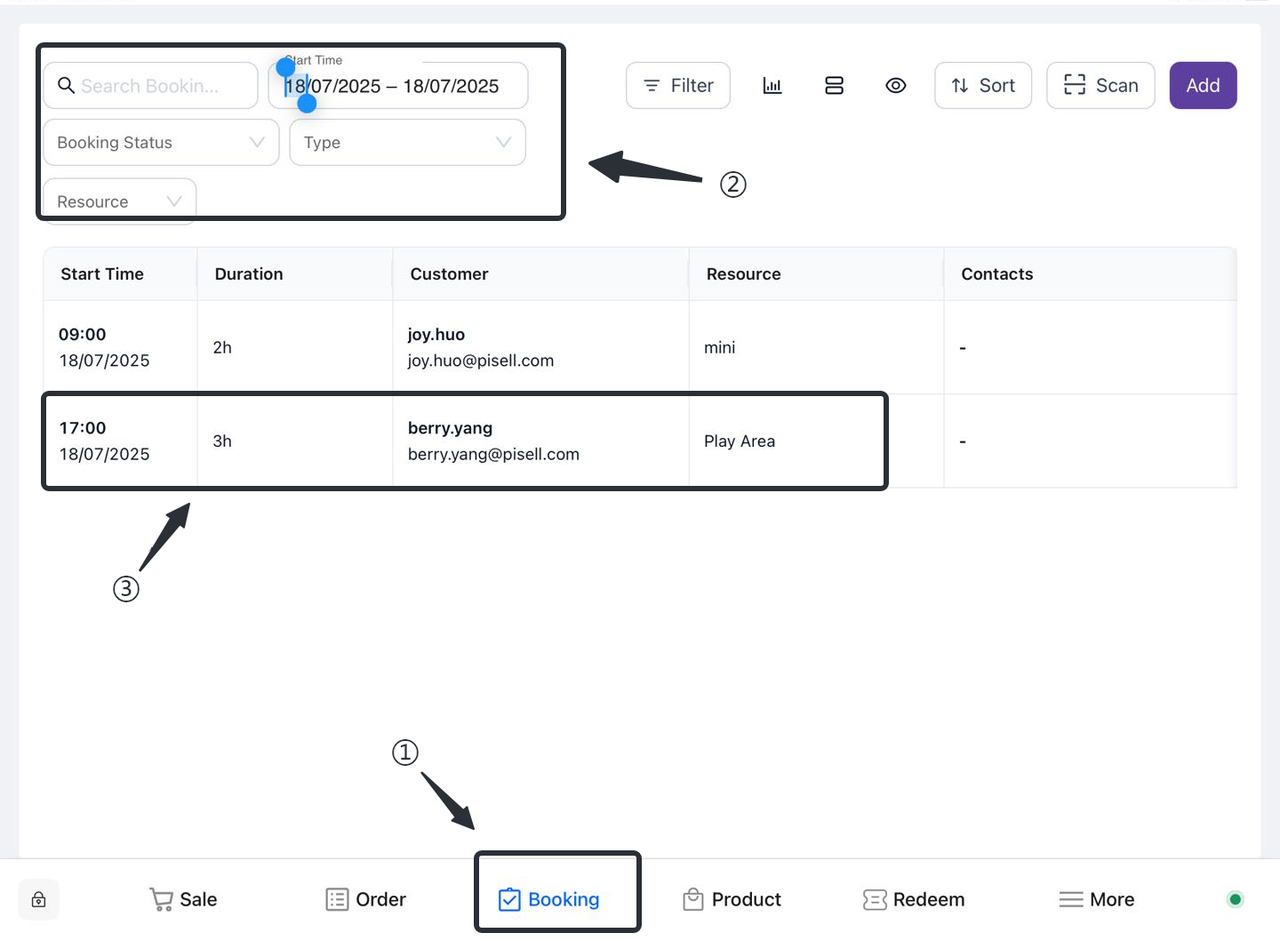
- Switch to the "Appointment" screen and find the corresponding order.
- Method 1 : Filter through customer information
Enter relevant information such as order number, date, etc. to filter out specific orders.
Review the filter results to confirm the details of the selected order.

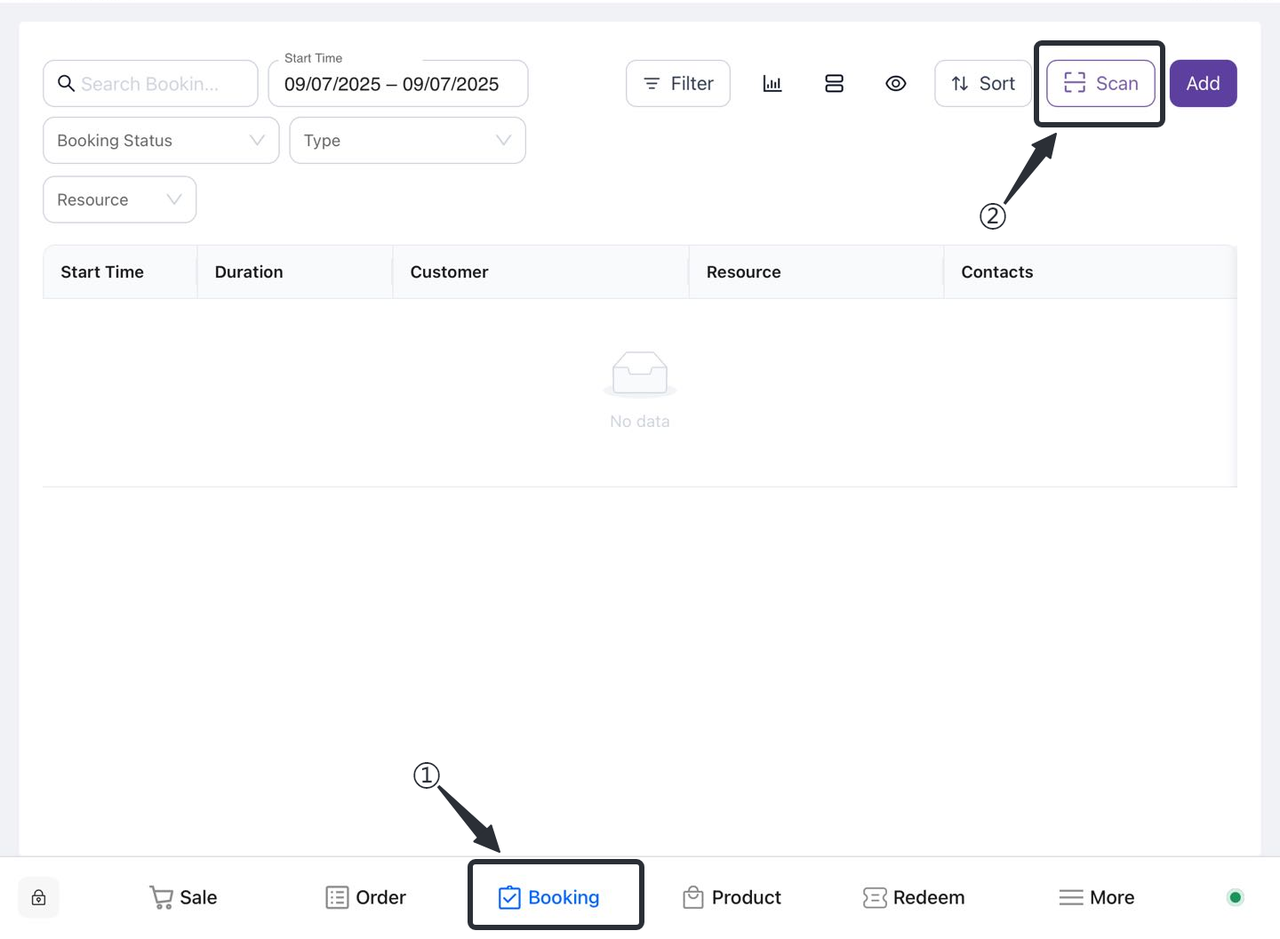
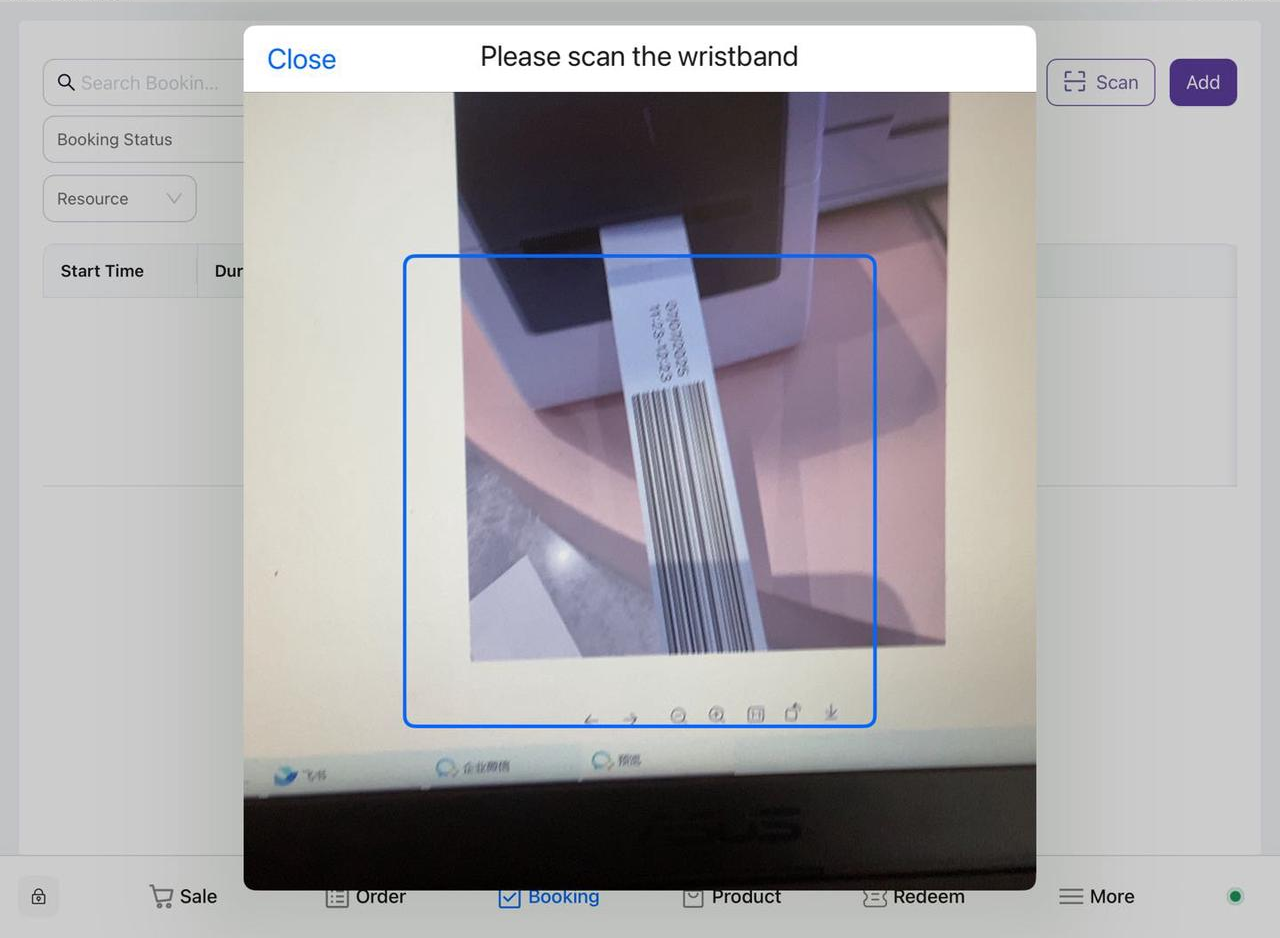
- Method 2 : Scan the customer bracelet
Enter the appointment interface: Find and click the "Reservation" option on the main interface to enter the appointment interface.
Select the scan function: In the appointment interface, find and click the "Scan" button to start the camera.
Align the bracelet: Point the mobile phone camera at the corresponding bracelet, ensure that the QR code or barcode on the bracelet is within the camera's field of view, and it will be bound to the corresponding order after successful scanning.


- The selection screen pops up
-
- The system pops up the overtime product selection interface.
- Select the items that require overtime
-
- Users browse through time-consuming products in the pop-up interface.
- The user selects the desired overtime product.
- Select Checkout
-
- After the user confirms their selection, click the "Checkout" button.
Overtime product usage instructions
-
Automatic Extension of Duration: After a successful purchase, the system will automatically extend the usage time of the user's bracelet.
-
Bracelet function: During the extended validity period, users can continue to use the bracelet to scan the gate for passage.
2. Wavior Management
2.1 How do I create a Wavior for a customer in the ticket sales interface?
- Open the Terminal app and tap Settings:
-
- Launch the Terminal app, find and tap on the "Settings" option in the app interface.
- Select "Ticket Selling Interface" and select Customer:
-
- Find the "Ticket Selling Interface" in the settings and click Enter, select an existing customer, or select "Create a new customer" to add customer information.
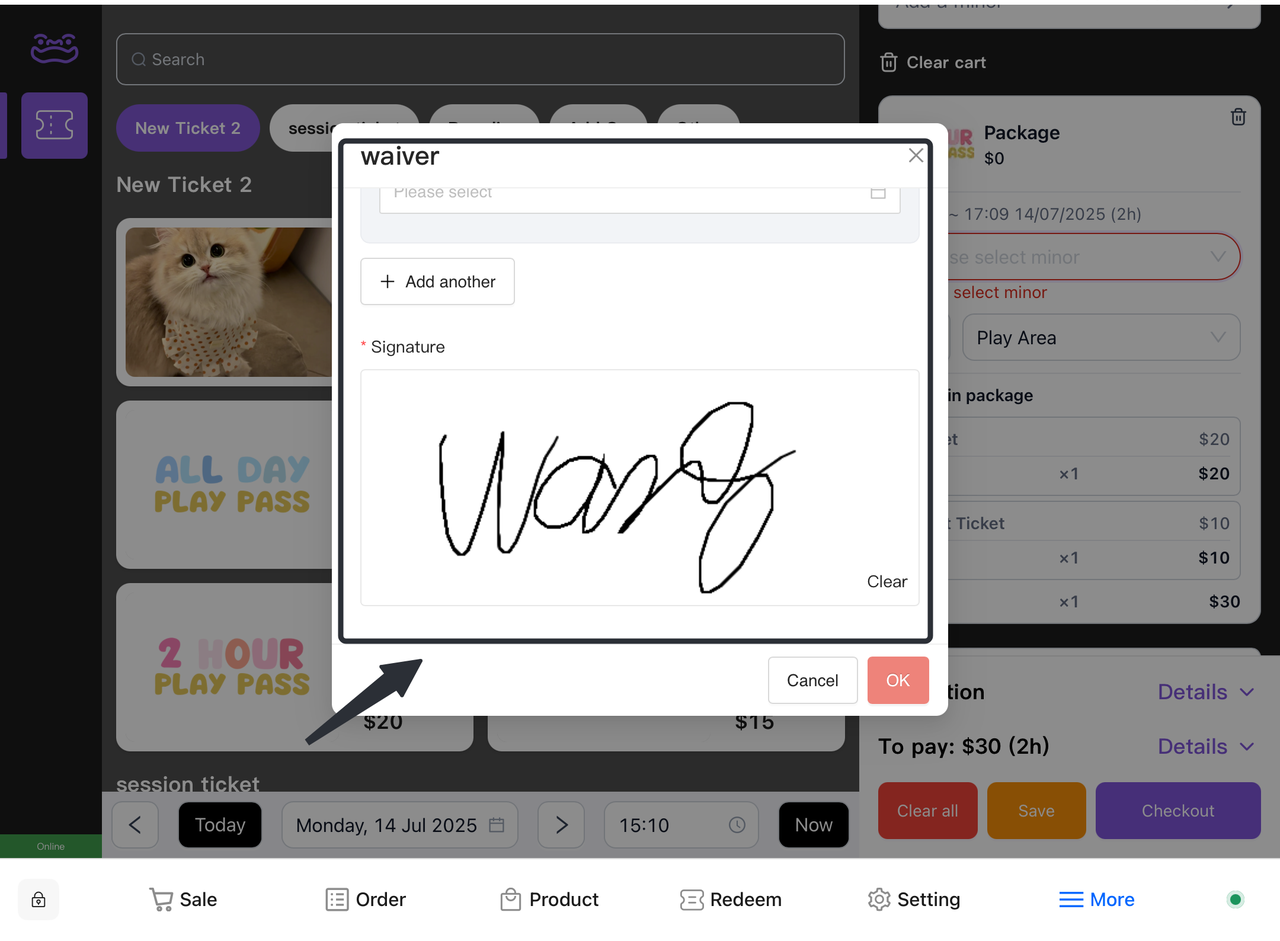
- Fill in the minor information and save:
-
- For each ticket, fill in the minor, make sure to add a minor to each ticket according to the actual situation of the customer, and click the "Save" button after filling in.
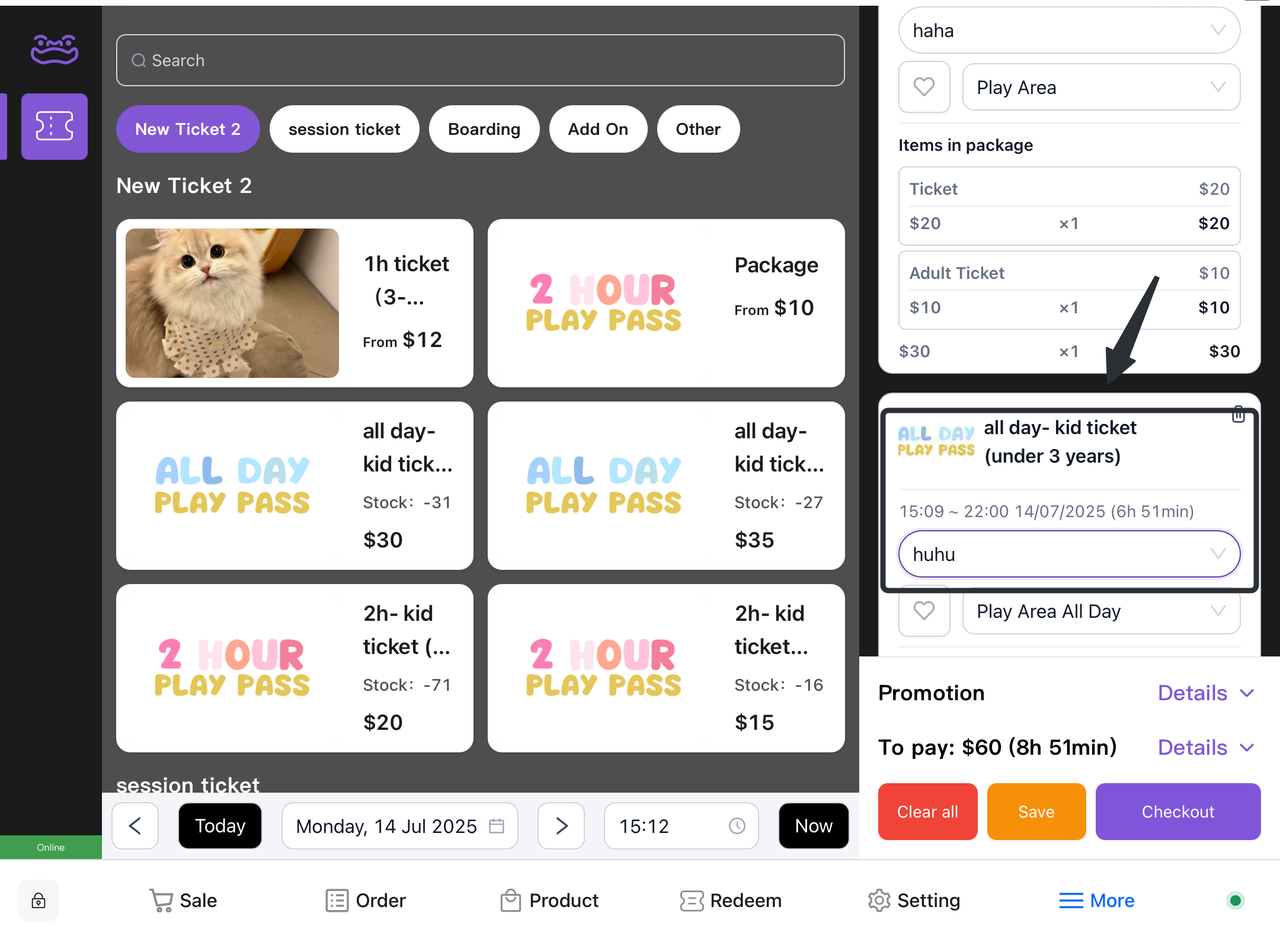
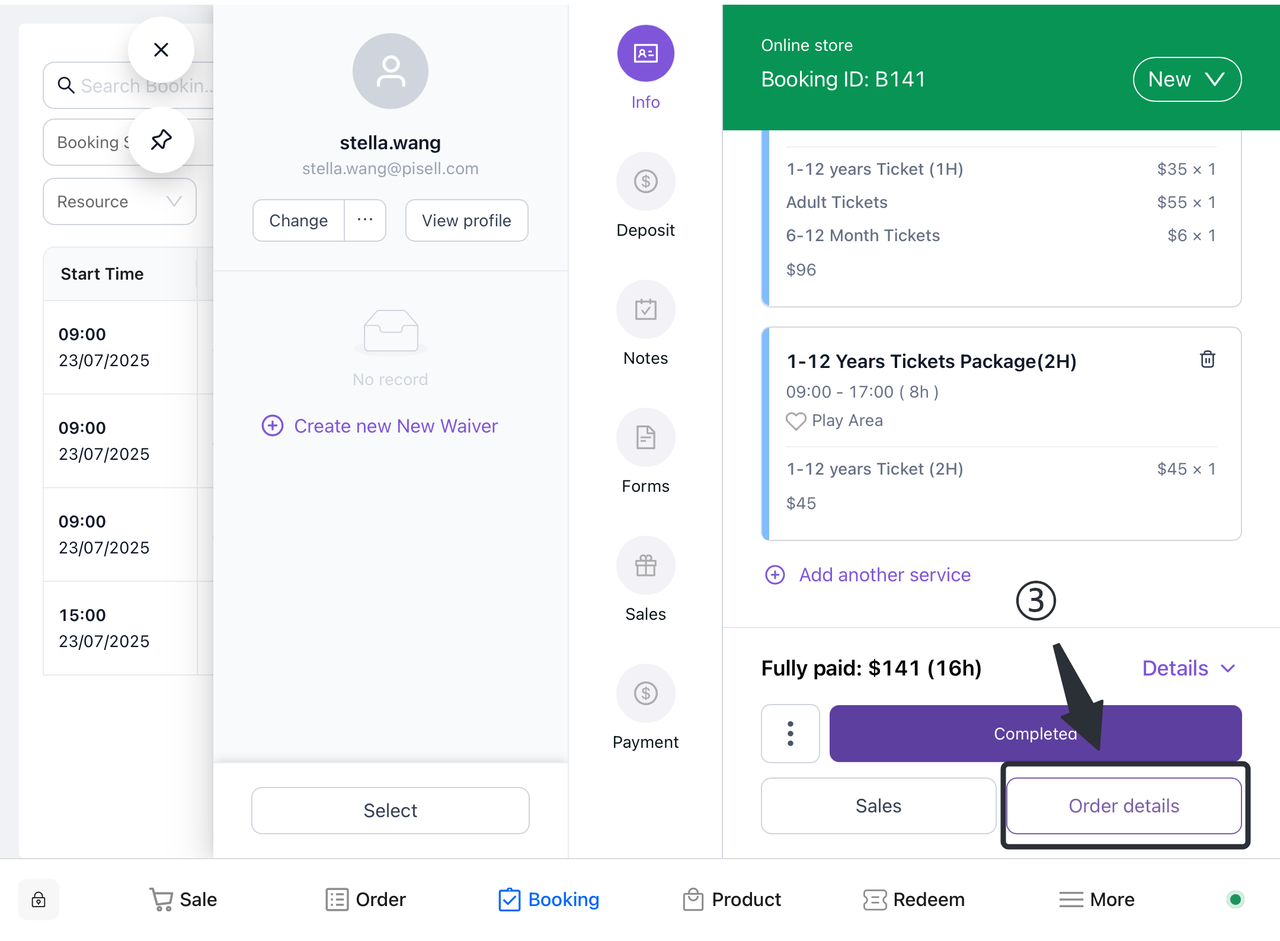
- Check your ticket and select "Checkout":
-
- Check the contents of the ticket in the shopping cart to make sure the information is correct, and after confirming that it is correct, click the "Checkout" button.
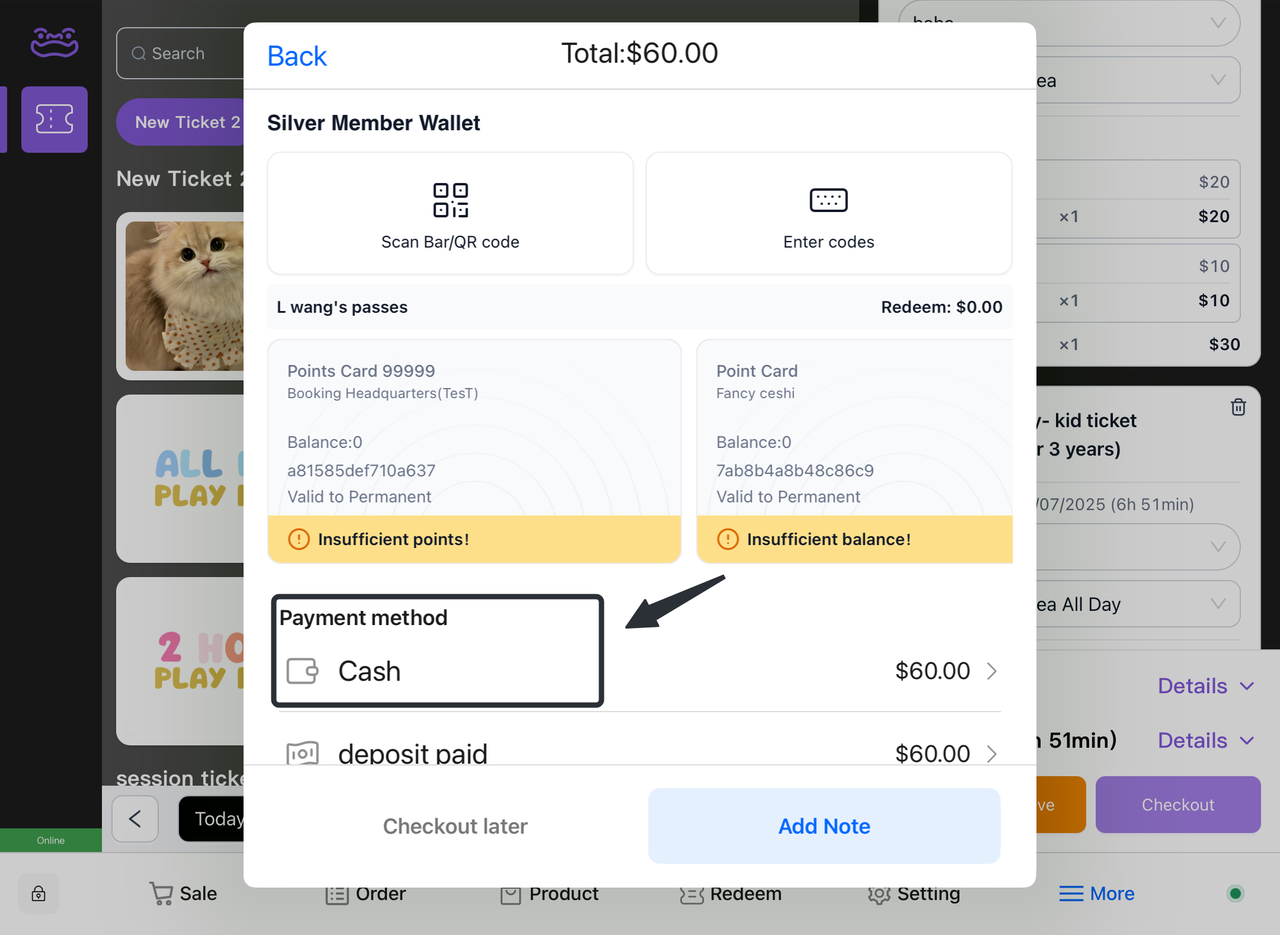
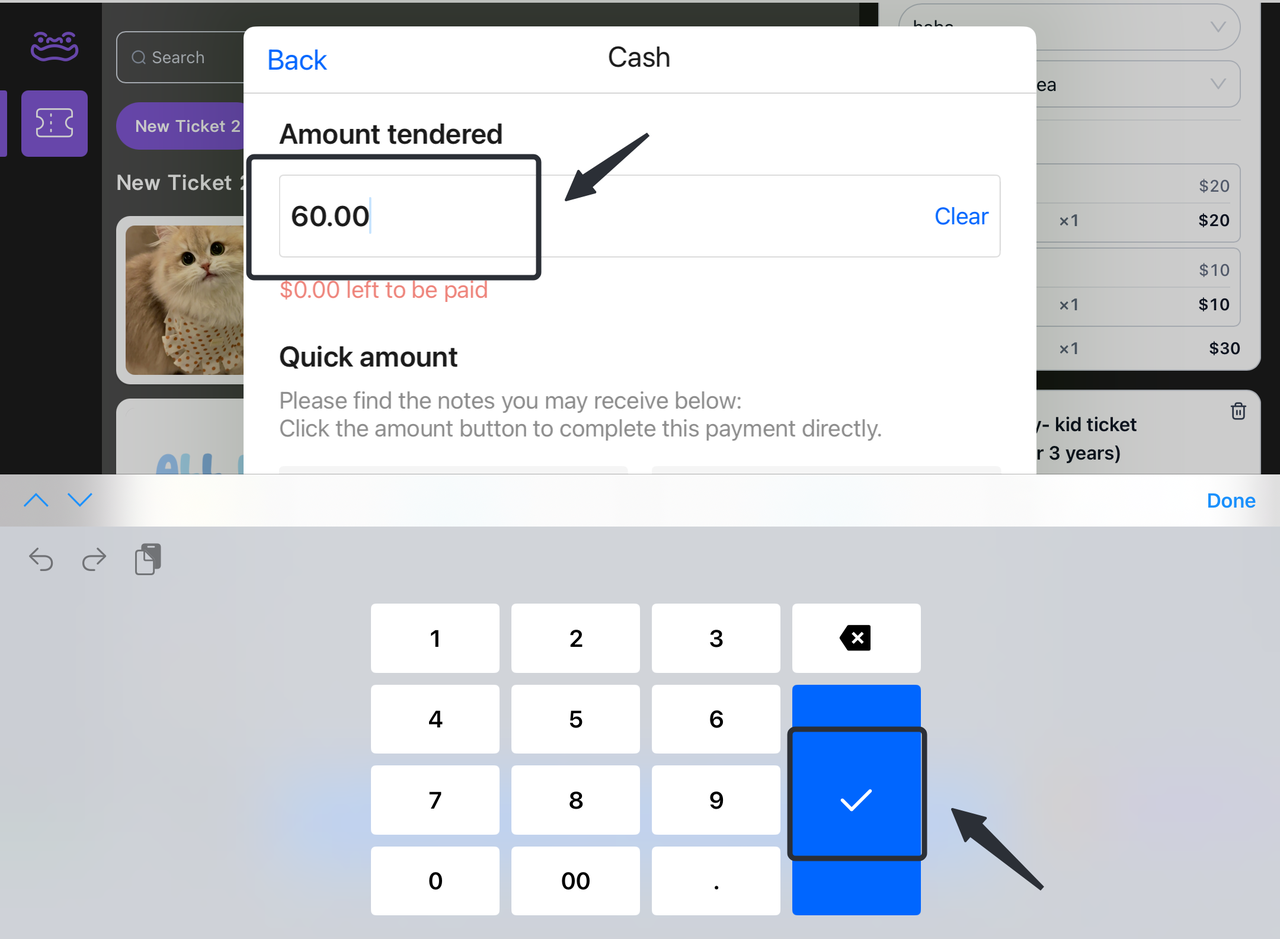
- Check the amount and click "[tick]":
-
- Check the total amount at the checkout page to make sure all fees are correct, and after confirming that they are correct, click "[tick]" to complete the payment.
3. Refund Operations
3.1 How do I process a refund?
3.1.1 Filter out the corresponding orders
Method 1: Filter orders based on customer information
-
-
Enter relevant information such as order number, date, etc. to filter out specific orders.
-
Review the filter results to confirm the details of the selected order.
-
Method 2: Scan the customer bracelet information to lock the order
-
-
Open the Terminal app: Launch the relevant Terminal app.
-
Enter the appointment interface: Find and click the "Reservation" option on the main interface to enter the appointment interface.
-
Select the scan function: In the appointment interface, find and click the "Scan" button to start the camera.
-
Align the bracelet: Point the mobile phone camera at the corresponding bracelet, ensure that the QR code or barcode on the bracelet is within the camera's field of view, and it will be bound to the corresponding order after successful scanning.
-

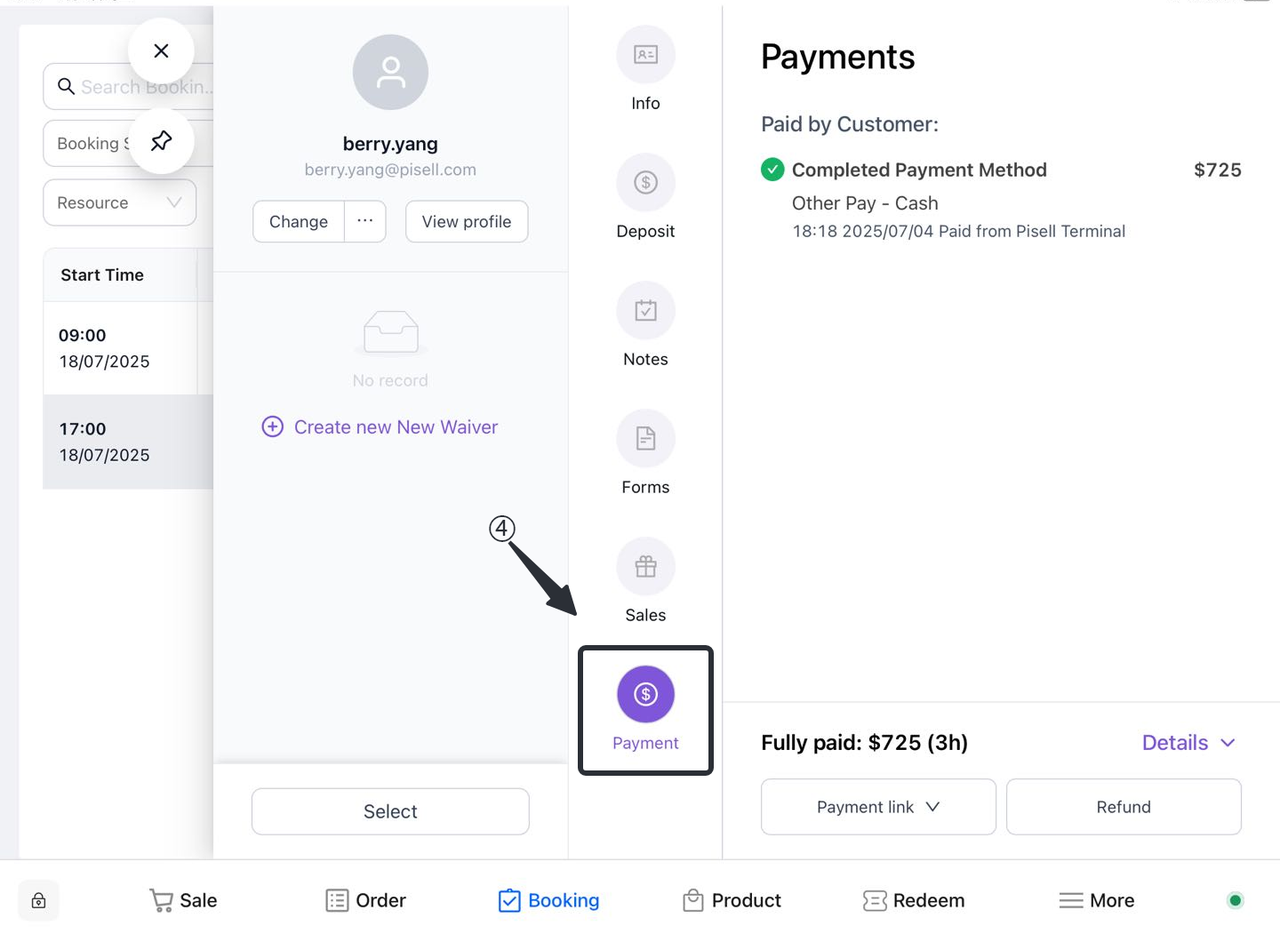
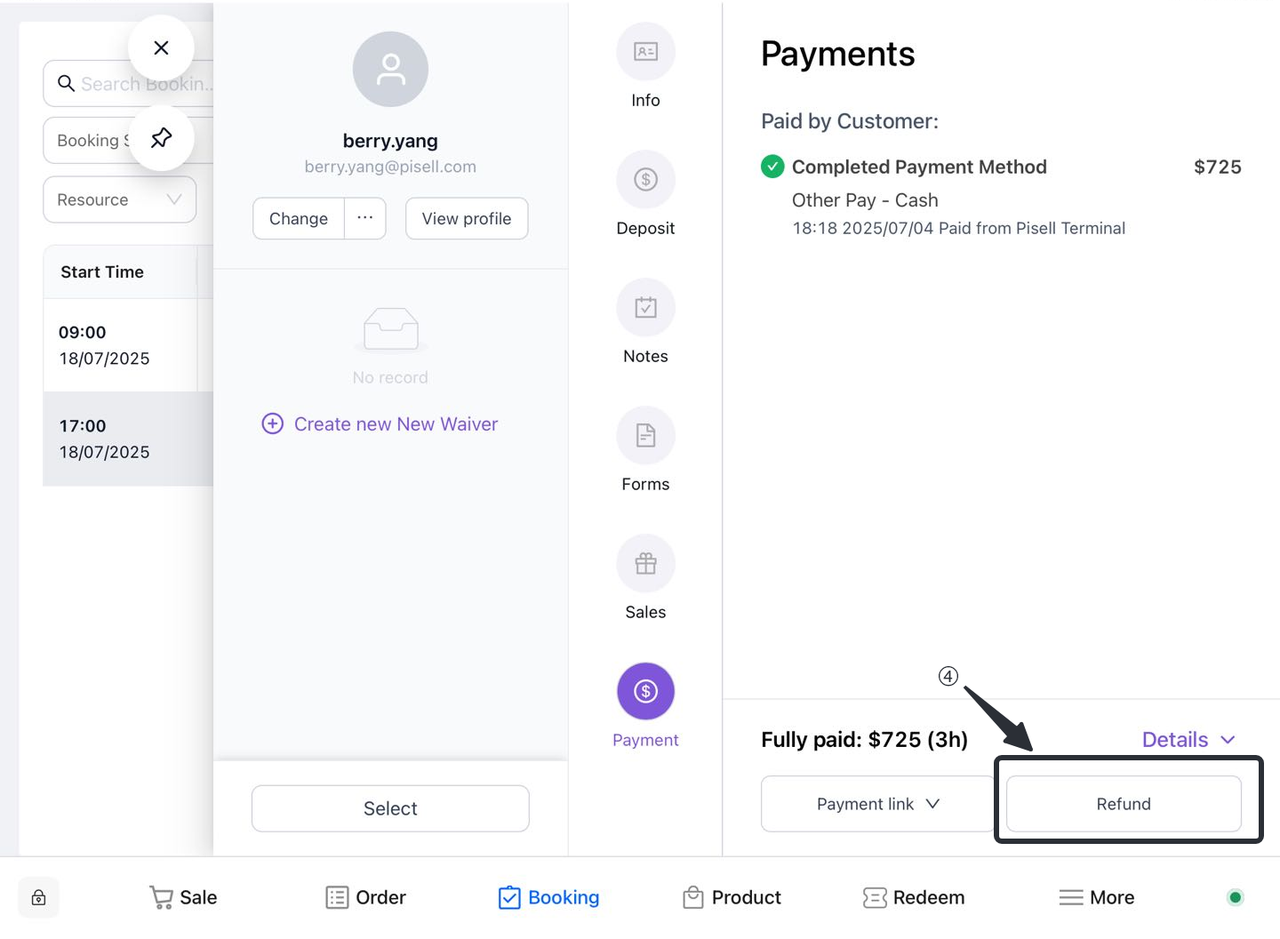
- Select the refund type:
-
- Click on the corresponding order to open the payment interface:
-
-
- On the order details page, select "Refund".
-
-
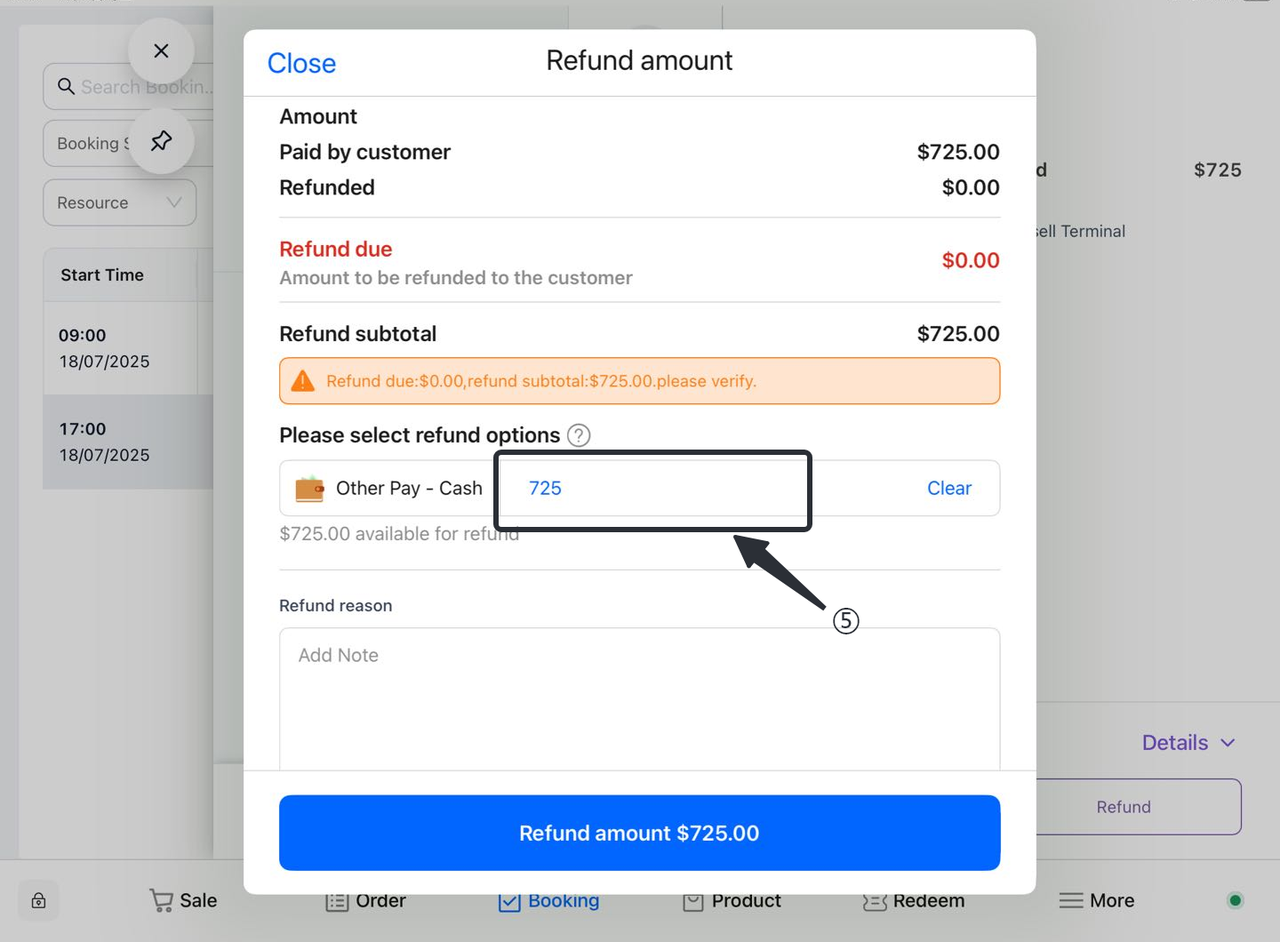
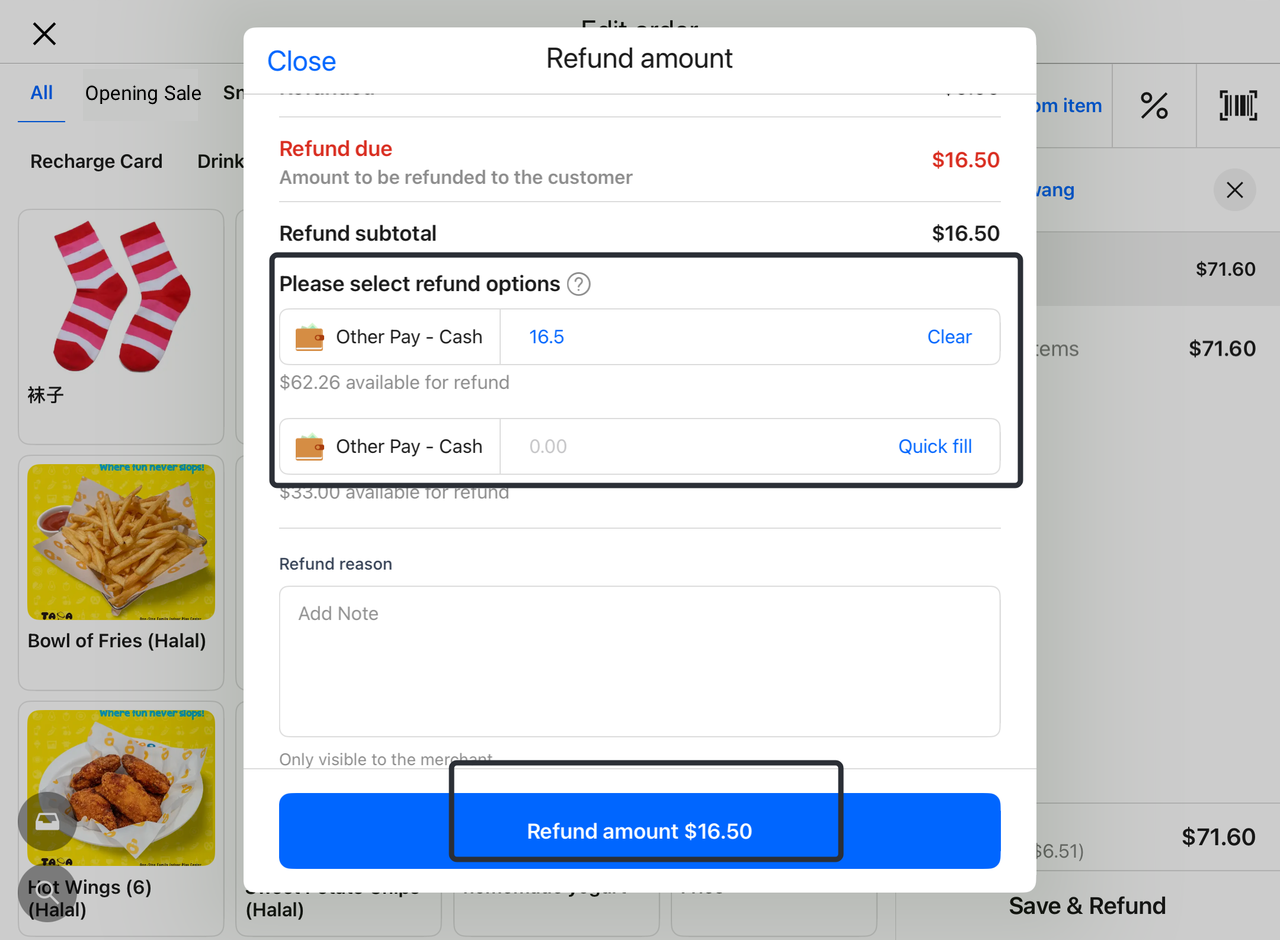
- Enter the corresponding refund amount:
-
-
-
On the refund request screen, find the "Refund Amount" input box.
-
Enter the amount you want to refund, making sure the amount is correct.
-
-
3.1.2 Refund only
- If the customer wants a refund only and not cancel the order, select the "Refund Only" option.
3.1.3 Refunds and Cancellations
- If the customer wishes to refund and cancel the order, select the "Refund and Cancellation" option.
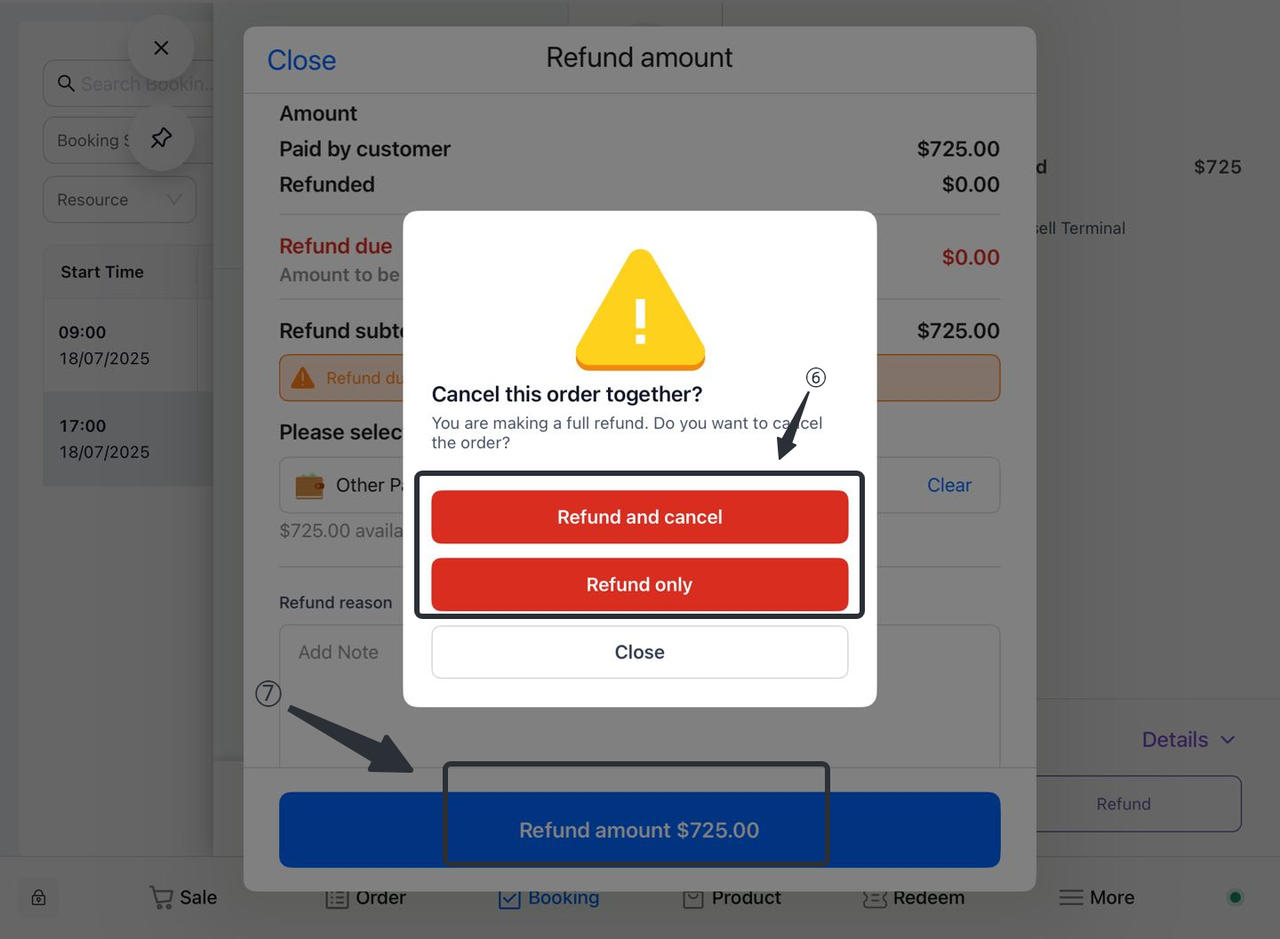
3.1.4 To refund and remove the item from the order
- If the customer wants to refund and remove the item from the order, select the option 'Refund and remove the item from the order'.
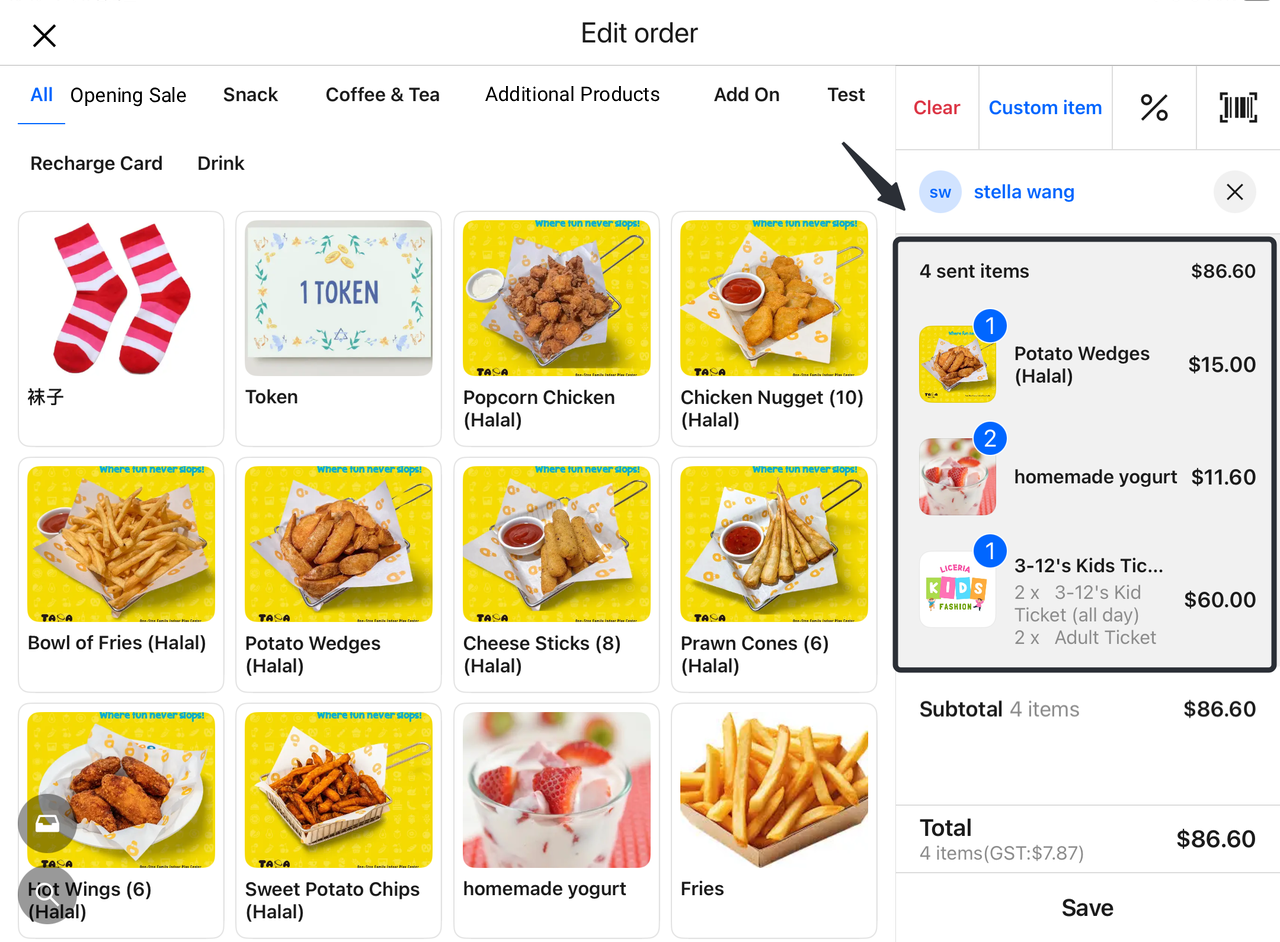
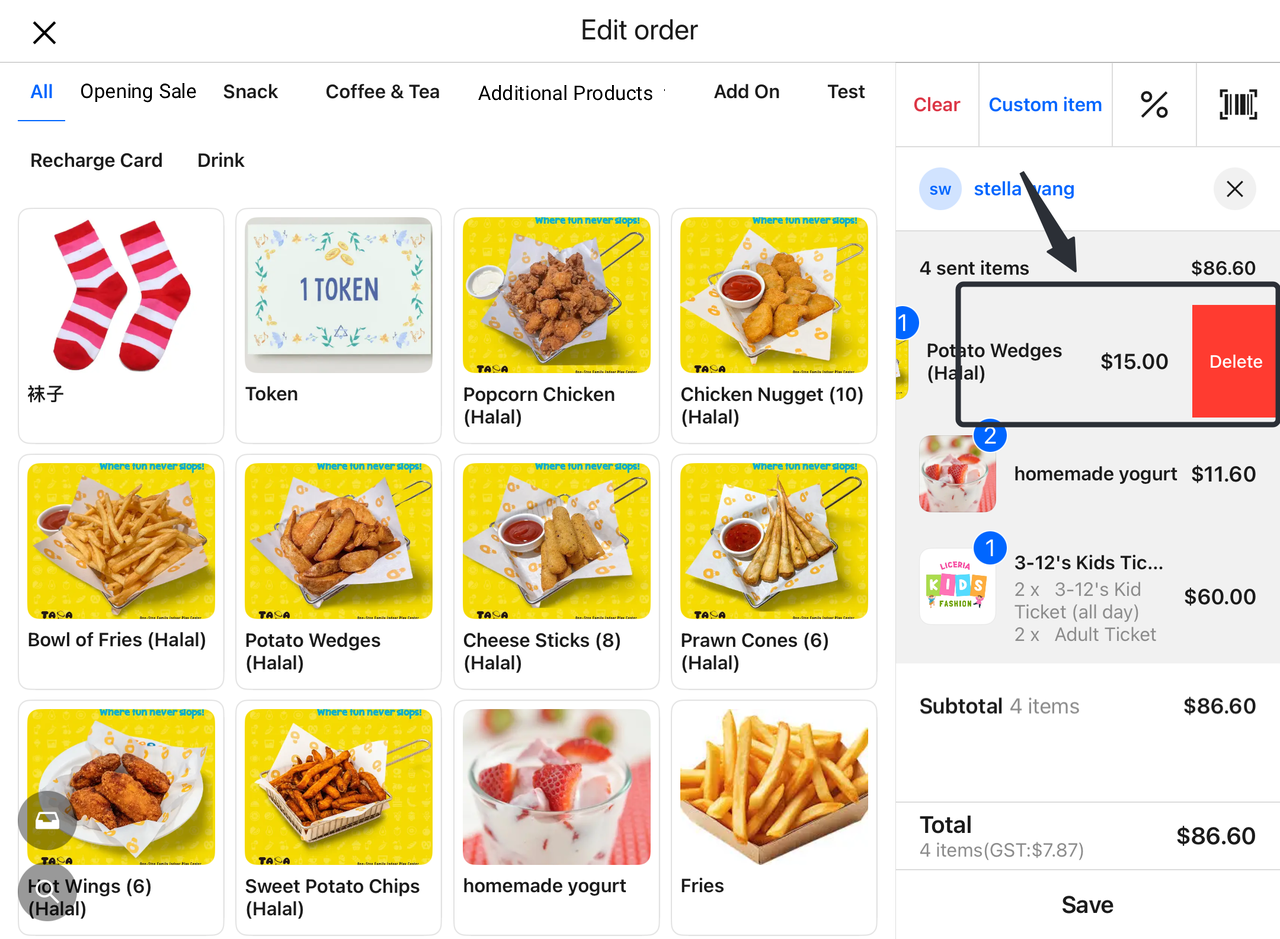
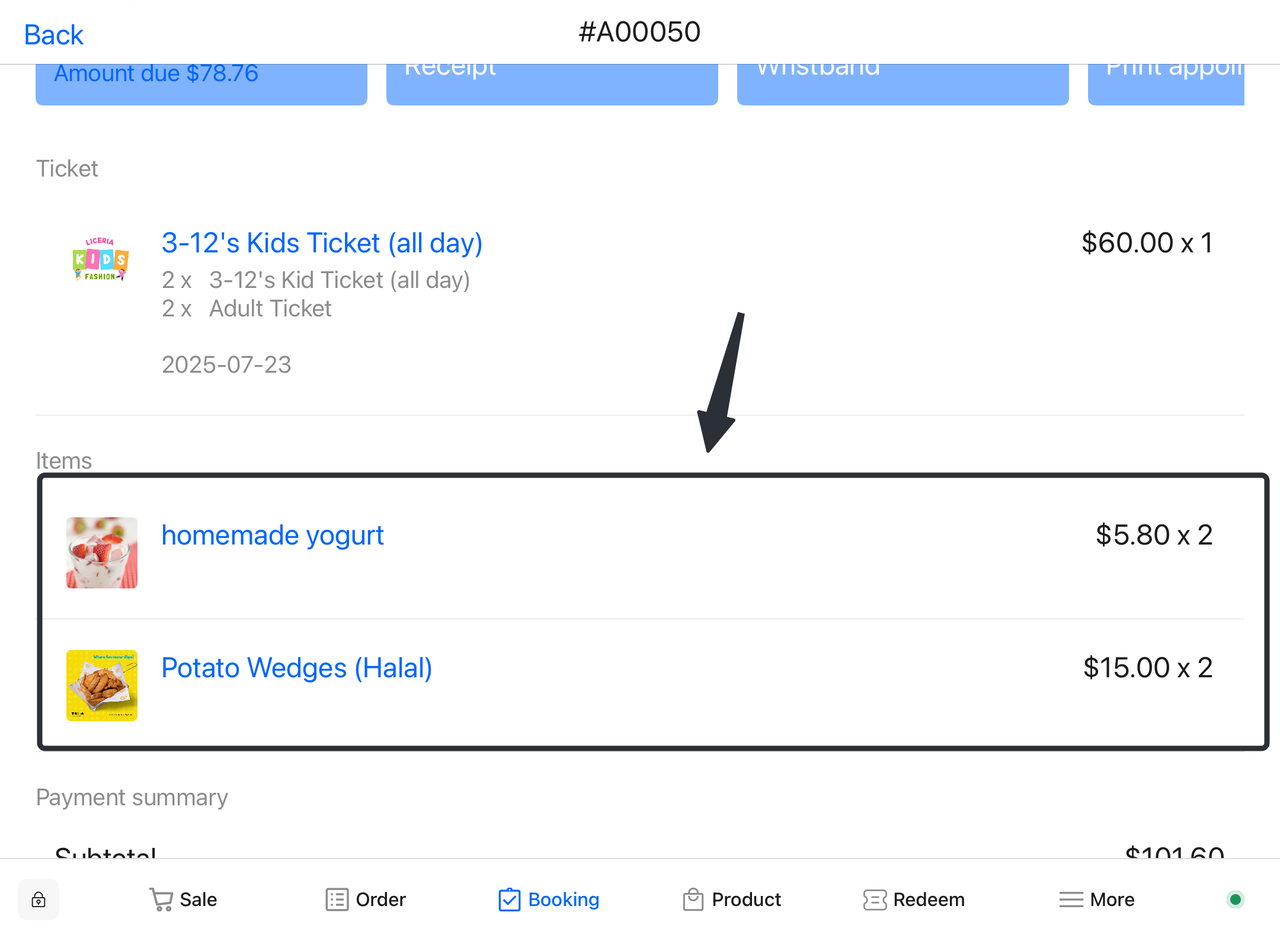
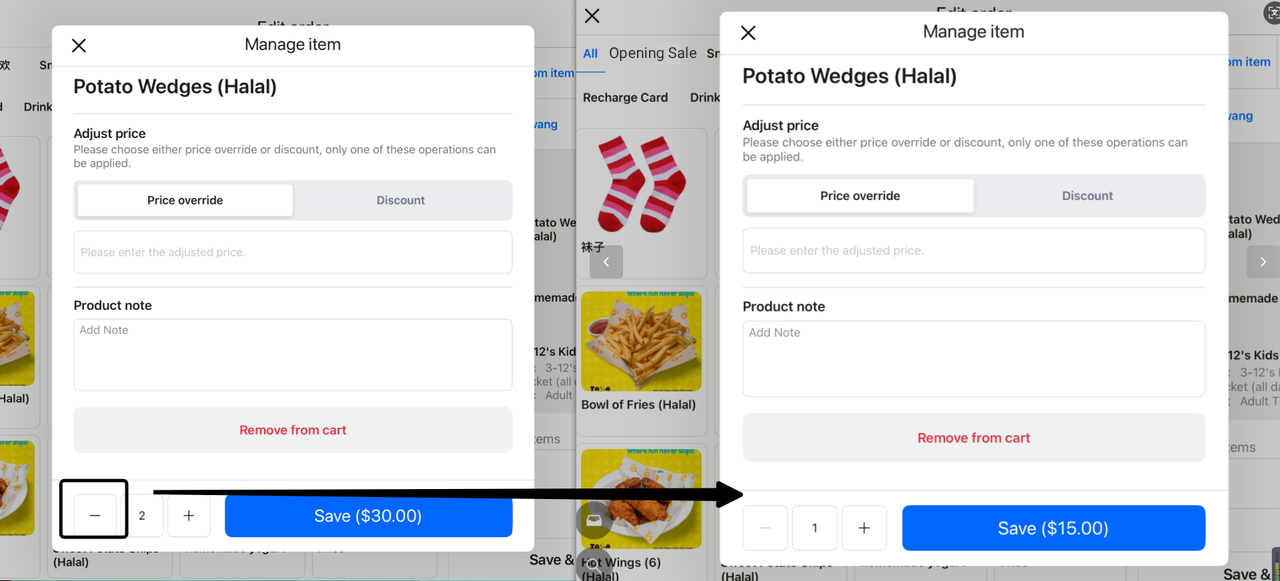
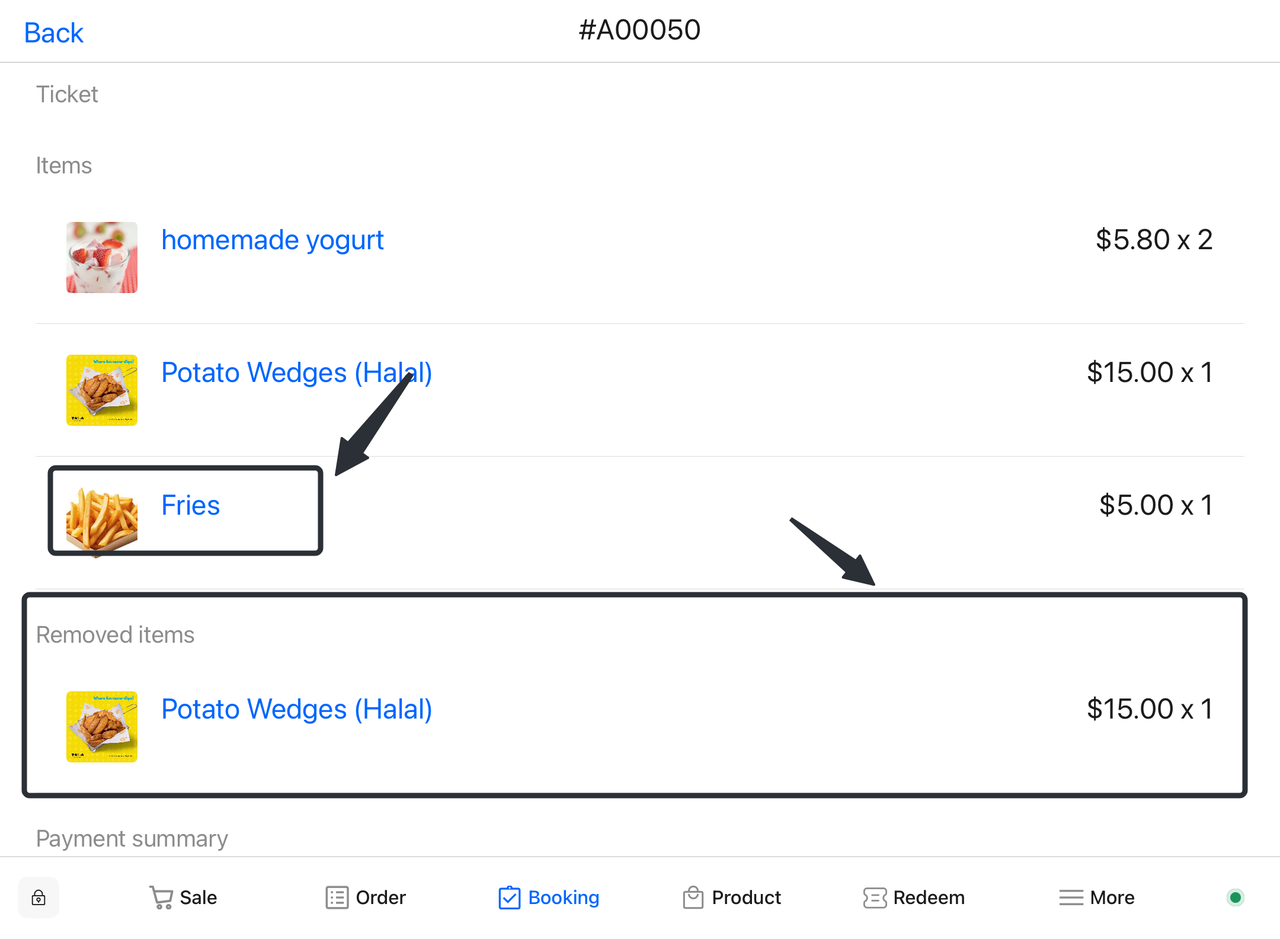
a. Return of retail items for refund:
Step 1: Select the order and delete the item
After selecting the corresponding order, click to jump to the sales page. Delete the items in your cart that require refunds and returns, then select "Save and refund."
Step 2: Enter the refund amount
On the refund details page that pops up, enter the corresponding refund amount.
Step 3: Complete the refund process
Once the refund amount is confirmed, the item will be removed from the order and the refund process will be completed.

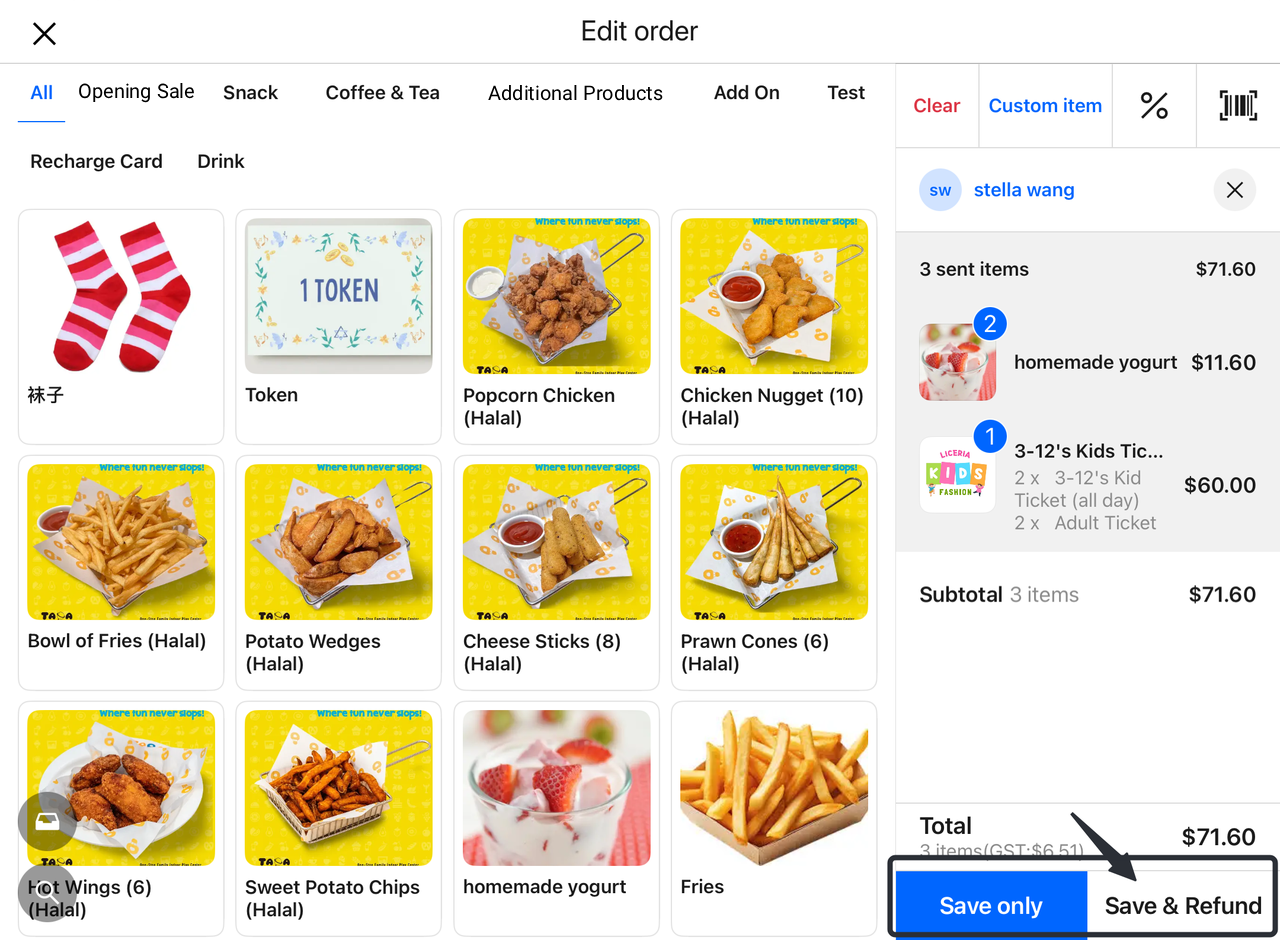
b. Return tickets and refunds:
Step 1: Select the order and delete the item
After selecting the corresponding order, click to jump to the ticket package page. Delete the items in your cart that need to be refunded and unsubscribed, then select "Apply".
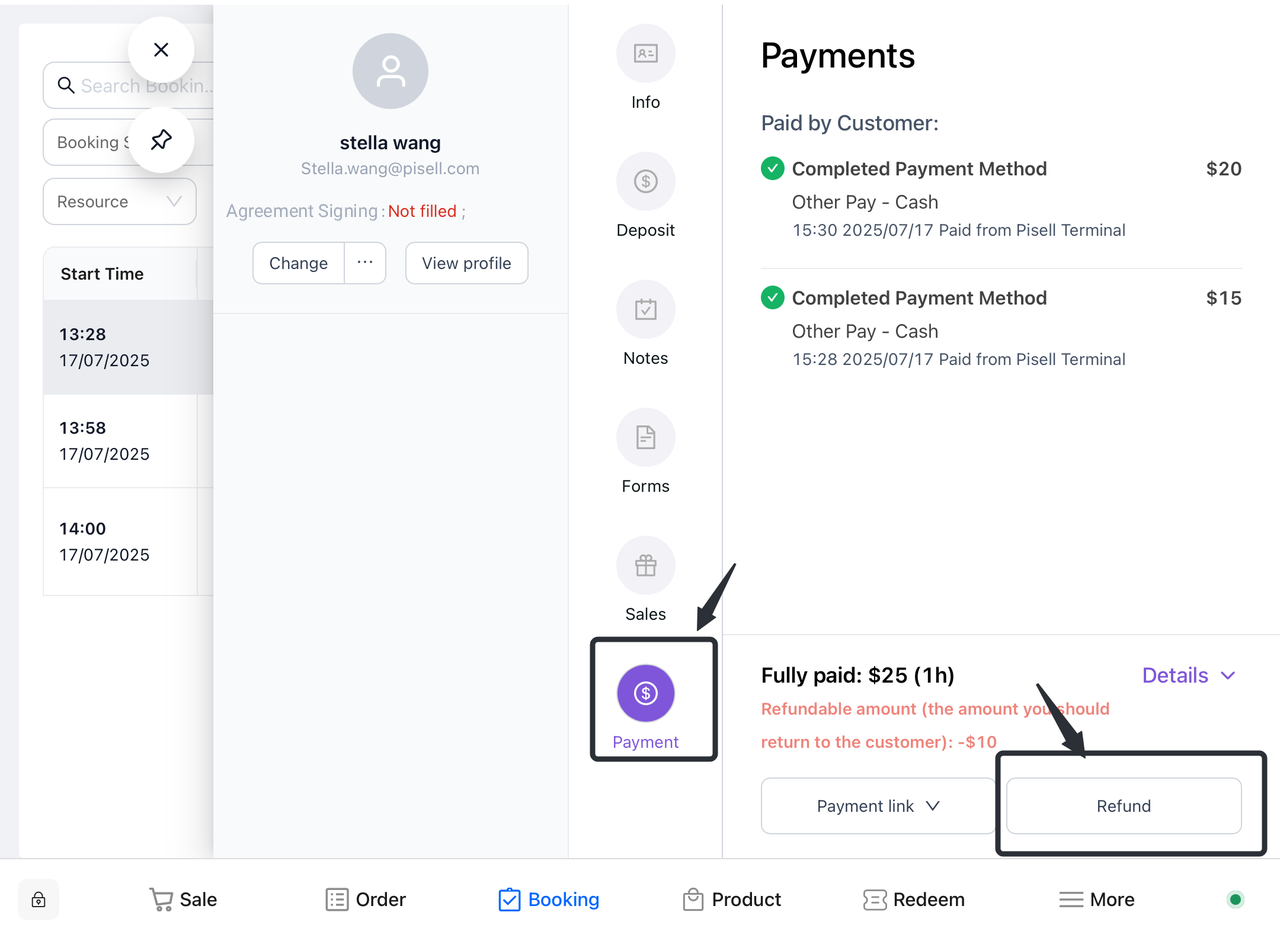
Step 2: Review the refundable amount
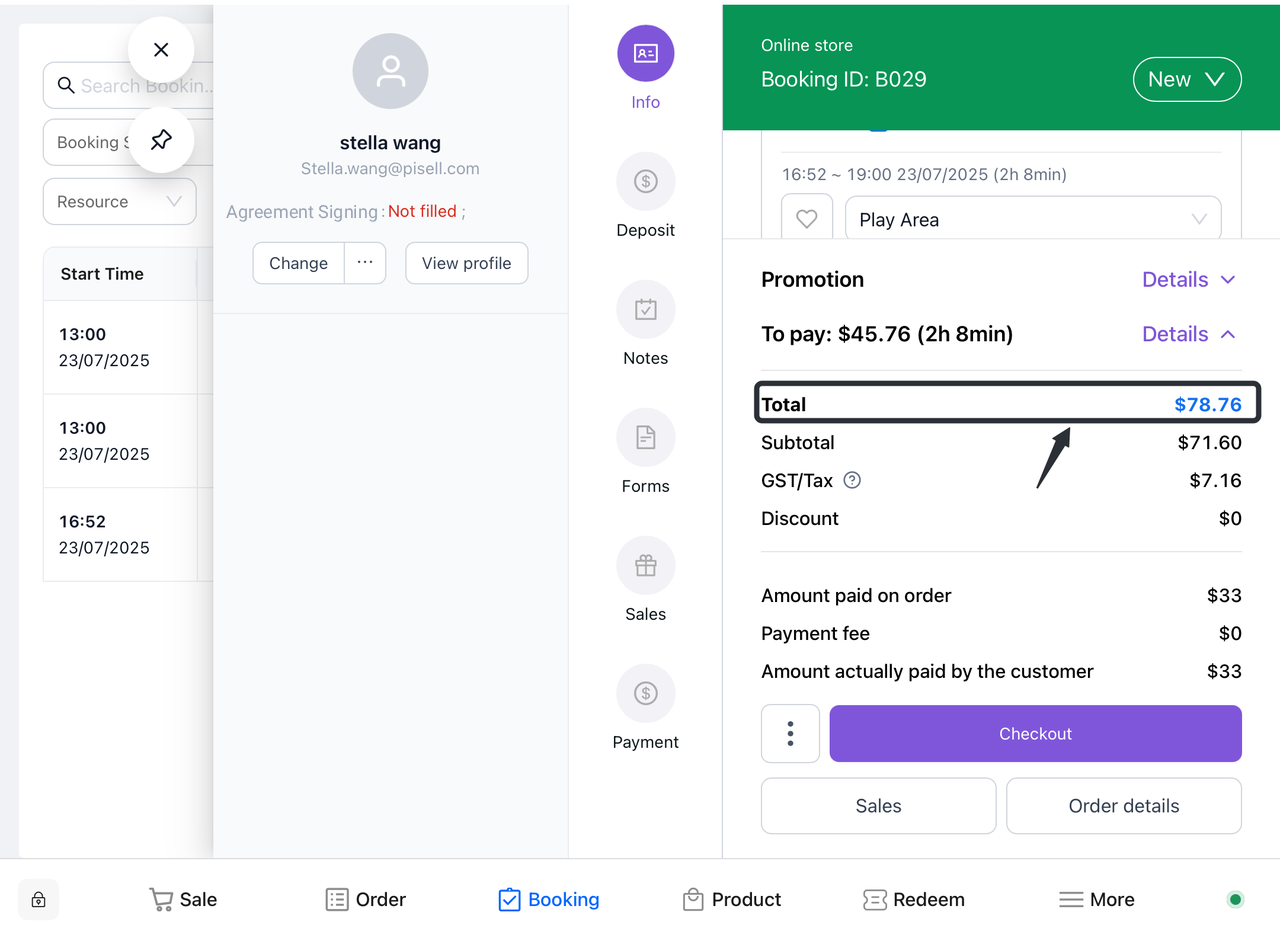
Go back to the order information screen and see the "Refundable amount (amount you should refund to the customer): -$XXX"
Step 3: Process the refund
Click the "Payment" button and select the corresponding "Refund". Enter the corresponding refund amount in the pop-up refund details page, and the item will be removed from the order and the refund process will be completed.

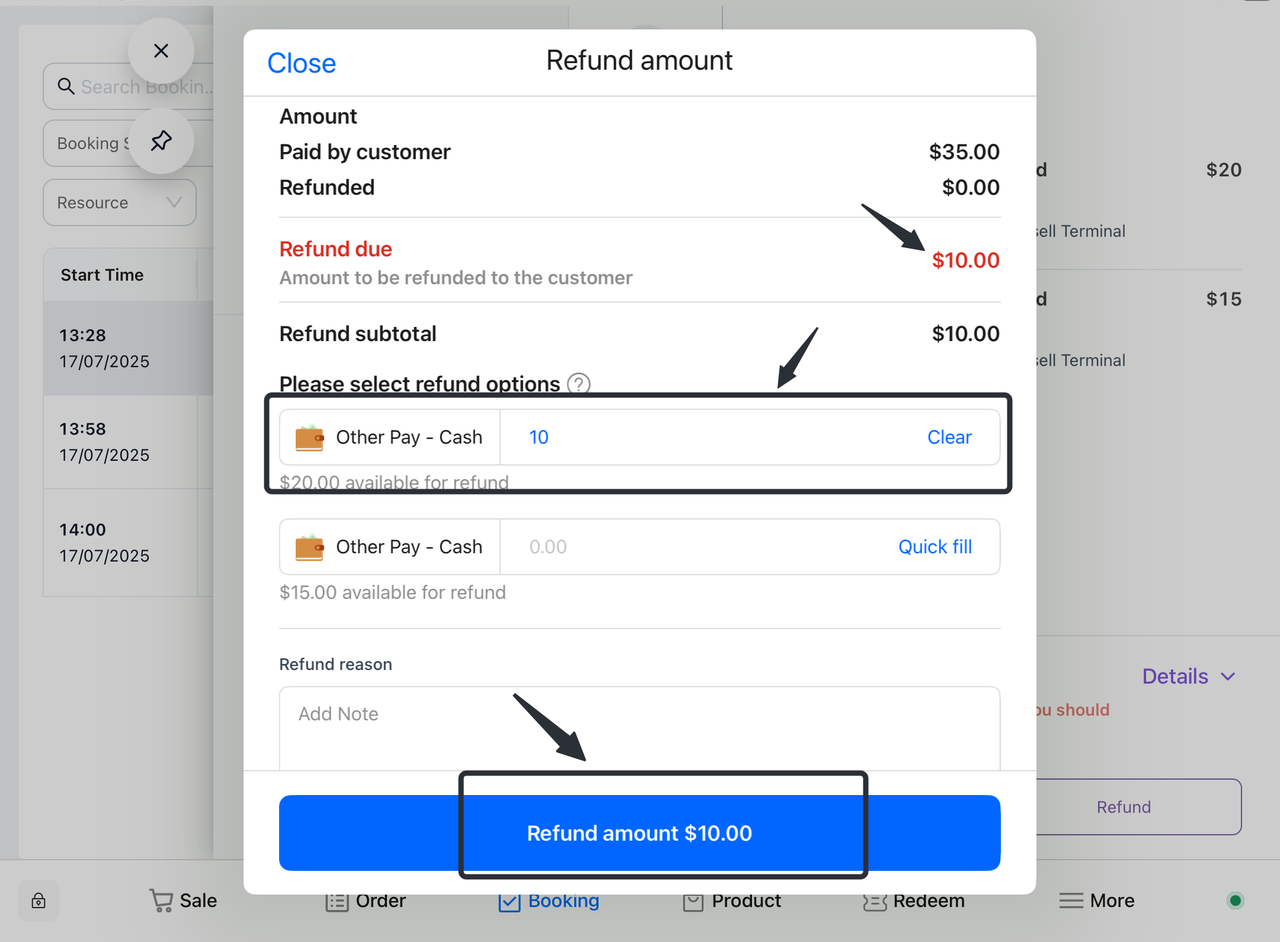
Confirm the selection:
-
Confirm the refund amount you entered.
-
Please click the "Refund" button to complete the application. The payment will be refunded through the original payment channe.
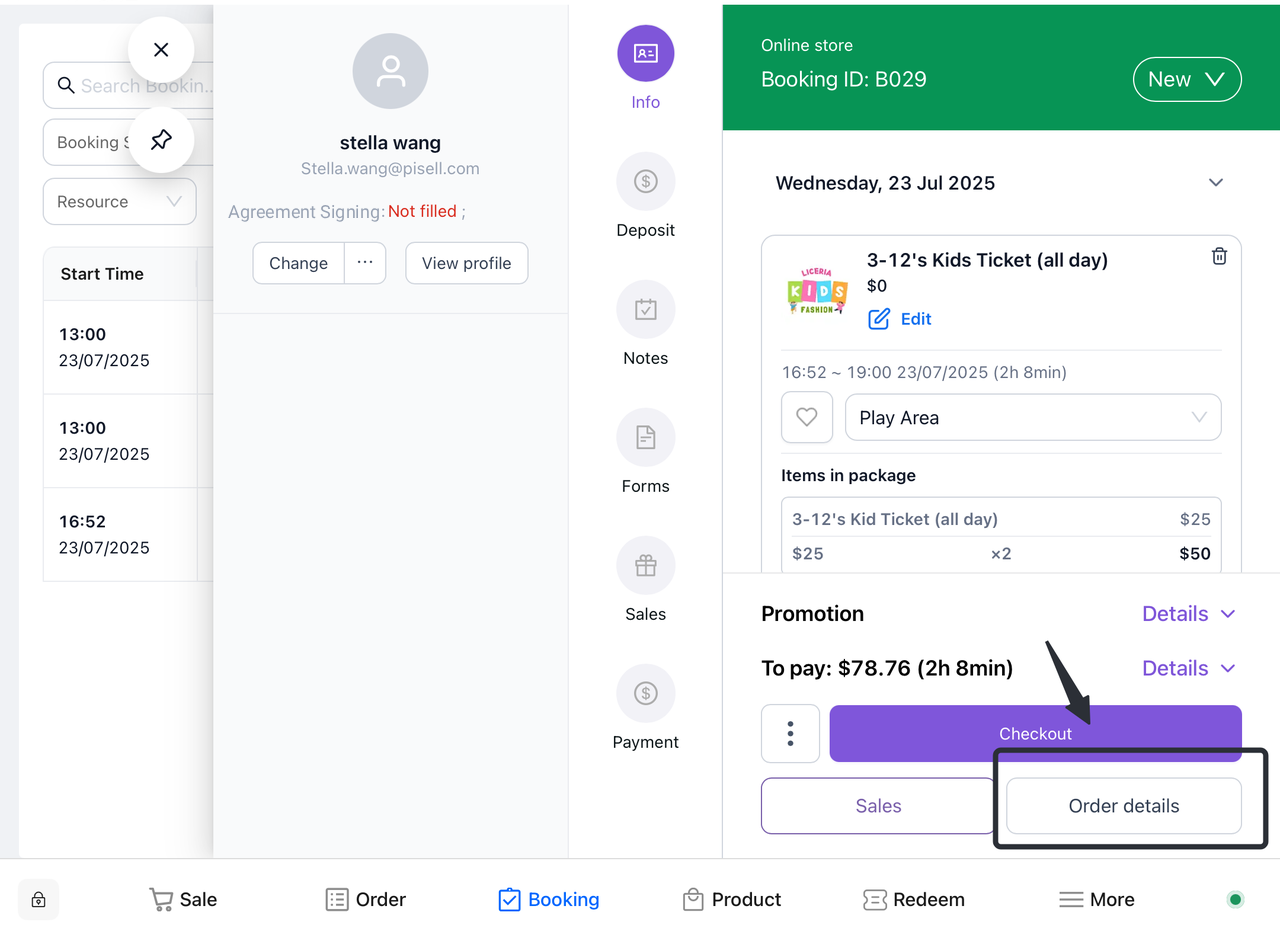
4. Order Management
4.1 How do I view my order?
4.1.1 Sales page
a. Open the Terminal app: Launch your Terminal app.
b. Access Order Management: In the top menu of the app, tap on the "Orders" option.
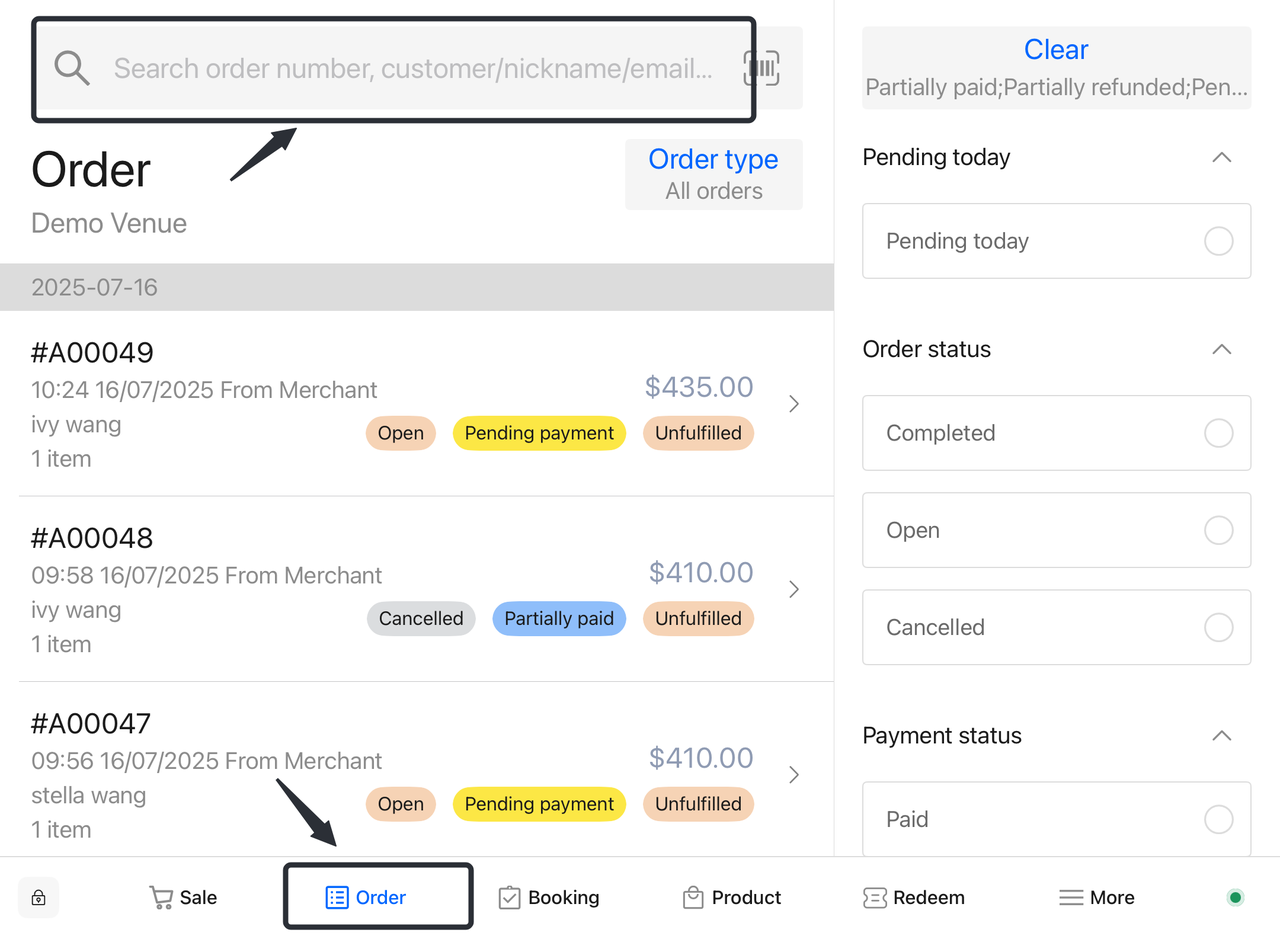
c. Conduct a search:
-
-
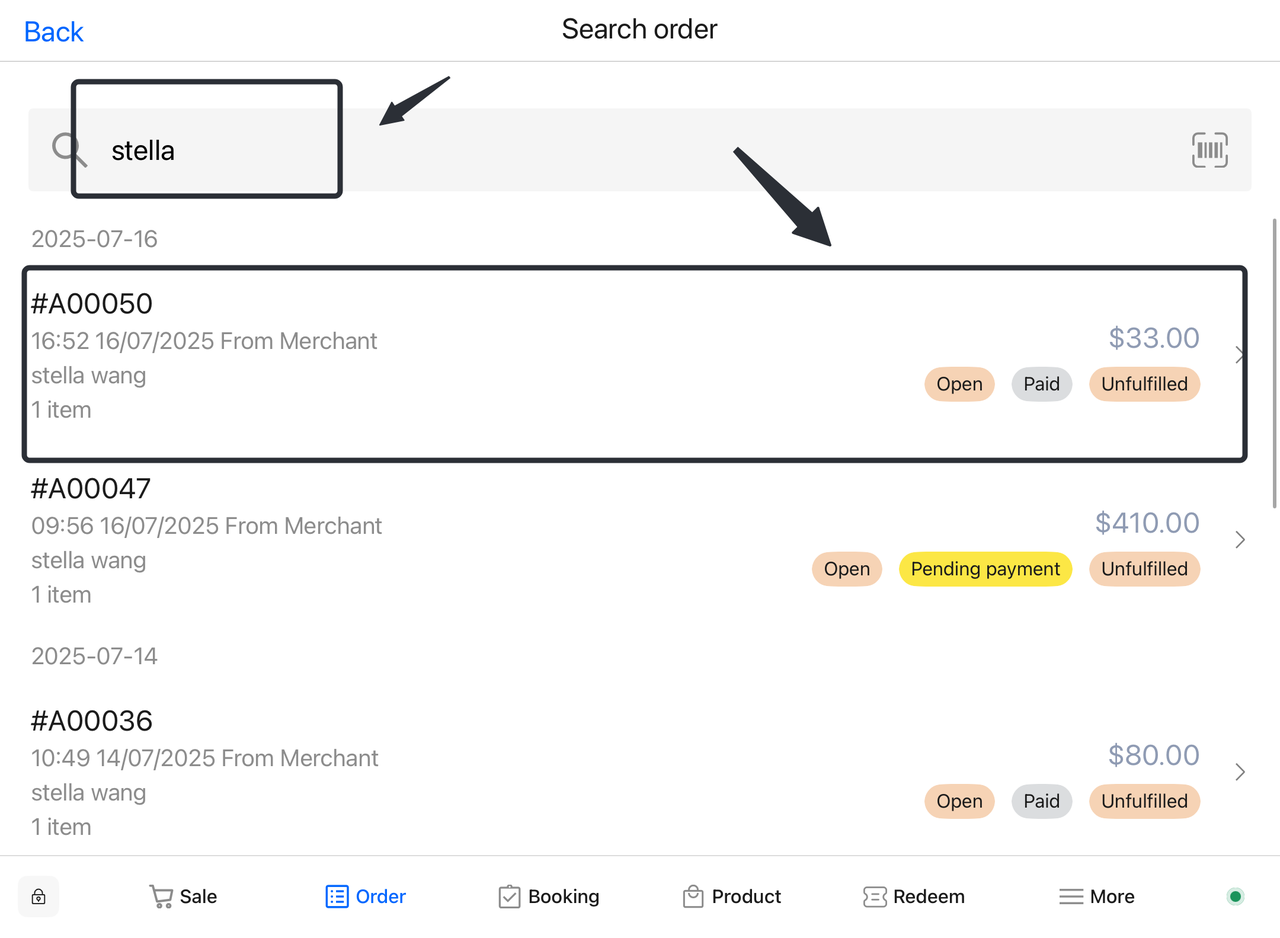
Enter the customer's nickname, email address, mobile phone number, or order code in the search box.
- Click the search button to find the corresponding order.
-
d. Lock Orders: In the search results, locate and click on your desired order to ensure the correct selection.
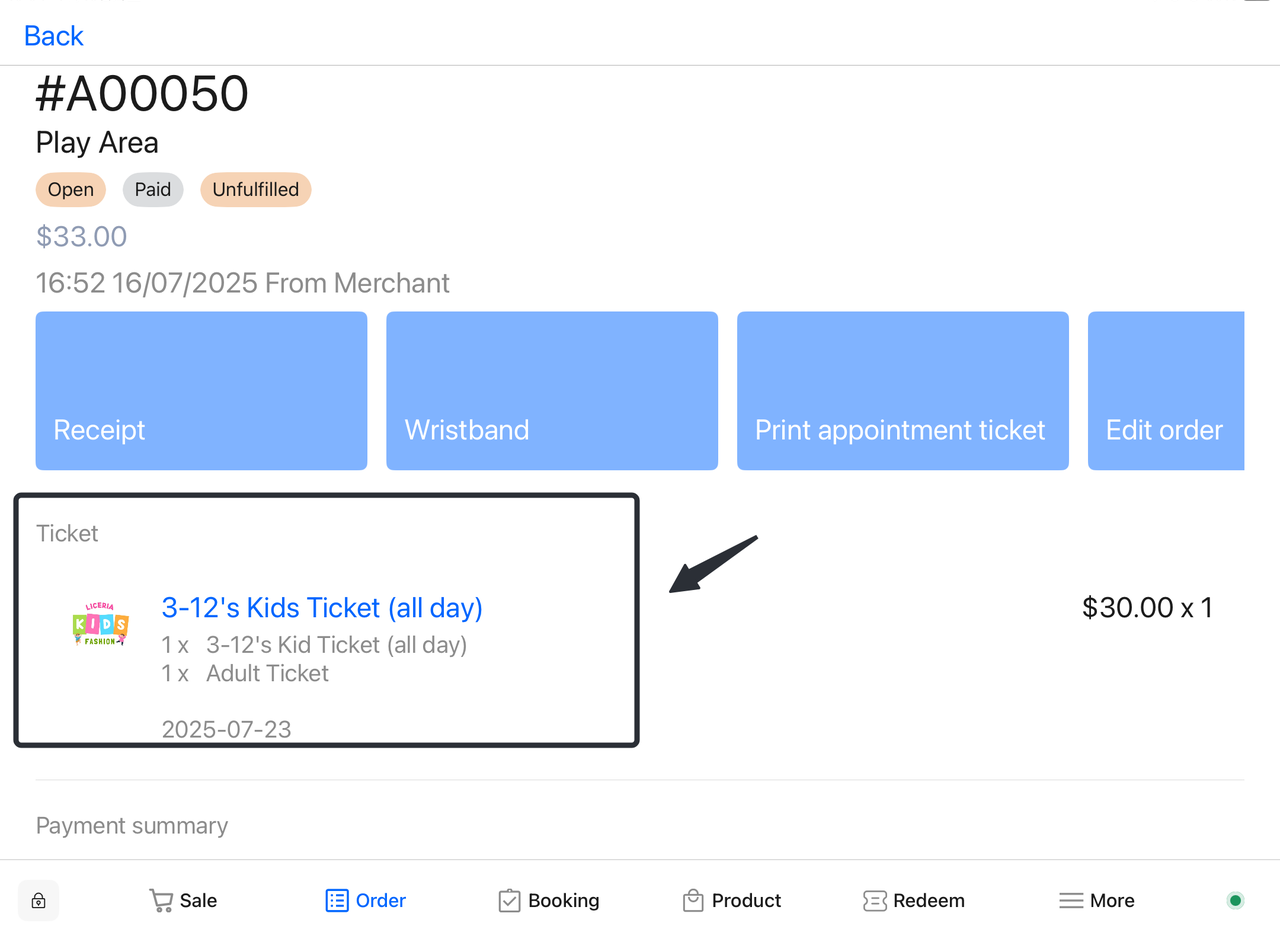
e. View Order Information: Once clicked, the system will link to the details page of the order, where you can view all the relevant information about the order.
4.1.2 Appointment interface
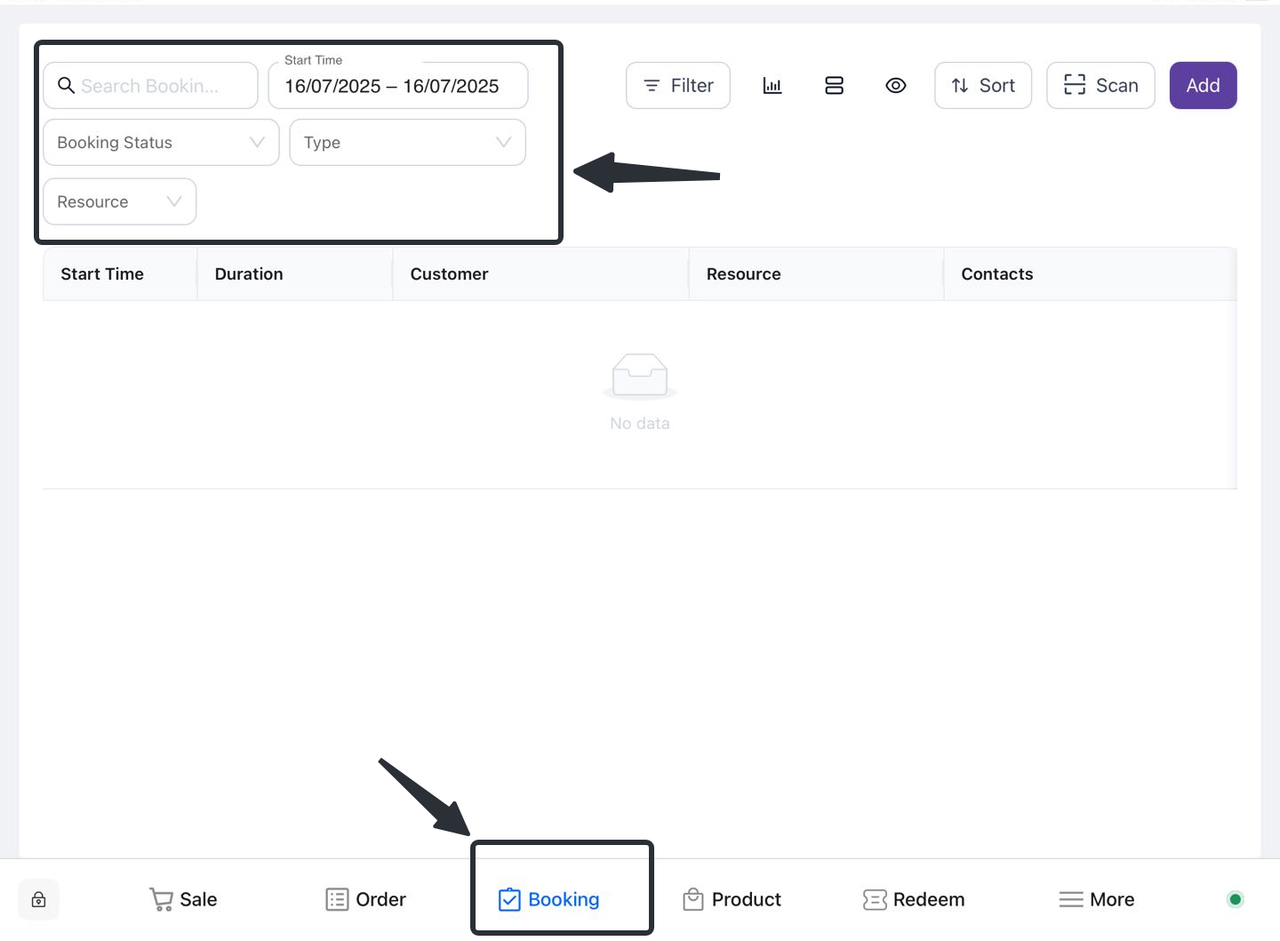
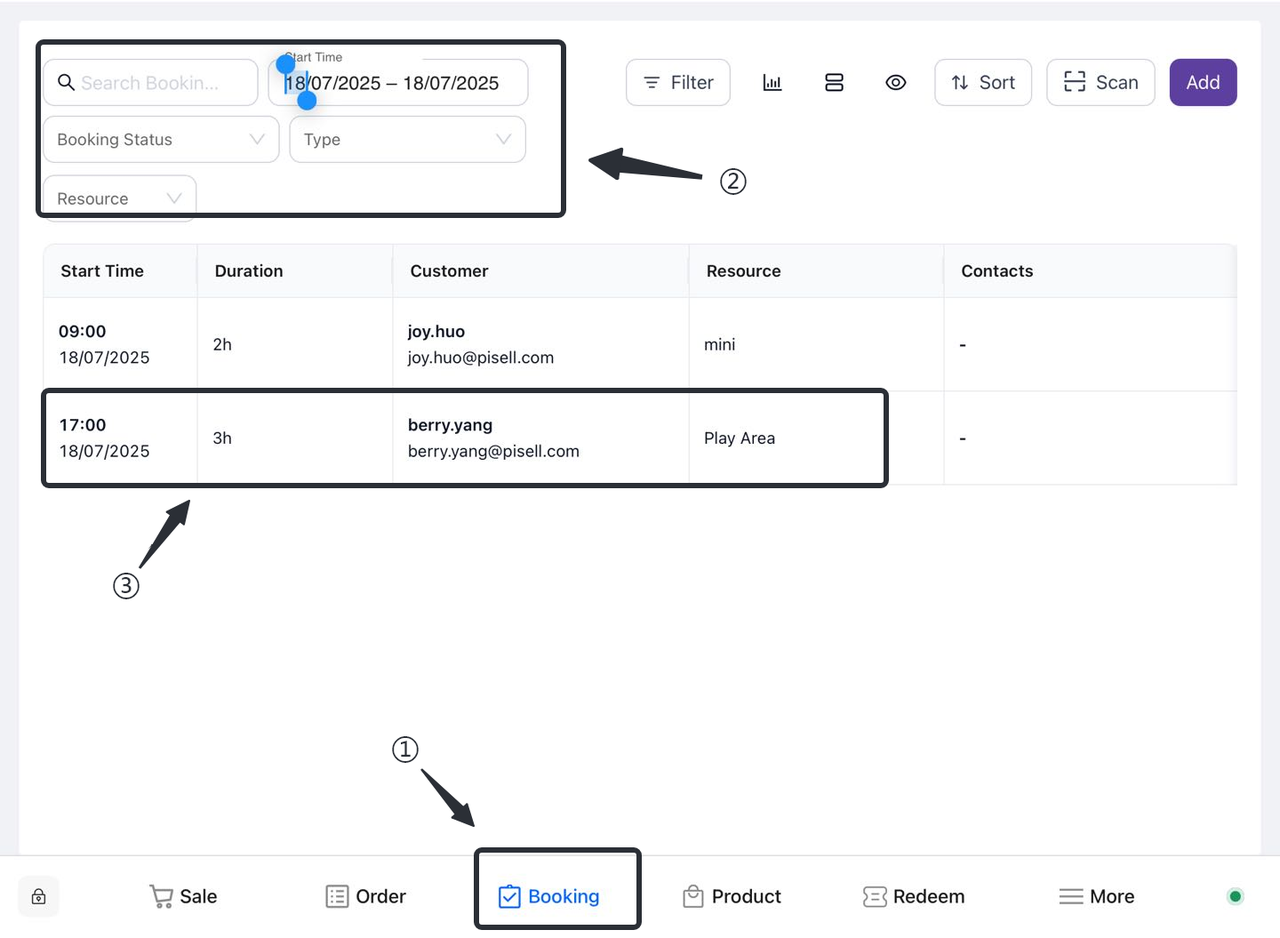
Method 1: Filter orders based on customer information
-
-
Click to open the "Appointment" screen.
-
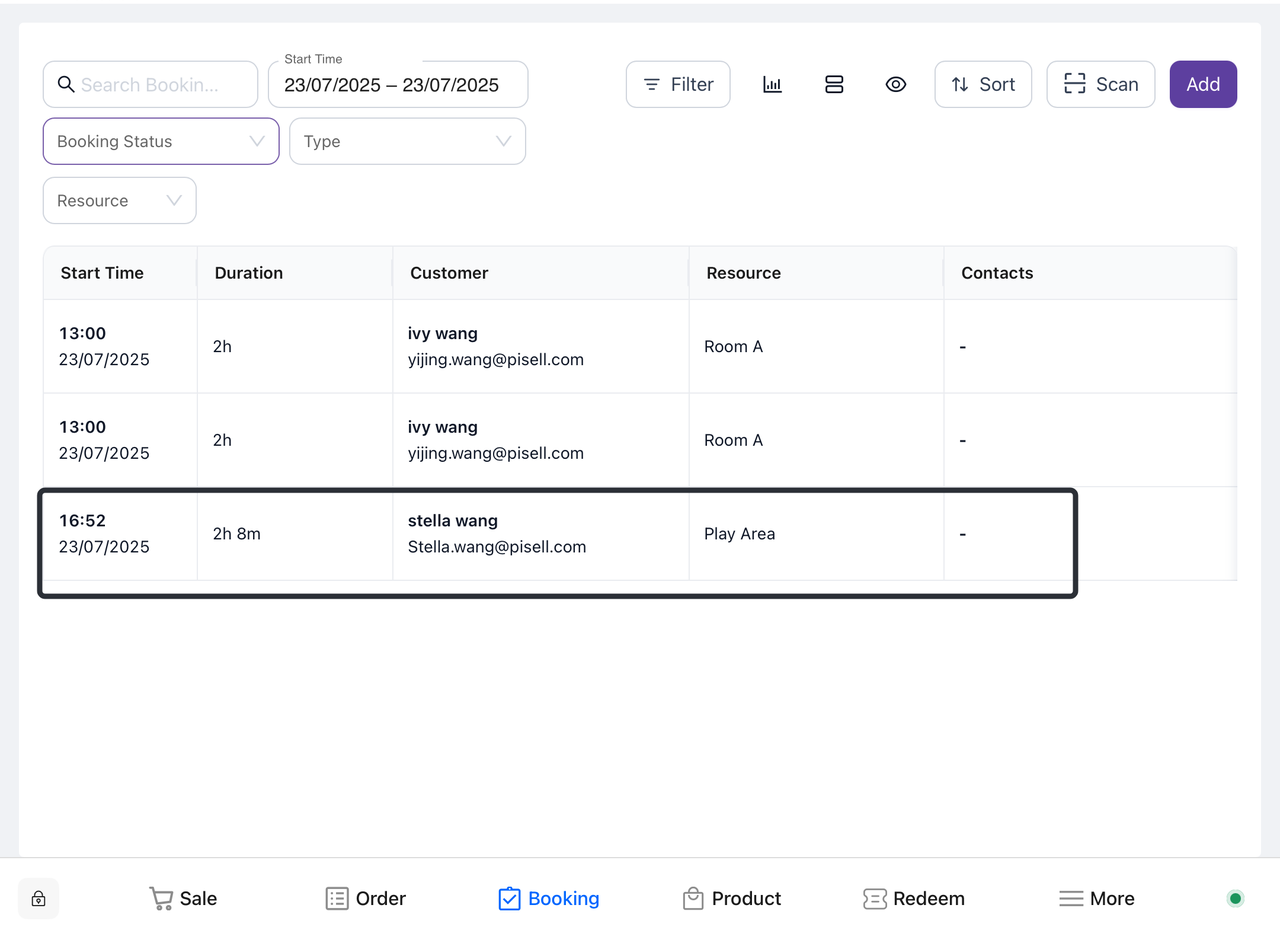
Enter relevant information such as order number, date, etc. to filter out specific orders.
-
Review the filter results and click on the corresponding order to see more details.
-
Method 2: Scan the bracelet to locate the order
-
-
Open the Terminal app: Launch the relevant Terminal app.
-
Enter the appointment interface: Find and click the "Reservation" option on the main interface to enter the appointment interface.
-
Select the scan function: In the appointment interface, find and click the "Scan" button to start the camera.
-
Align the bracelet: Point the mobile phone camera at the corresponding bracelet, ensure that the QR code or barcode on the bracelet is within the camera's field of view, and it will be bound to the corresponding order after successful scanning.
-

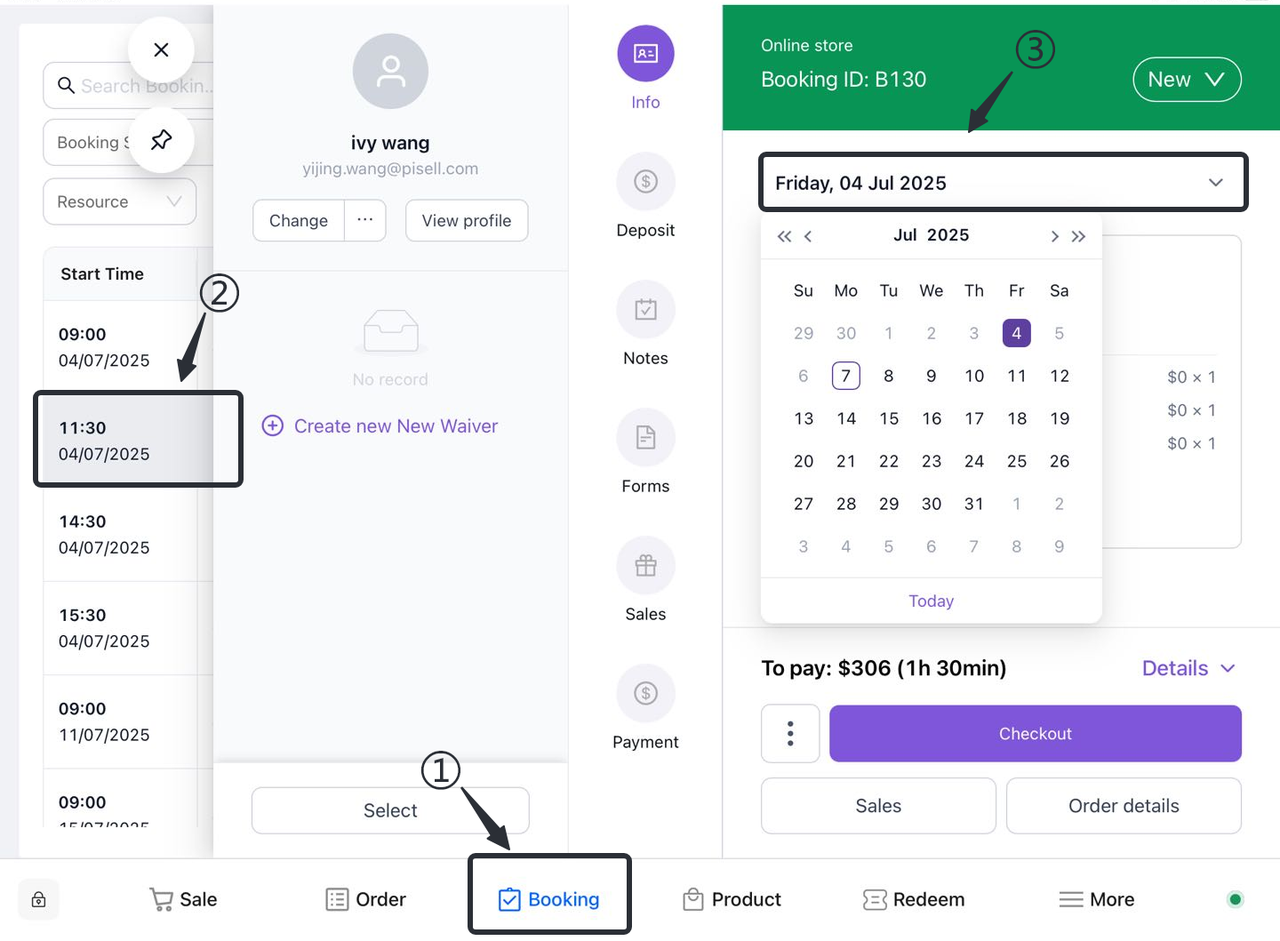
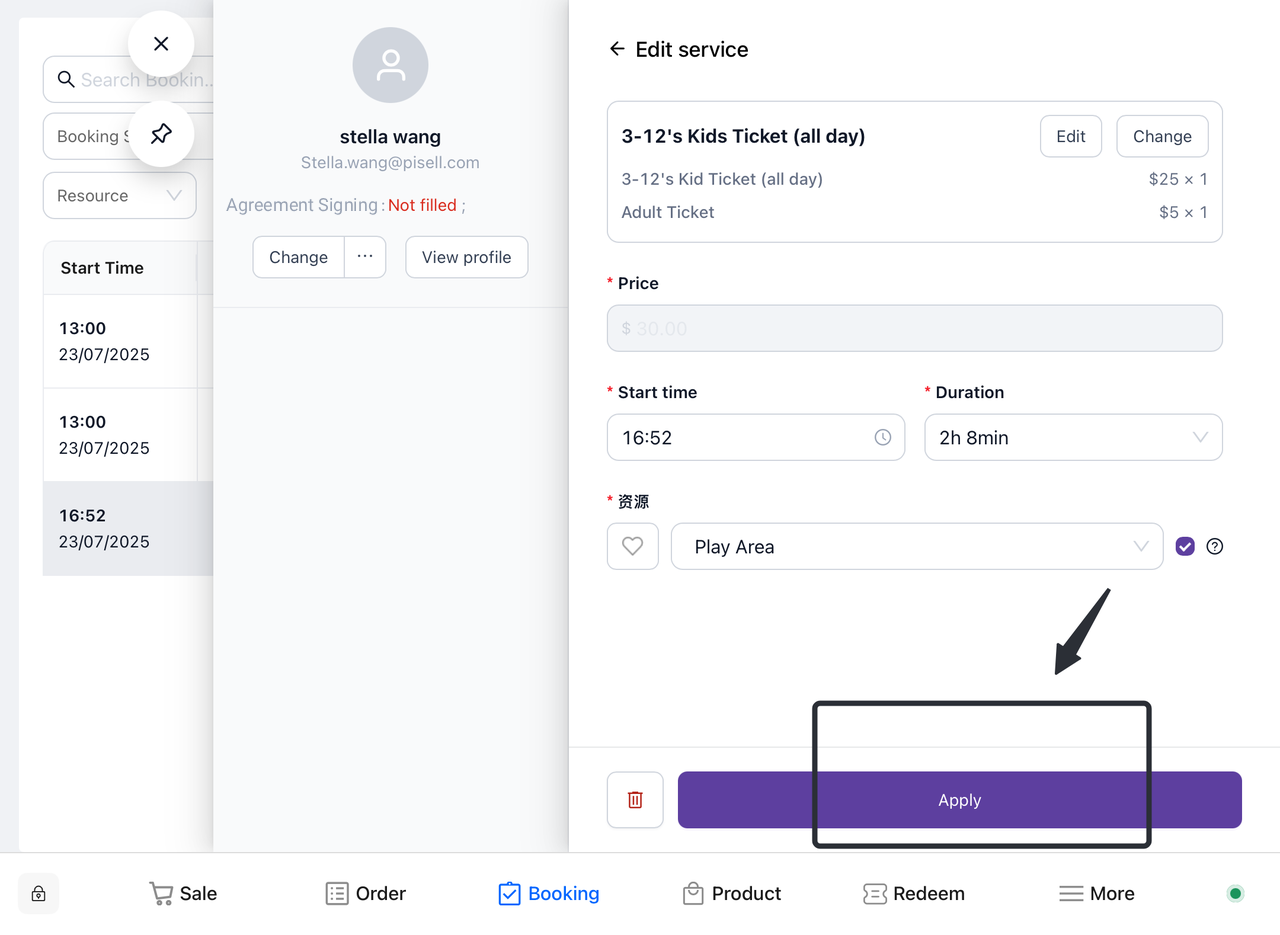
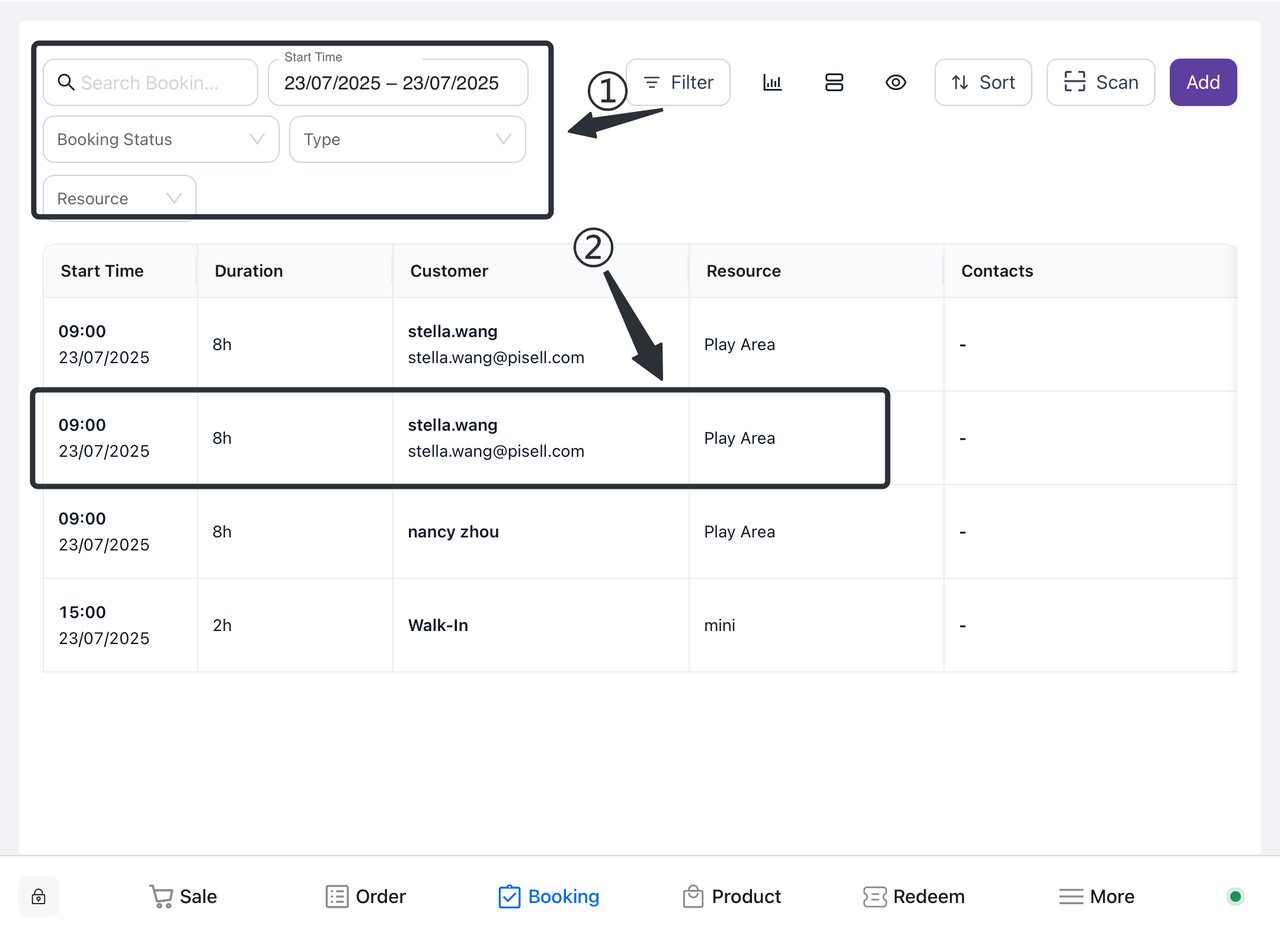
4.2 How do I modify the time and date of my order?
① Click to open the "Appointment" screen.
② Find the order that needs to be modified for time and date.
Method 1: Filter orders based on customer information
-
-
Enter relevant information such as order number, date, etc. to filter out specific orders.
-
Review the filter results to confirm the details of the selected order.
-

Method 2: Scan the customer bracelet information to lock the order
-
-
Open the Terminal app: Launch the relevant Terminal app.
-
Enter the appointment interface: Find and click the "Reservation" option on the main interface to enter the appointment interface.
-
Select the scan function: In the appointment interface, find and click the "Scan" button to start the camera.
-
Align the bracelet: Point the mobile phone camera at the corresponding bracelet, ensure that the QR code or barcode on the bracelet is within the camera's field of view, and it will be bound to the corresponding order after successful scanning.
-


③ In the pop-up right reservation interface, click the corresponding time.
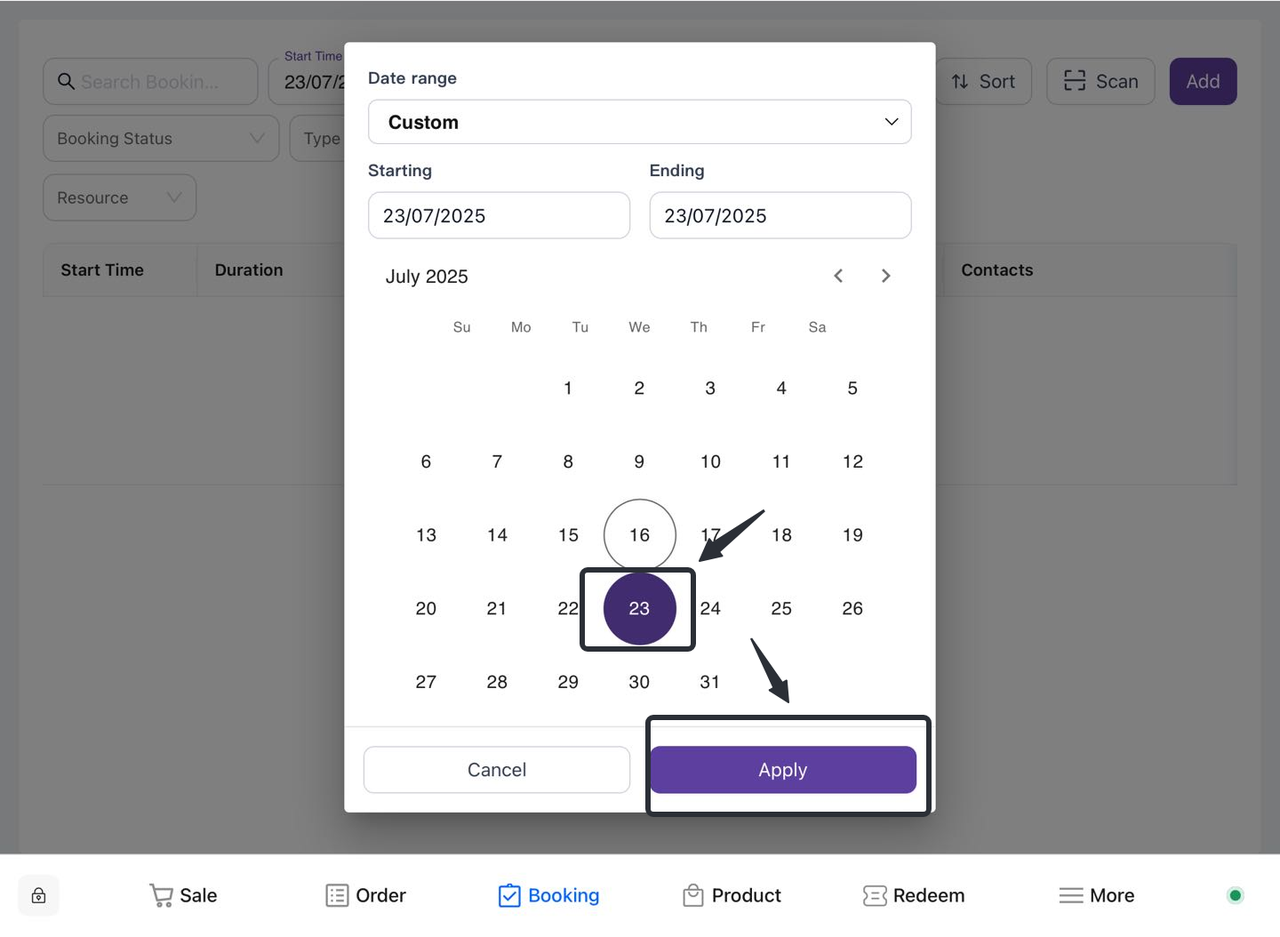
④ Select the date you want to modify.
⑤ Click "Save" to confirm your changes.
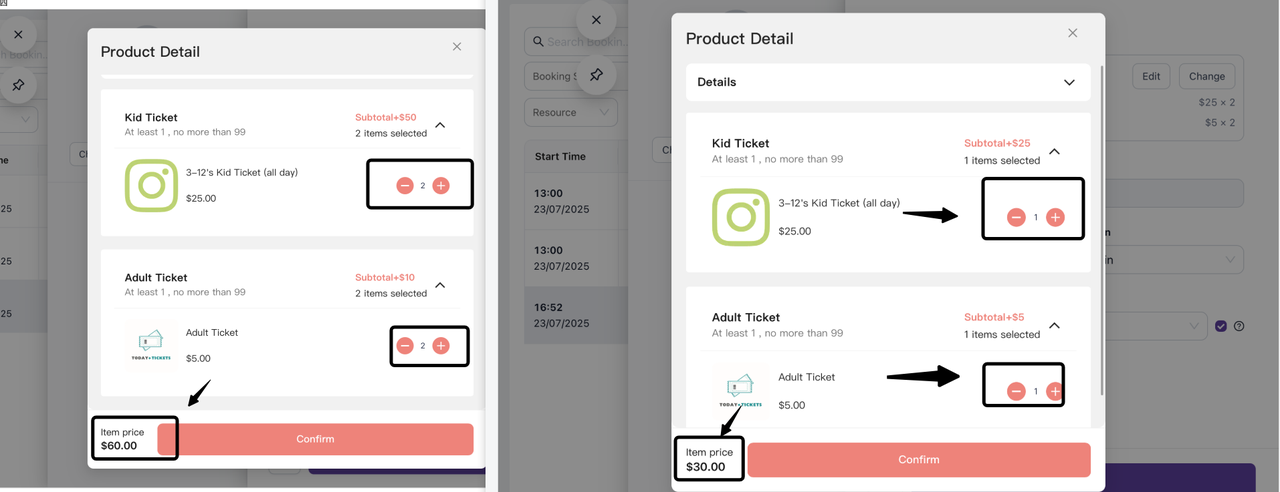
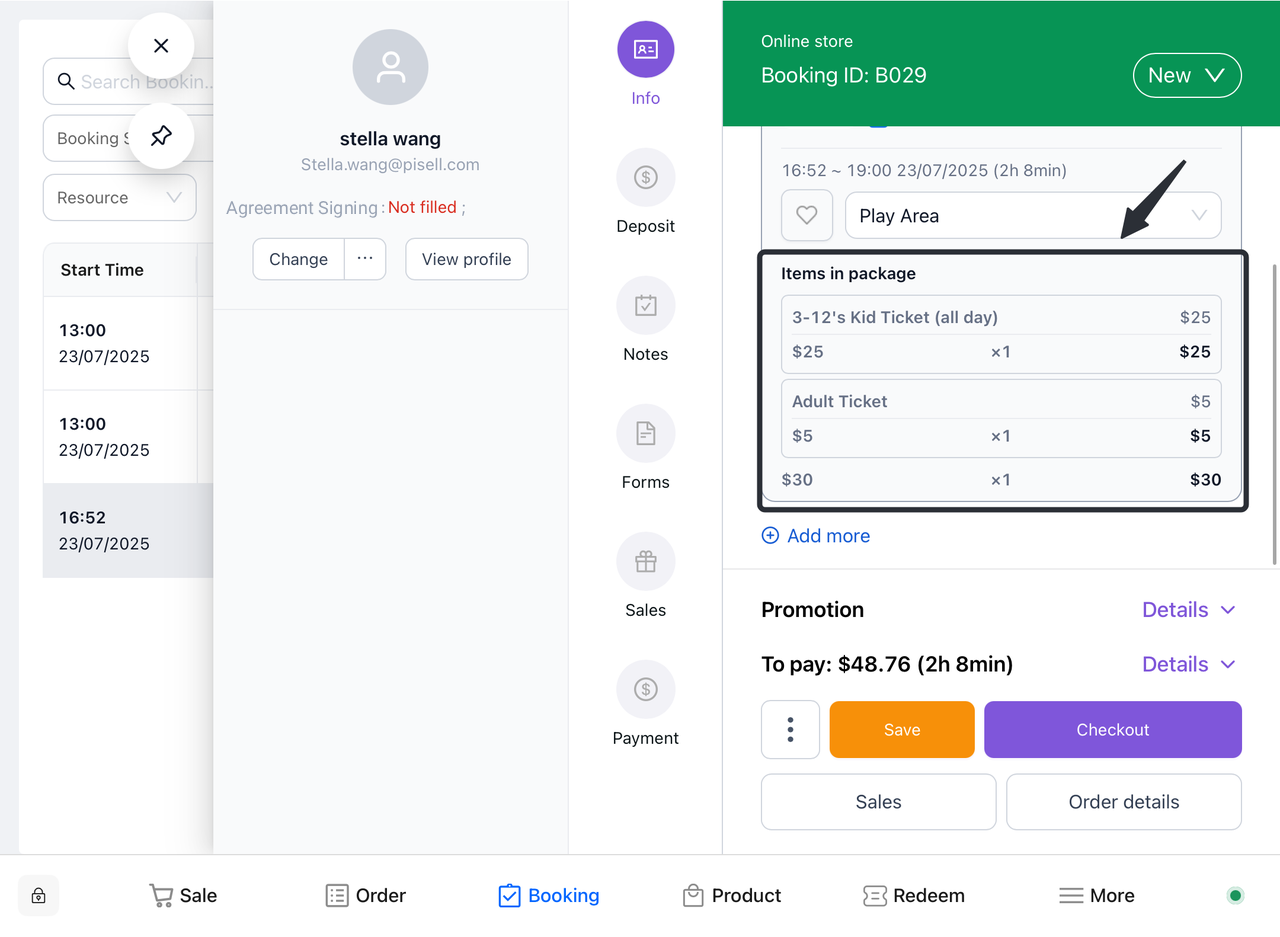
4.3 How do I add an order to a ticket order?
4.3.1 Add tickets to the original order
① Click to open the "Appointment" screen
② Find the order that needs a ticket increase.
Method 1: Filter orders based on customer information
-
-
Enter relevant information such as order number, date, etc. to filter out specific orders .
-
Review the filter results to confirm the details of the selected order.
-
Method 2: Scan the customer bracelet information to lock the order
-
-
Open the Terminal app: Launch the relevant Terminal app.
-
Enter the appointment interface: Find and click the "Reservation" option on the main interface to enter the appointment interface.
-
Select the scan function: In the appointment interface, find and click the "Scan" button to start the camera.
-
Align the bracelet: Point the mobile phone camera at the corresponding bracelet, ensure that the QR code or barcode on the bracelet is within the camera's field of view, and it will be bound to the corresponding order after successful scanning
-


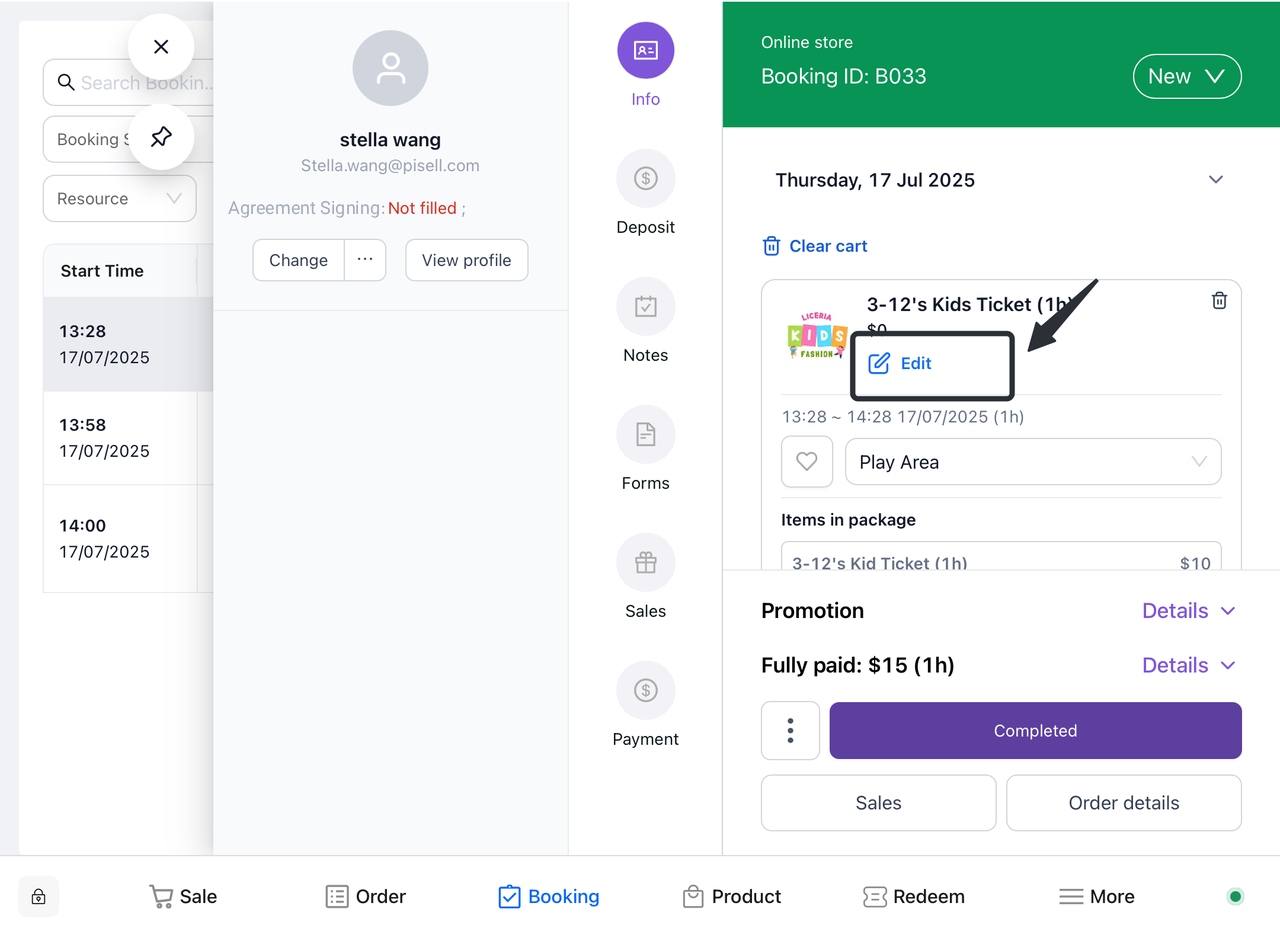
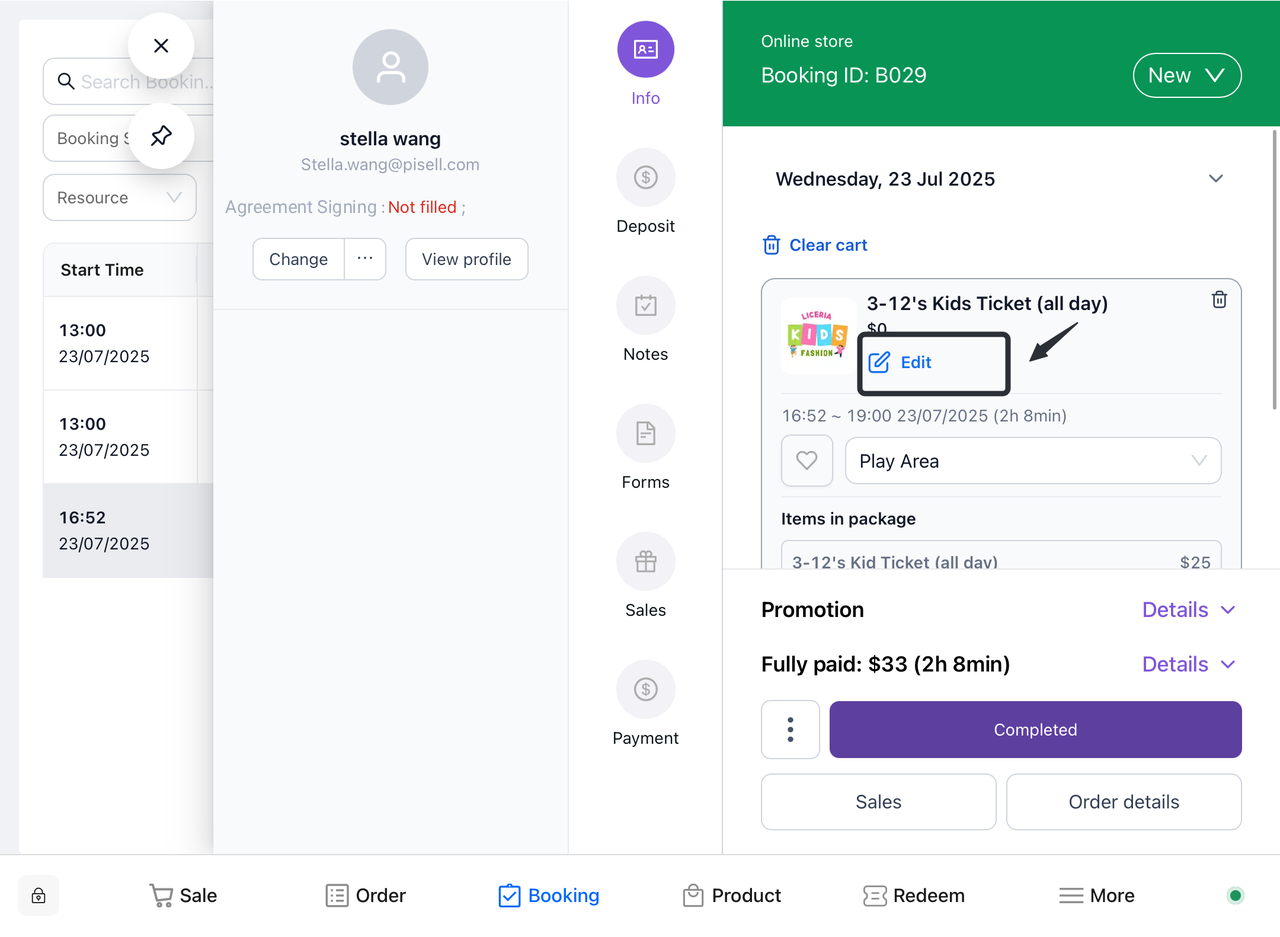
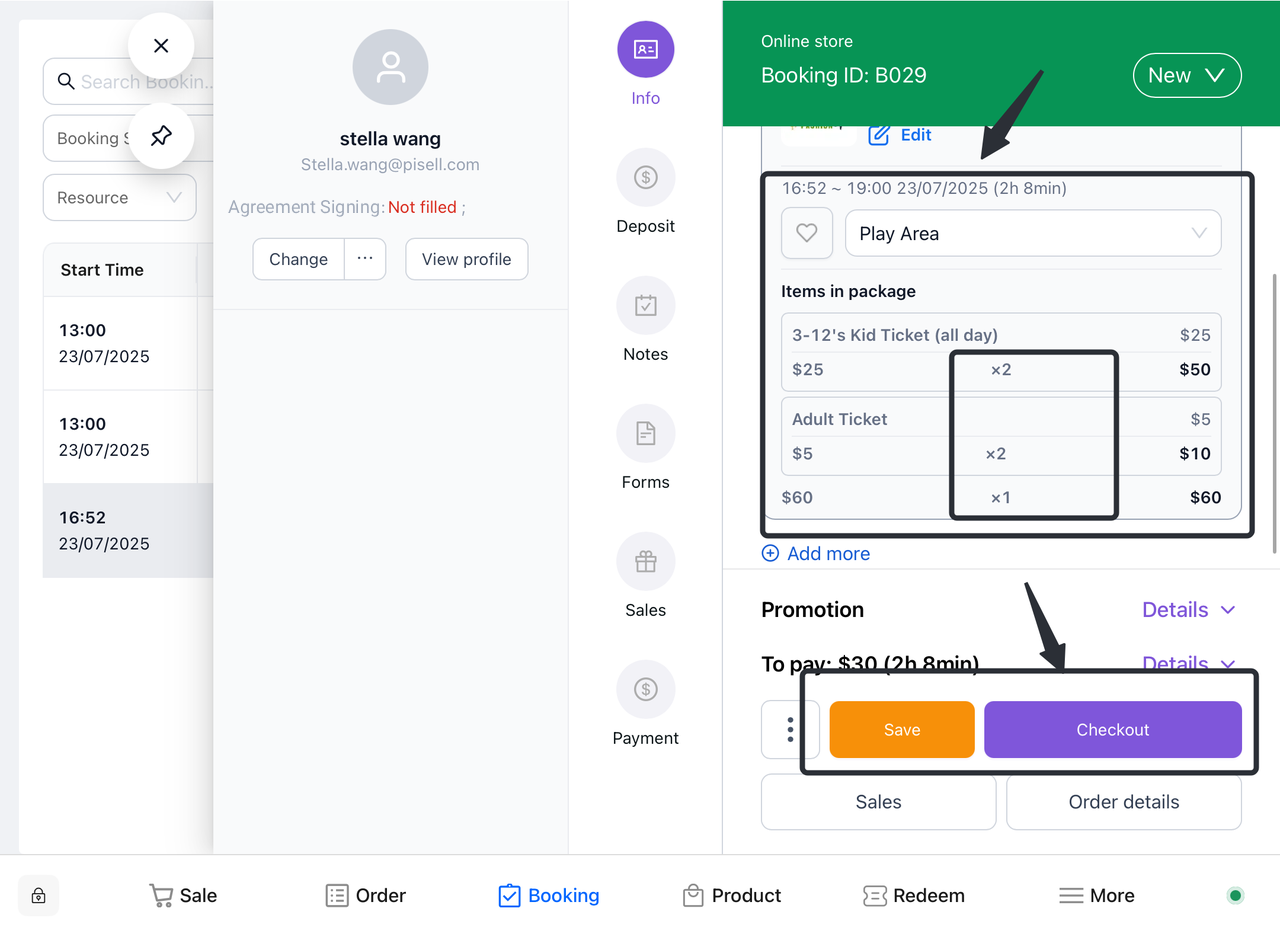
③ Click on the order that requires a ticket increase.
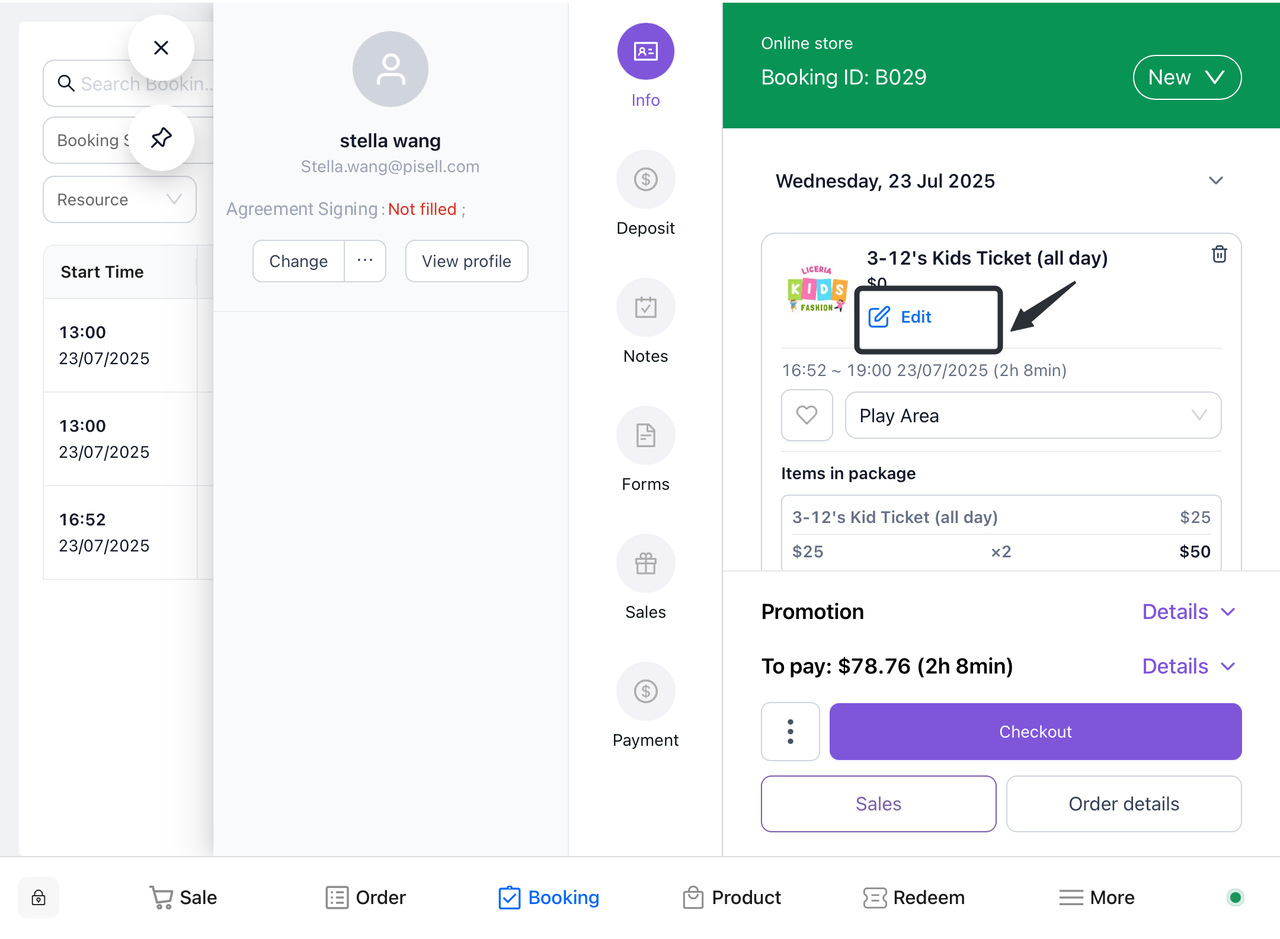
1. Click Edit
-
- On the order information page, the user finds and clicks the "Edit" button.
2. Jump to the product selection page
-
- The system will automatically jump to the product purchase page, displaying a list of ticket products to choose from.
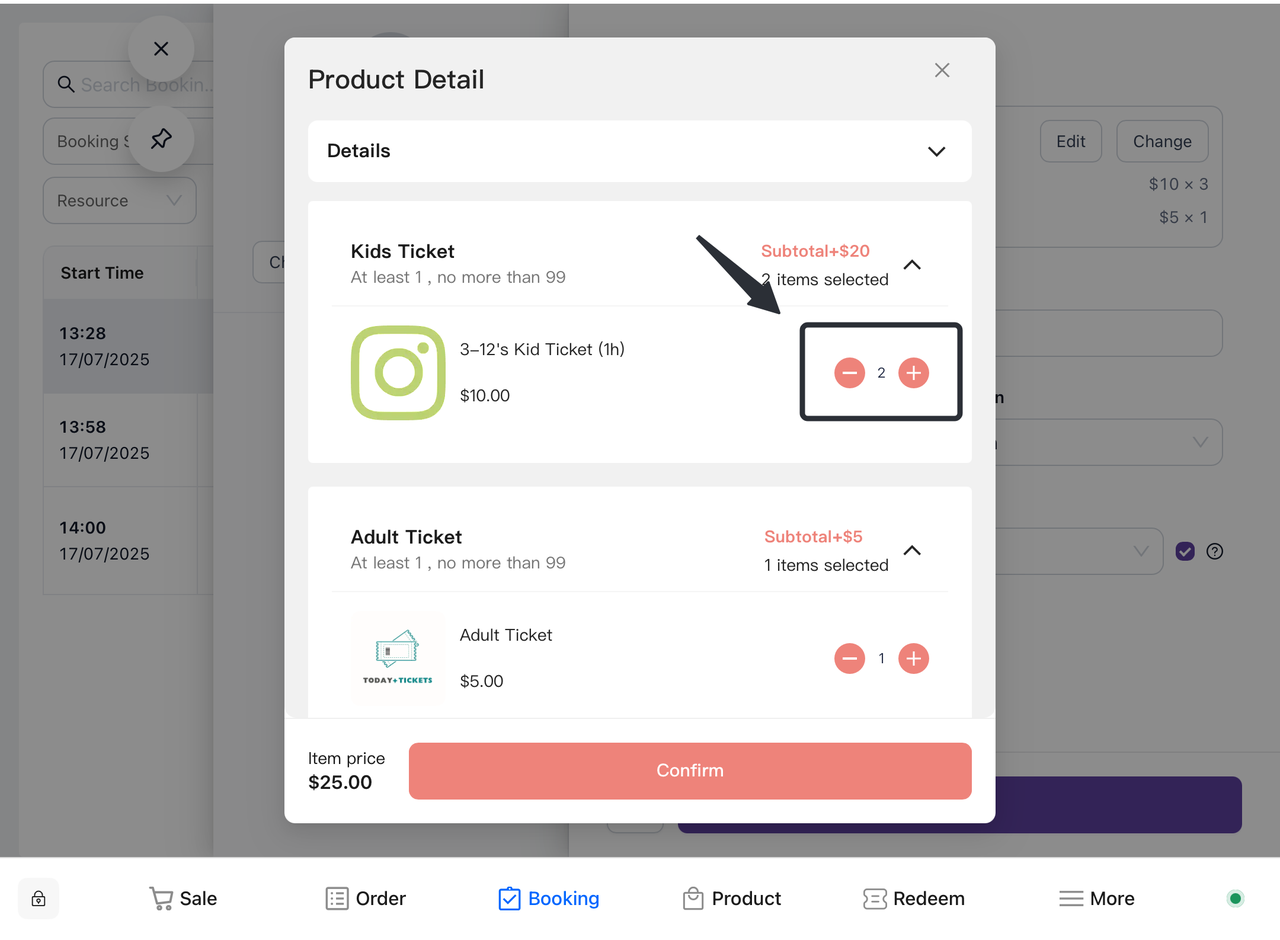
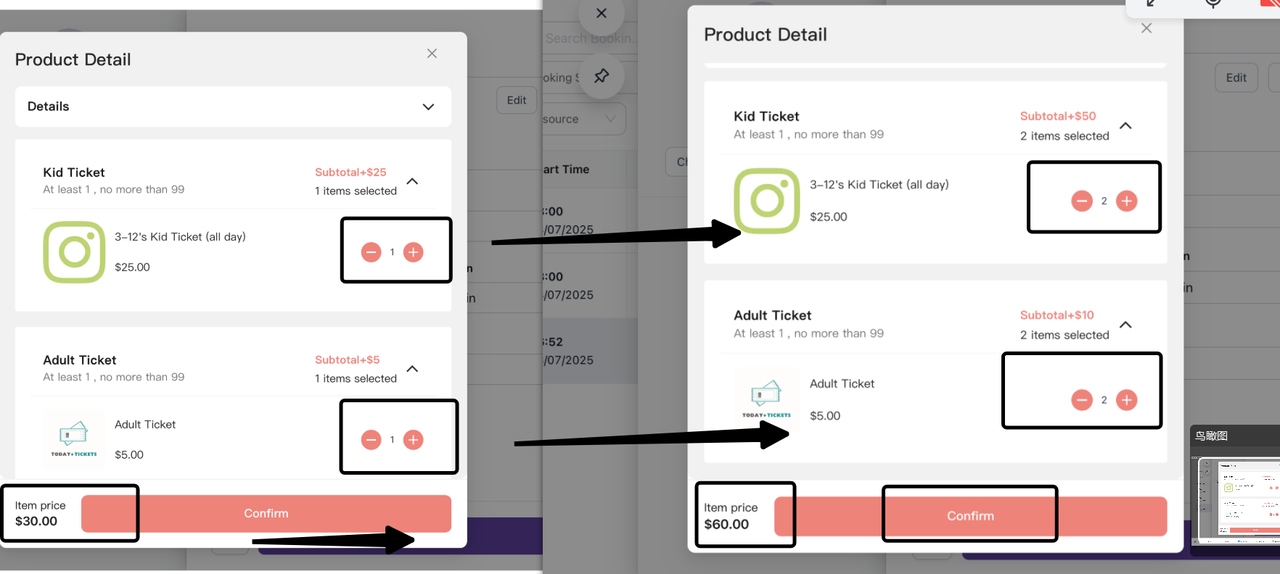
3. Select Add Ticket Item
-
- Users browse the product list and select the ticket products that need to be added.
4. Automatically calculate prices
-
- The system automatically calculates the price of new tickets based on the ticket products selected by the user, and updates and displays them in real time on the page.
5. Click Confirm
-
- After the user confirms their selection, click the "Confirm" button.
6. Update your order details
-
- The system will update the new ticket products and their prices to the order details.
7. Select Checkout or Save
-
-
On the updated order details page, users can choose:
-
-
-
Click "Checkout" to pay.
-
Click "Save" to temporarily save the order and work on it later.
-
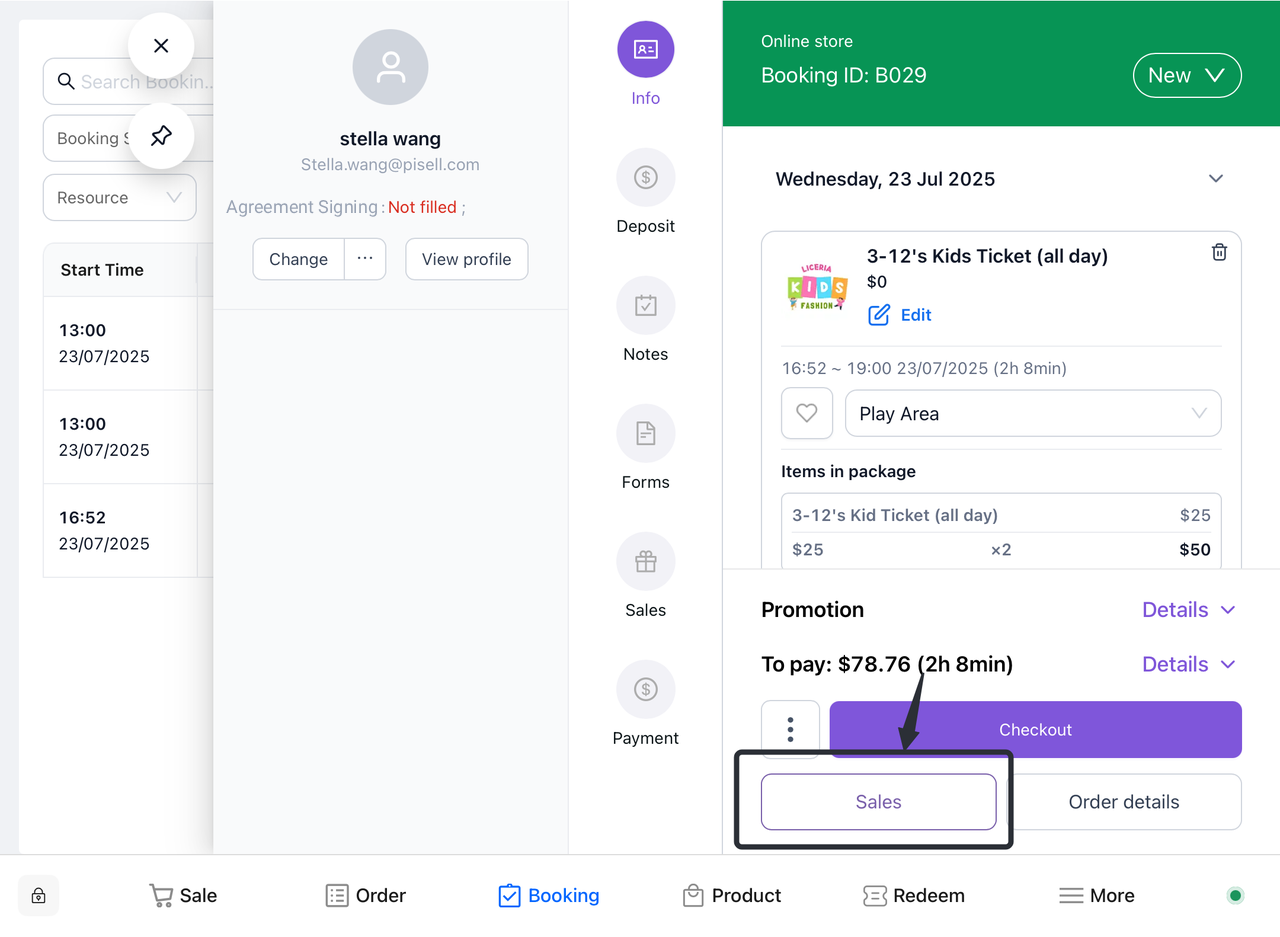
4.3.2 Retail goods on the basis of the original order
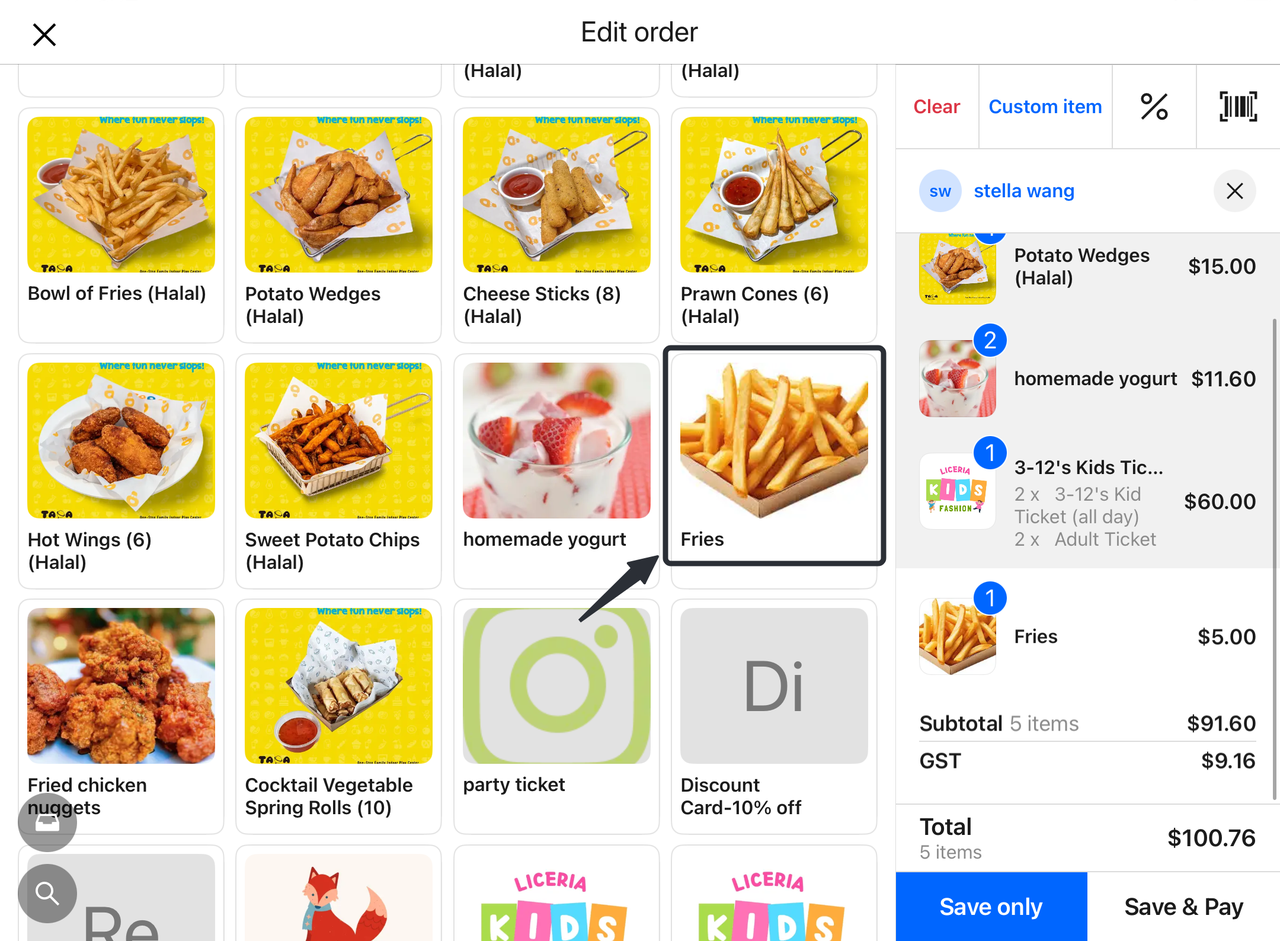
1. Select Orders
-
- Click the order for which you want to add retail items.
2. Go to the sales page
-
-
On the order page, click on the "Sell" option.
-
The system automatically redirects to the retail page.
-

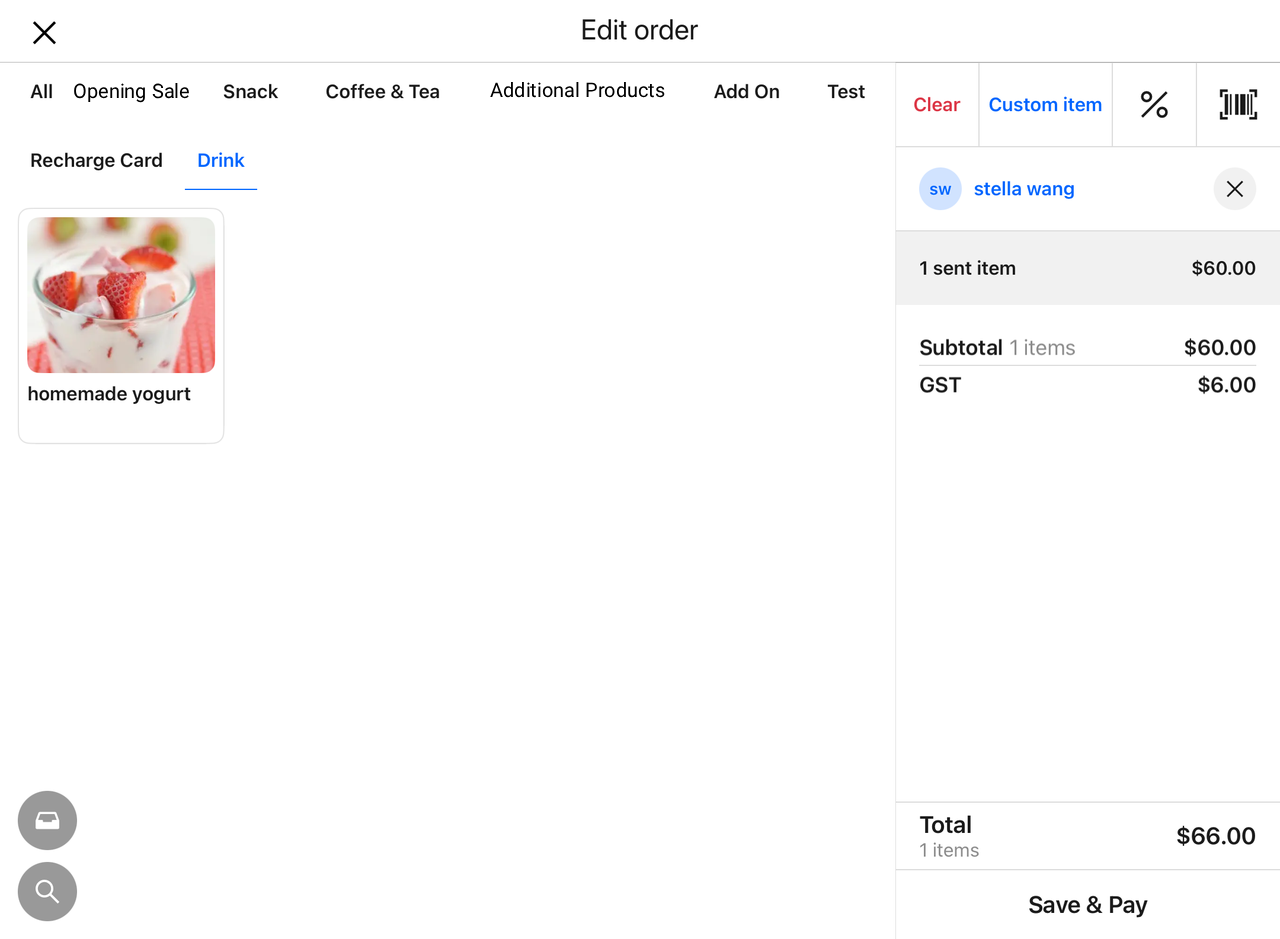
3. Select Retail Items
-
- On the Retail page, select the desired retail item for the customer.
4. Complete add-ons
-
- When you've finished selecting your products, select one of the following options:
-
-
- "Save Only"
- "Save and Pay"
-
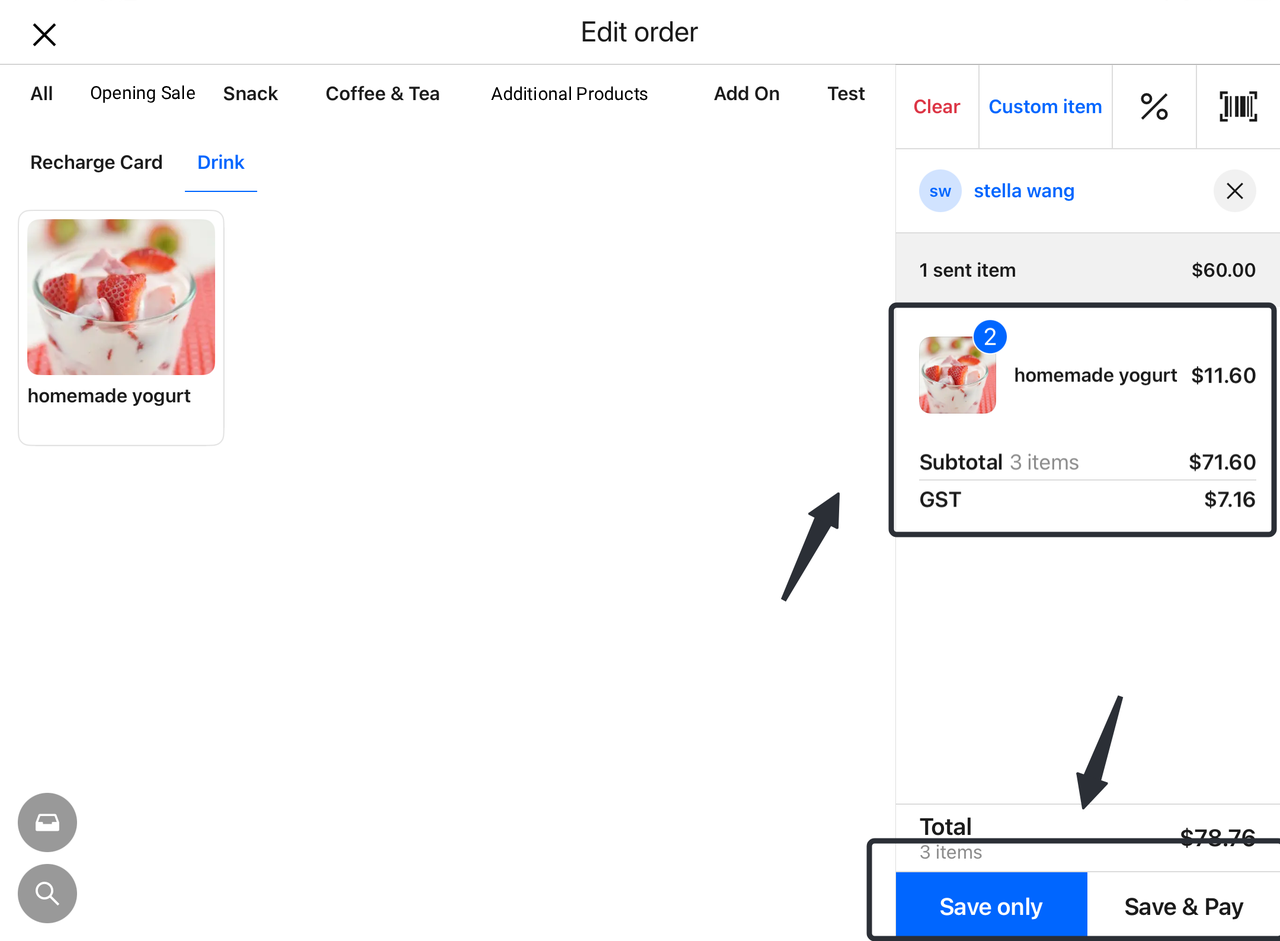
5. The amount is updated automatically
-
- The corresponding retail order amount will be automatically added to the corresponding ticket order.
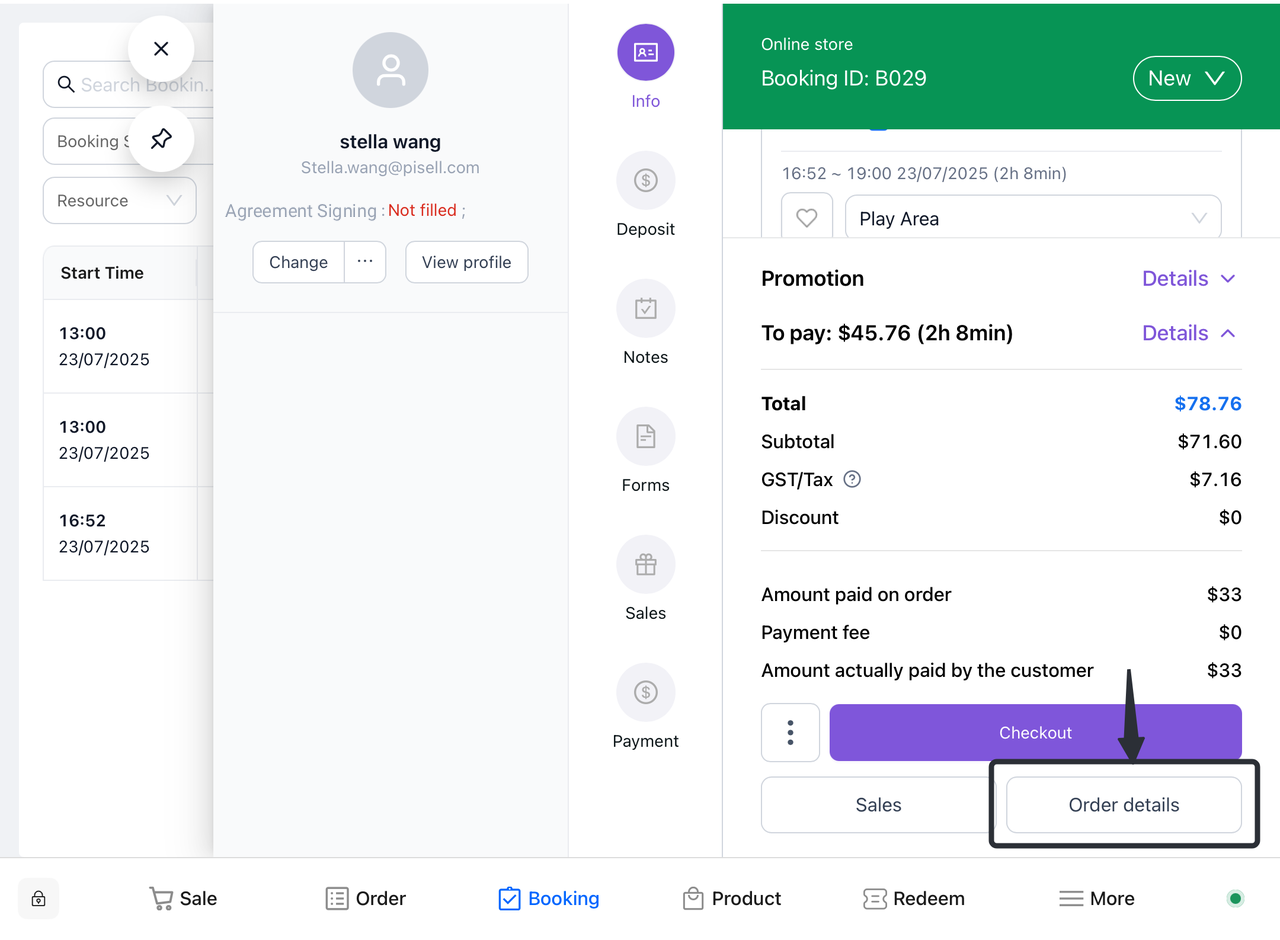
6. View order details
-
- Click on "Order Details" to view the details of the add-on.
4.3.3 Replace the original product on the basis of the original order
a. Replace the original ticket product
- Find your order
-
-
On the user homepage, find the "My Orders" or "Manage Orders" option
-
Browse the list of orders to target the order that needs to be replaced
-
- Edit the order
-
- Click the "Edit" button next to the order to enter the order editing page.
- Jump to the product shopping list
-
- On the order edit page, click the "Replacement Product" or "Ticket Product Purchase" link to jump to the ticket product purchase list.
- Delete the original ticket products
-
-
In the product purchase list, find the original ticket product.
-
According to actual needs, select the original ticket product that needs to be deleted and click the "-" button.
-
- Purchase additional replacements
-
-
In the product selection list, browse the available replacement products.
-
Select the replacement item that needs to be added, and click the "Add Purchase" or "Add to Order" button.
-
- Confirm the replacement
-
-
Confirm the changes made, including the original product that was deleted and the replacement product that was added.
-
Click the "Apply" button.
-
- The system calculates the difference
-
-
The system automatically calculates the difference between the replacement product and the original product.
-
Displays the updated order amount and replacement listing.
-
- Pay the difference (if any)
-
-
If there is a difference, the user pays according to the prompts.
-
Select a payment method and complete the payment.
-
- Order updates
-
-
The system updates the order status and product information.
-
Users can view the updated order details in Orders.
-
b. Replace retail products
- Find your order
-
- You can filter in the "Booking Screen" or scan the customer bracelet to locate the order that needs to be modified.
- Go to the sales page
-
- Click the "Sell" button below the order, and the system will automatically jump to the retail page.
- Open the cart
-
-
On the retail page, find the shopping cart section.
-
Click Open the collapsed item in your cart to see a list of items in your current order.
-

- Select Replace product
-
-
In the shopping cart, find the item that needs to be replaced.
-
Click the "-" button to modify the quantity of the product and reduce it to 0 to delete the product.
-
- Purchase additional target products
-
-
On the Retail page, browse the list of optional products and select the replacement items that need to be added.
-
Click the "Add to Cart" button to add the target item to the cart.
-
- The system calculates the difference
-
-
The system automatically calculates the difference between the replacement product and the original product.
-
The updated settlement amount will be displayed in the shopping cart.
-
- Save or pay
-
-
Users can select "Save" to save their modifications, or "Save and Pay" to complete the payment.
-
If you choose to pay, follow the prompts to complete the payment process.
-
- View the operation log
- After the modification is completed, the user can view the corresponding operation records in the order details to confirm the replacement product and the amount change.
4.4 How do I associate or modify a customer?
① Click to open the "Appointment" screen.
② Click to select the order you want to modify for the associated customer.
③ Select "Change Customer" in the pop-up reservation screen on the right.
④ You can choose to recreate new customer information for the order or relink existing customer information.
⑤ Click "Save" to confirm the modification.
5. Bracelet Management
5.1 How do I scan the bracelet to find the corresponding order?
- Open the app:
-
- Launch the relevant appointment application.
- Go to the appointment interface:
-
- Find and click the "Appointment" option on the main interface to enter the appointment interface.
- Select the scan function:
-
- In the appointment interface, find and click the "Scan" button to start the camera.
- Align the bracelet:
-
- Point the mobile phone camera at the corresponding bracelet, make sure that the QR code or barcode on the bracelet is within the camera's field of view, and it will be bound to the corresponding order after successful scanning.


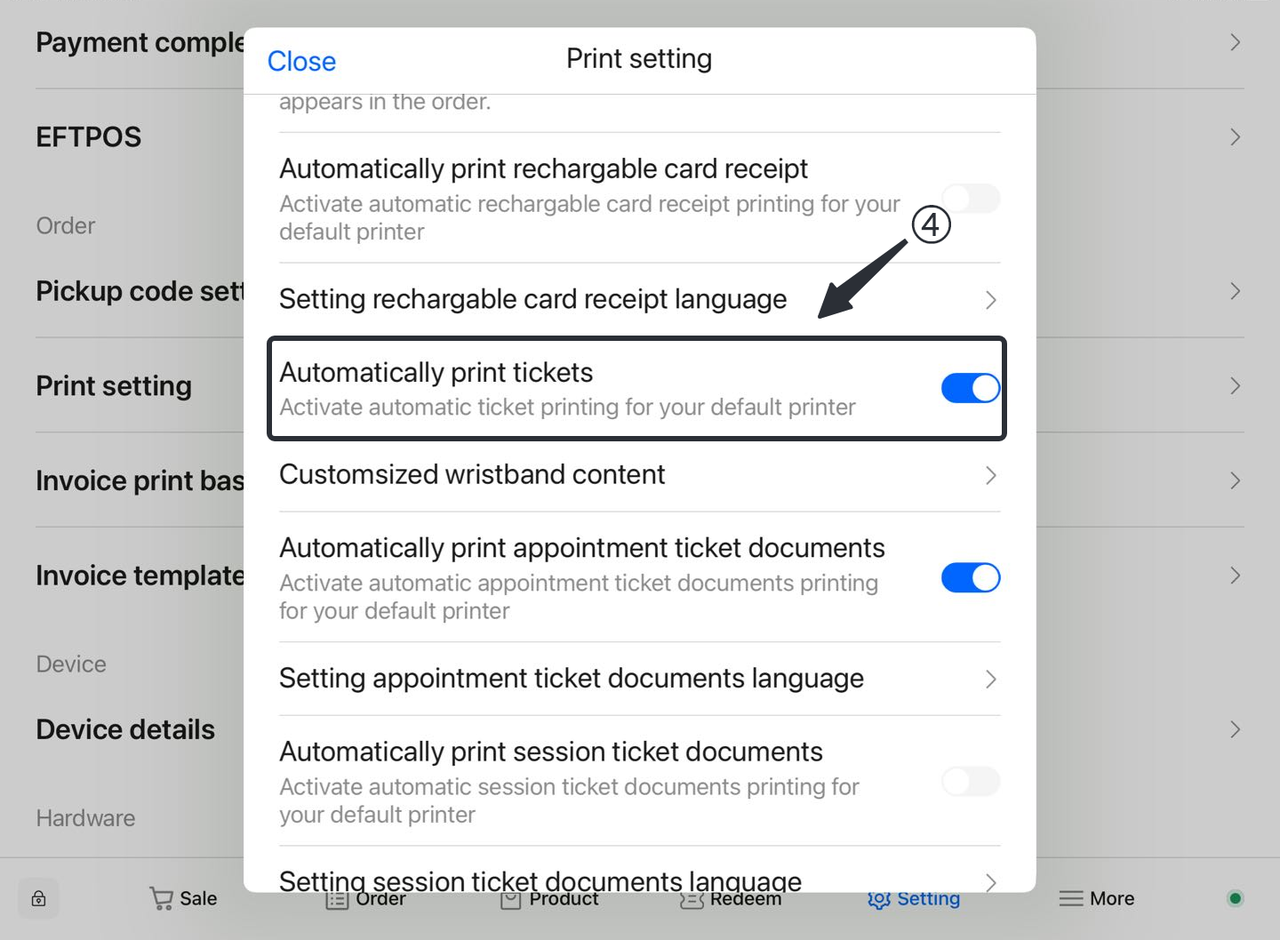
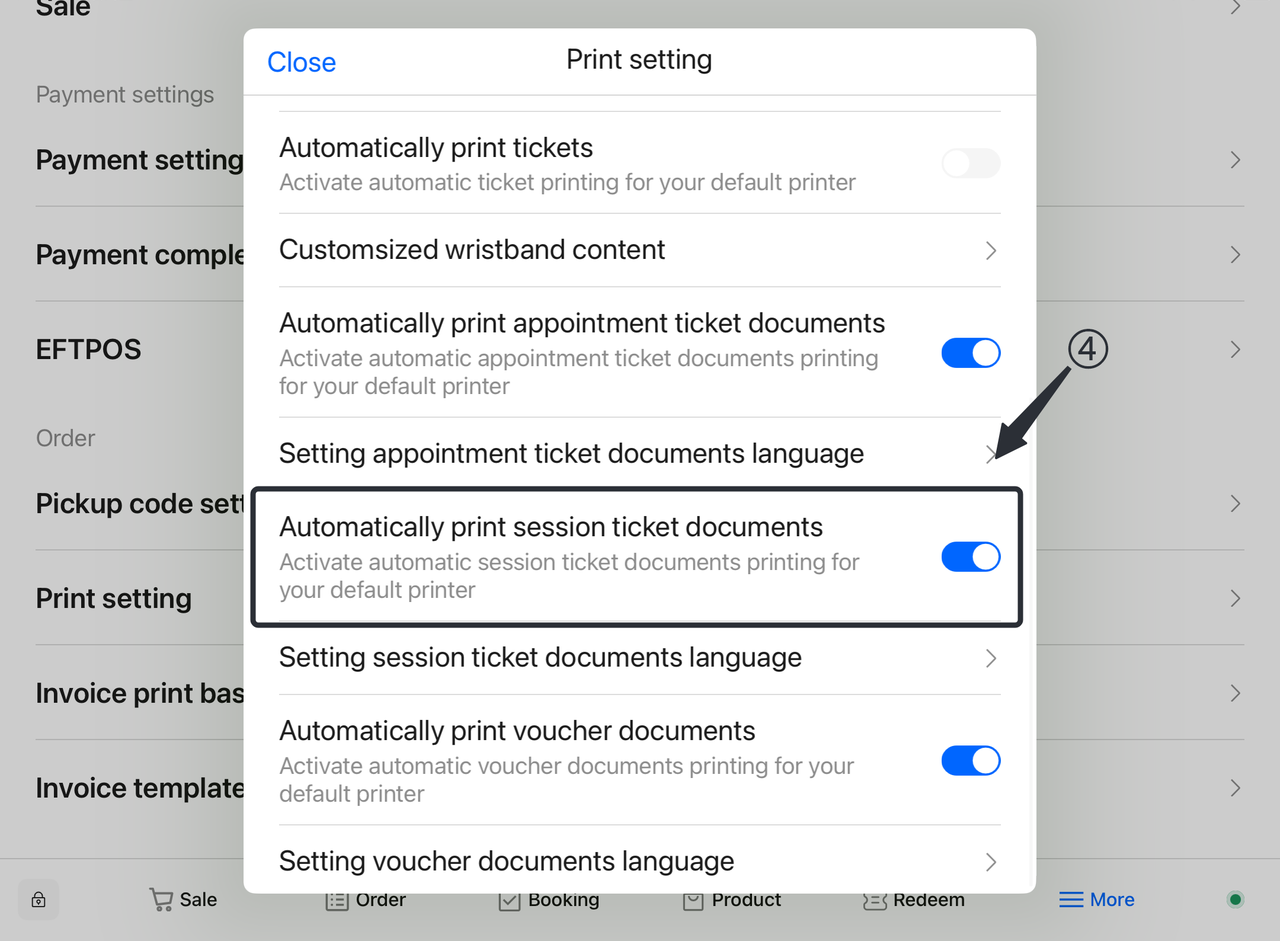
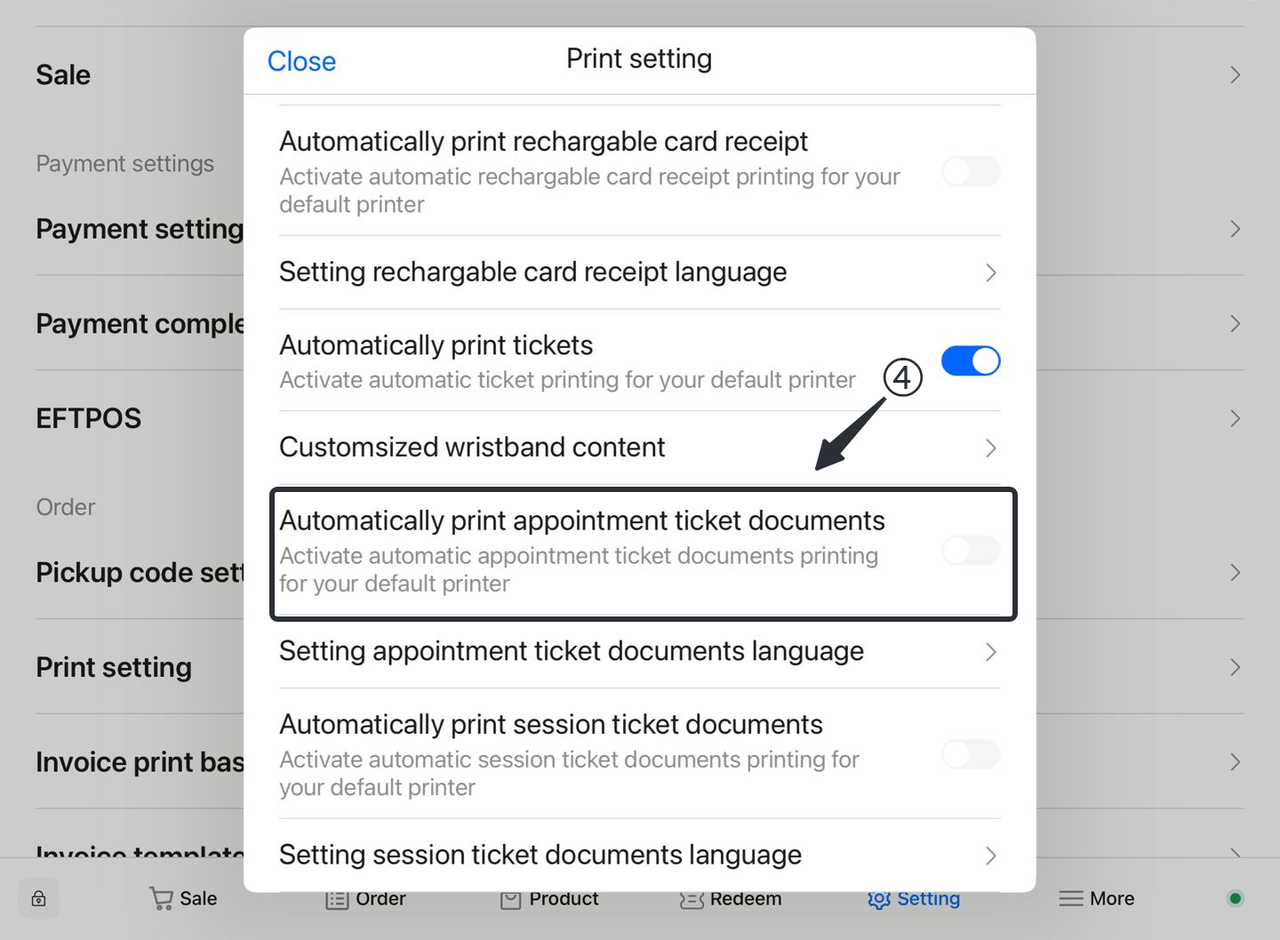
5.2 Print the settings of the bracelet
5.2.1 Is it printed automatically?
- Open terminal:
-
- Launch the Terminal app.
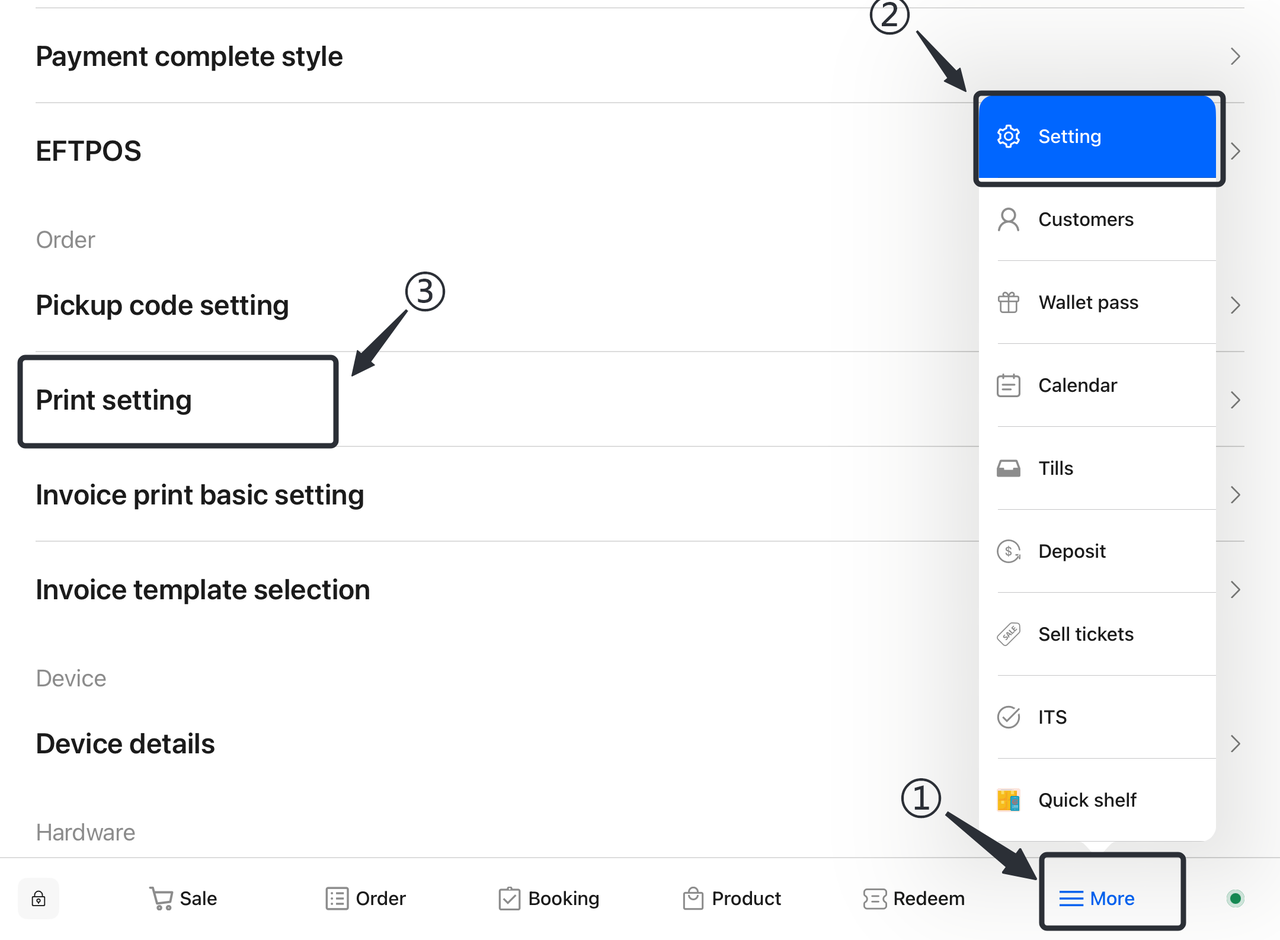
- Select More:
-
- In the Terminal interface, find and tap on the "More" option, and in the "More" menu, select and tap on the "Settings" option.
- Select Print Settings:
-
- In the settings interface, scroll down to find and tap the "Print Settings" option.
- Turn on automatic printing:
-
- In the print settings, find the "Automatically print tickets" option and toggle the switch to "On".
After completing the above steps, the system will automatically print the reservation ticket bracelet.

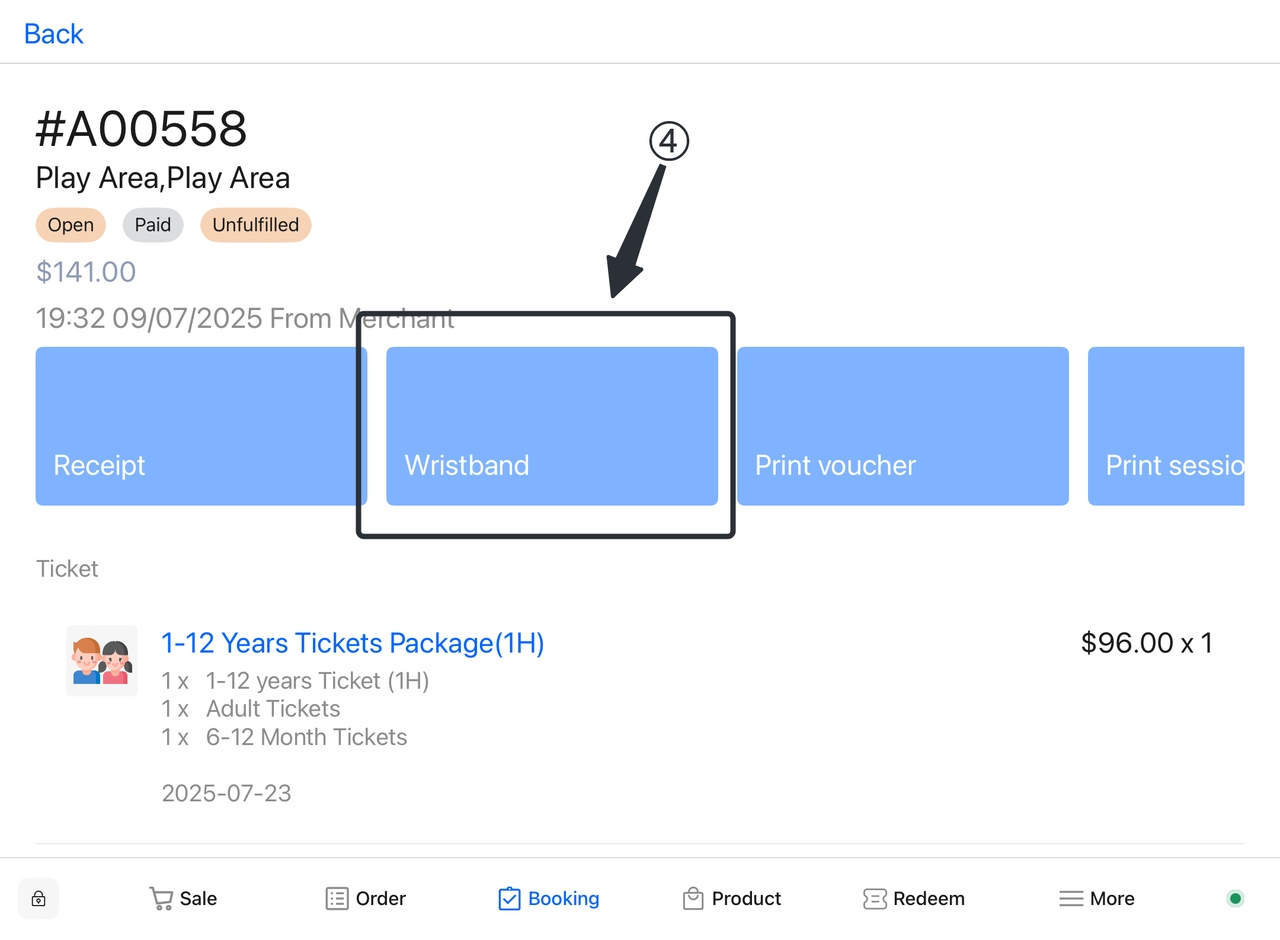
5.2.2 How do I reprint a bracelet?
① Open the reservation screen and filter according to the order information.
② Click to select the corresponding order.
③ Click to view order details.
④ On the order details page, click "Reprint Bracelet".
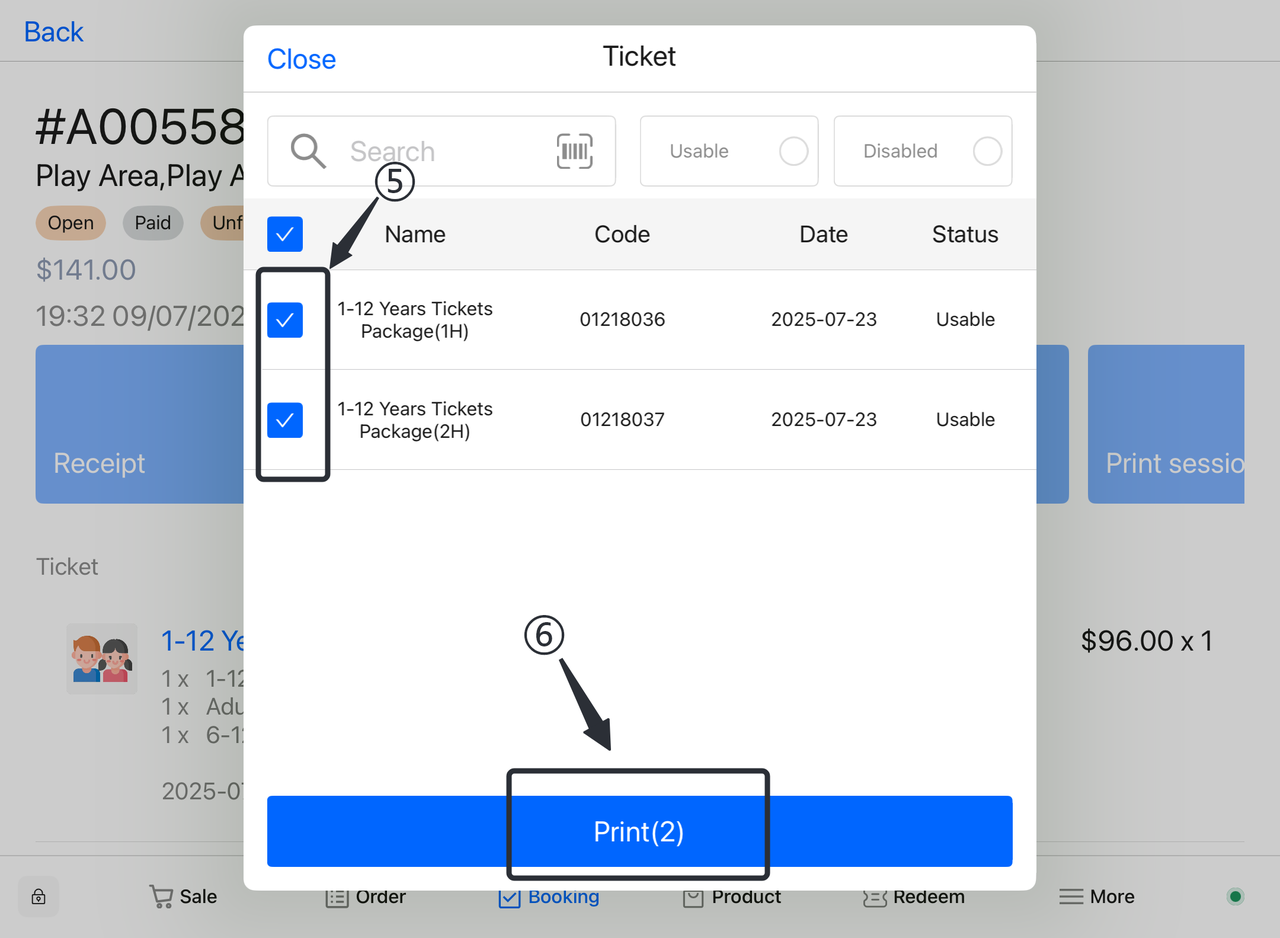
⑤ Select the ticket bracelet that needs to be reprinted.
⑥ Click "Print".
6. Receipt Management
6.1 How to open the receipt for printing ticket products?
- Open terminal:
-
- Launch the Terminal app.
- Launch the Terminal app.
- Select More:
-
- In the Terminal interface, find and tap on the "More" option, and in the "More" menu, select and tap on the "Settings" option.
- Select Print Settings:
-
- In the settings interface, scroll down to find and tap the "Print Settings" option.
- Turn on automatic printing:
-
- In the printing settings, find the "Automatically print reservation ticket receipts" option and toggle the switch to the "On" state.
After completing the above steps, the system will automatically print the reservation ticket bracelet.
6.2 How do I turn on the print bracelet?
- Open terminal:
-
- Launch the Terminal app.
- Select More:
-
- In the Terminal interface, find and tap on the "More" option, and in the "More" menu, select and tap on the "Settings" option.
- Select Print Settings:
-
- In the settings interface, scroll down to find and tap the "Print Settings" option.
- Turn on automatic printing:
-
- In the print settings, find the "Automatically print reservation ticket receipts" option and toggle the switch to the "Off" state.
After completing the above steps, the system will automatically print the reservation ticket bracelet.

 2909
2909Family Restaurant Operation Guide - Terminal F&B System
 2711
2711Apple Pay Platform Web Merchant Terms and Conditions
 - Client-Side Booking for Parties and Tickets") 2916
2916Family-Friendly Restaurant User Guide (Operational Items) - Client-Side Booking for Parties and Tickets
2442Kids Cafe Usage Guide (Operational Items) - Terminal Selling Tickets
 2481
2481Family-Friendly Restaurant User Guide - Terminal for Booking Parties
![[Important Notice] Pisell Client Operations Team— Fixed Online Service Hours Pisell Support](https://file.mypisell.com/pisel/image/435/d7d250eb99c80ca34e3e7fc75c5b92cd2025_09_26_18_07_00_009_03613999964__2880_2112__.jpeg?x-oss-process=image/format,jpg/interlace,1,image/resize,w_1080/quality,Q_90/sharpen,90 "[Important Notice] Pisell Client Operations Team— Fixed Online Service Hours Pisell Support") 3328
3328[Important Notice] Pisell Client Operations Team— Fixed Online Service Hours Pisell Support
") 4227
4227Guidelines for Estimating Reserve (Merchant Self-Assessment Version)
 4103
4103Voluntary Withholding Funds & Reserve Explanation
 3681
3681Voluntary Withholding Funds
 4135
4135Online Payment 3DS Security Upgrade
 3647
3647Kids Playground Owners Beware: Your Payment System Might Be Charging You 3x More Than You Think
 6007
6007Manage Your Pisell Subscription
 5731
5731Pisell Payment Chargeback FAQ
 6019
6019Pisell Terminal Connecting to Cash Box
 5923
5923