

Family-Friendly Restaurant User Guide - Terminal for Booking Parties
VENUE Booking & F&B Usage Guide
I. Customer Order Placement and Payment Process
-
How to Place an Order for a Party?
-
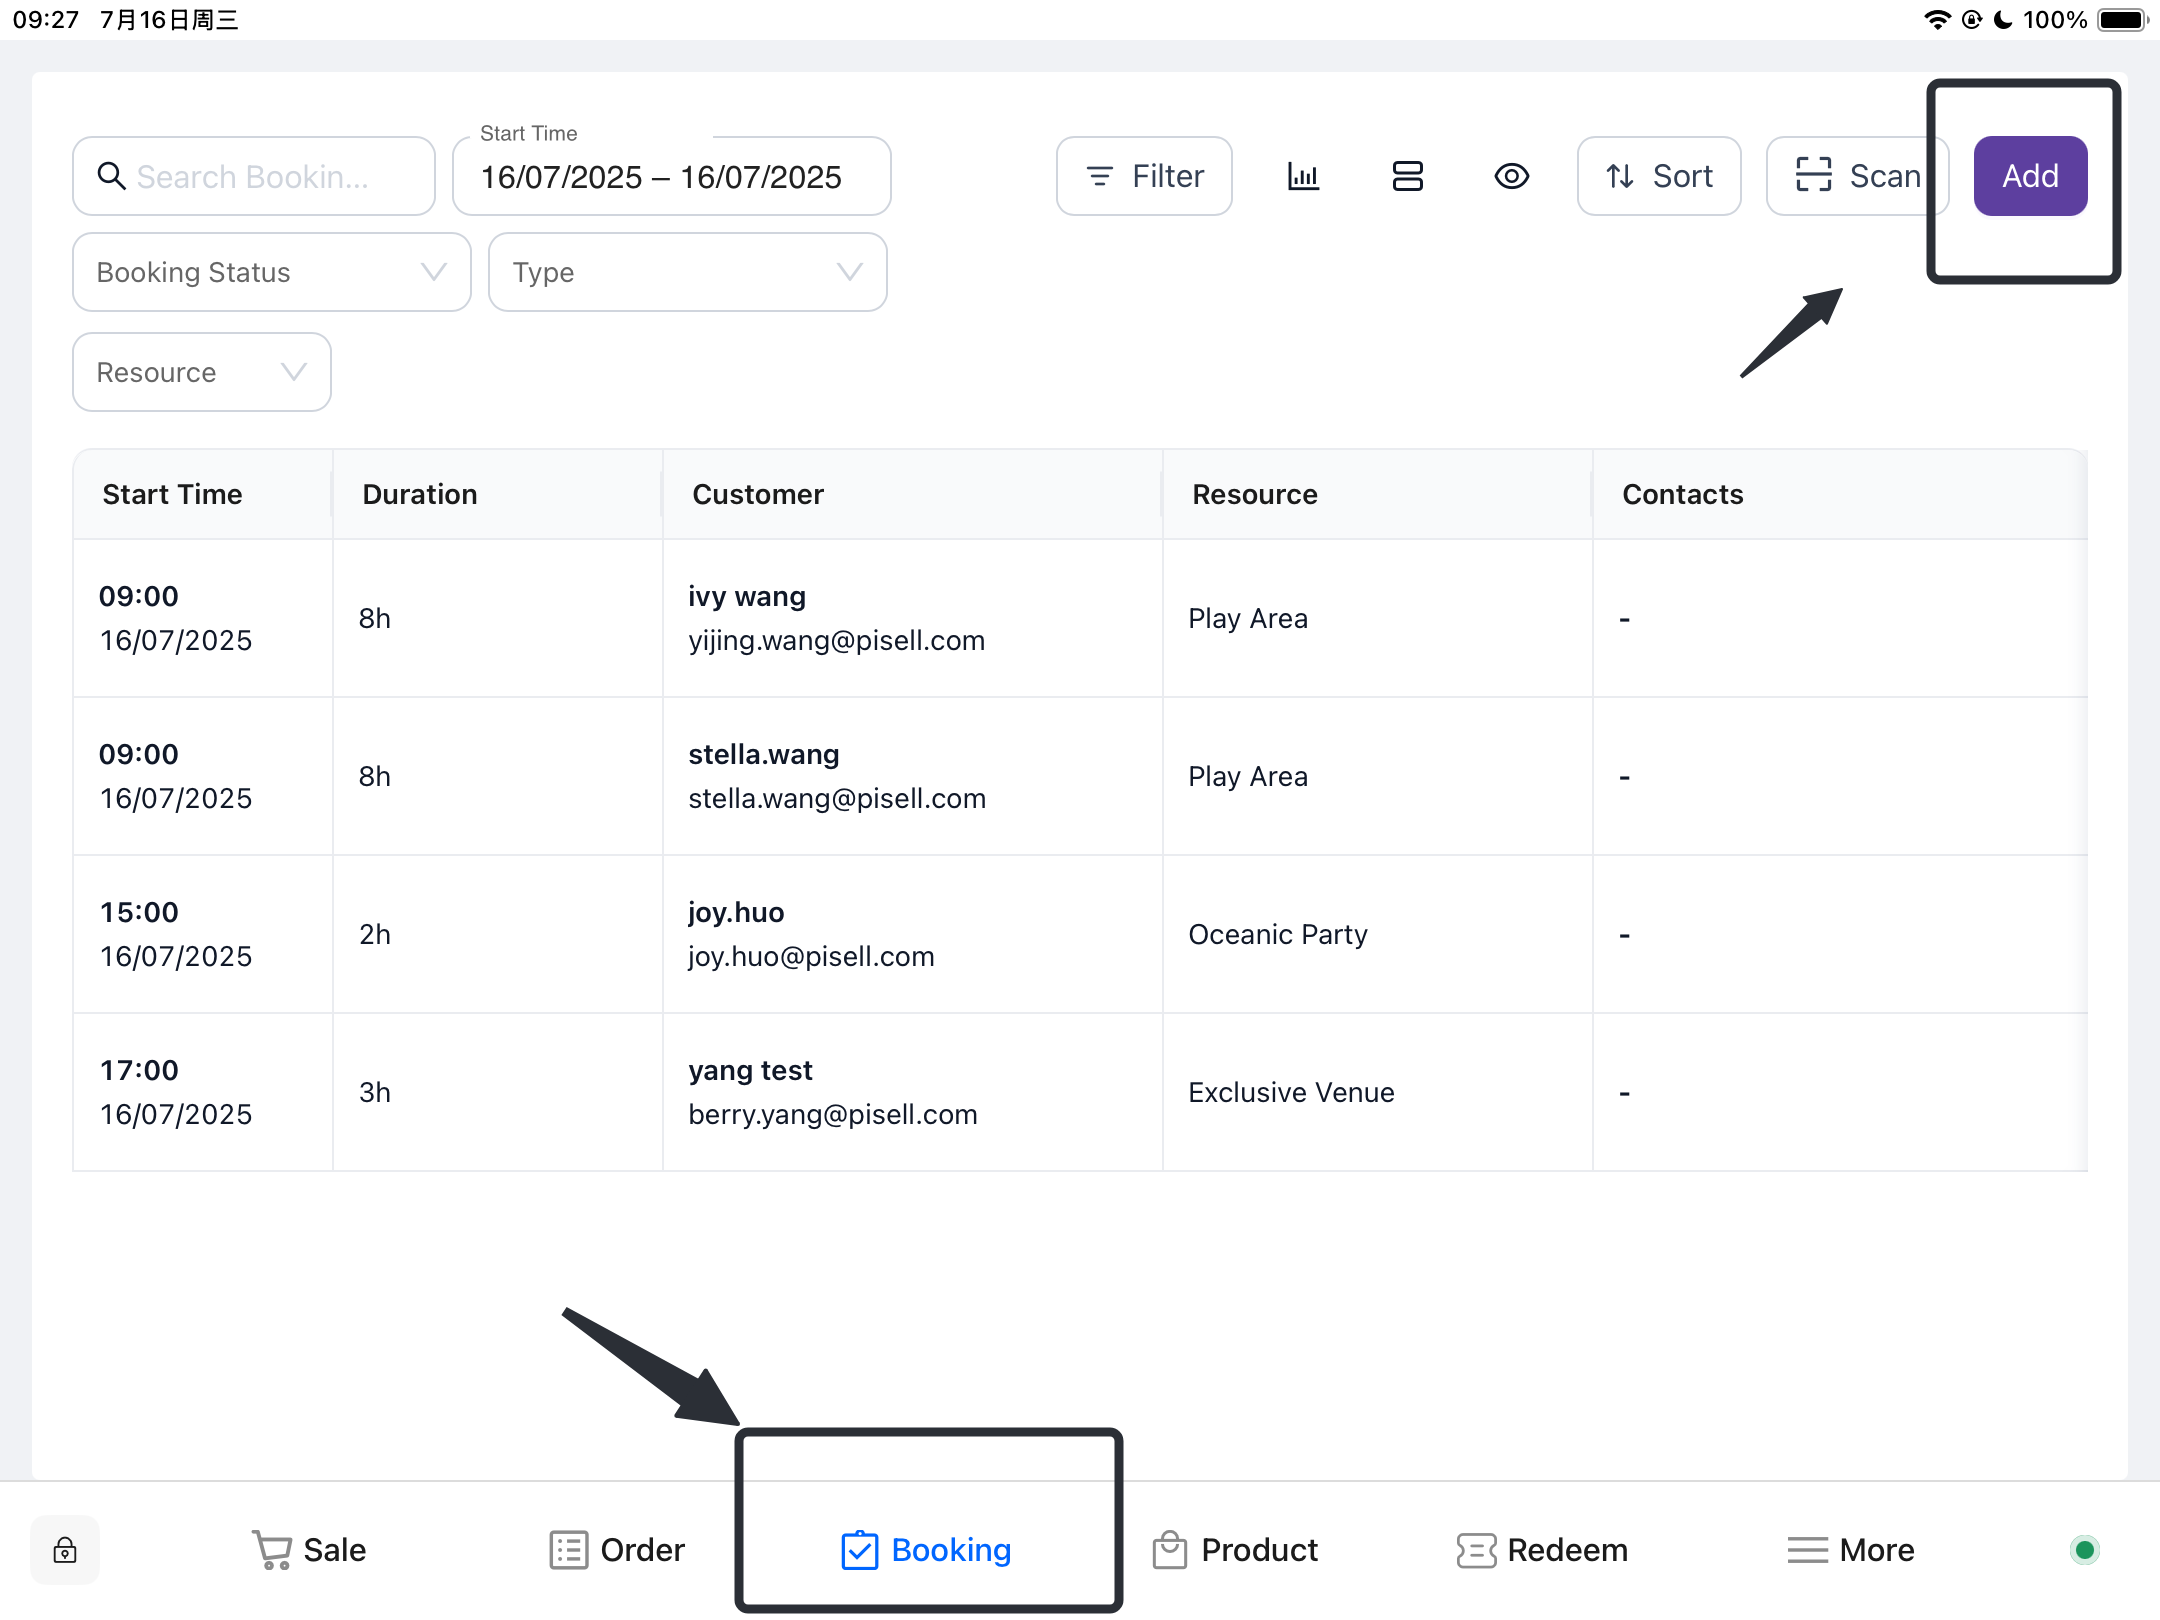
Log in to the Terminal application
- Click "Book"
-
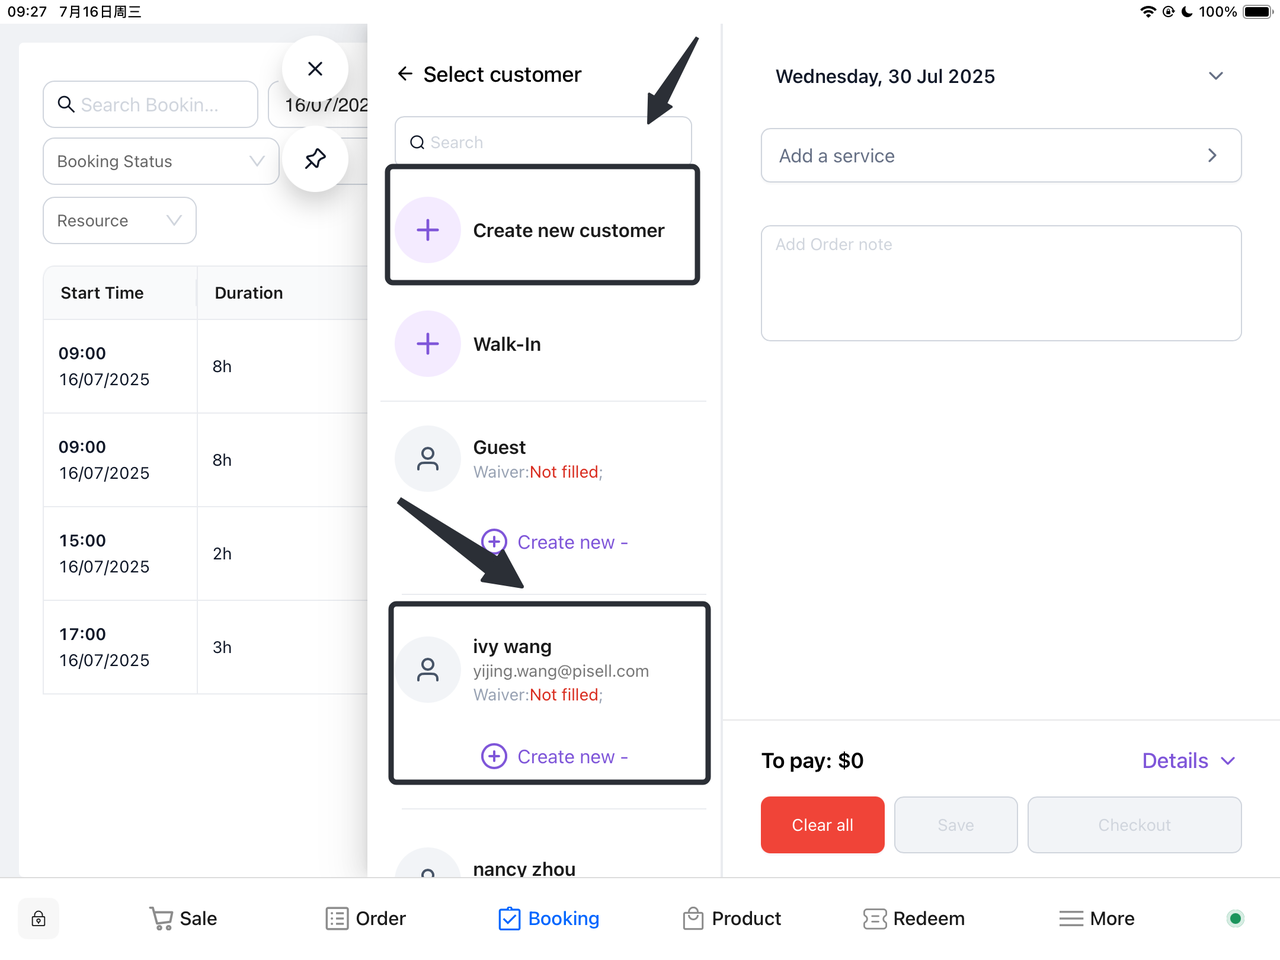
Customer Management
-
New Customer:
- Select "Create New Customer", fill in customer information, and save.
-
Existing Customer:
- Enter customer information (such as name or contact information) in the search box. Find and select the corresponding customer profile.
-
-
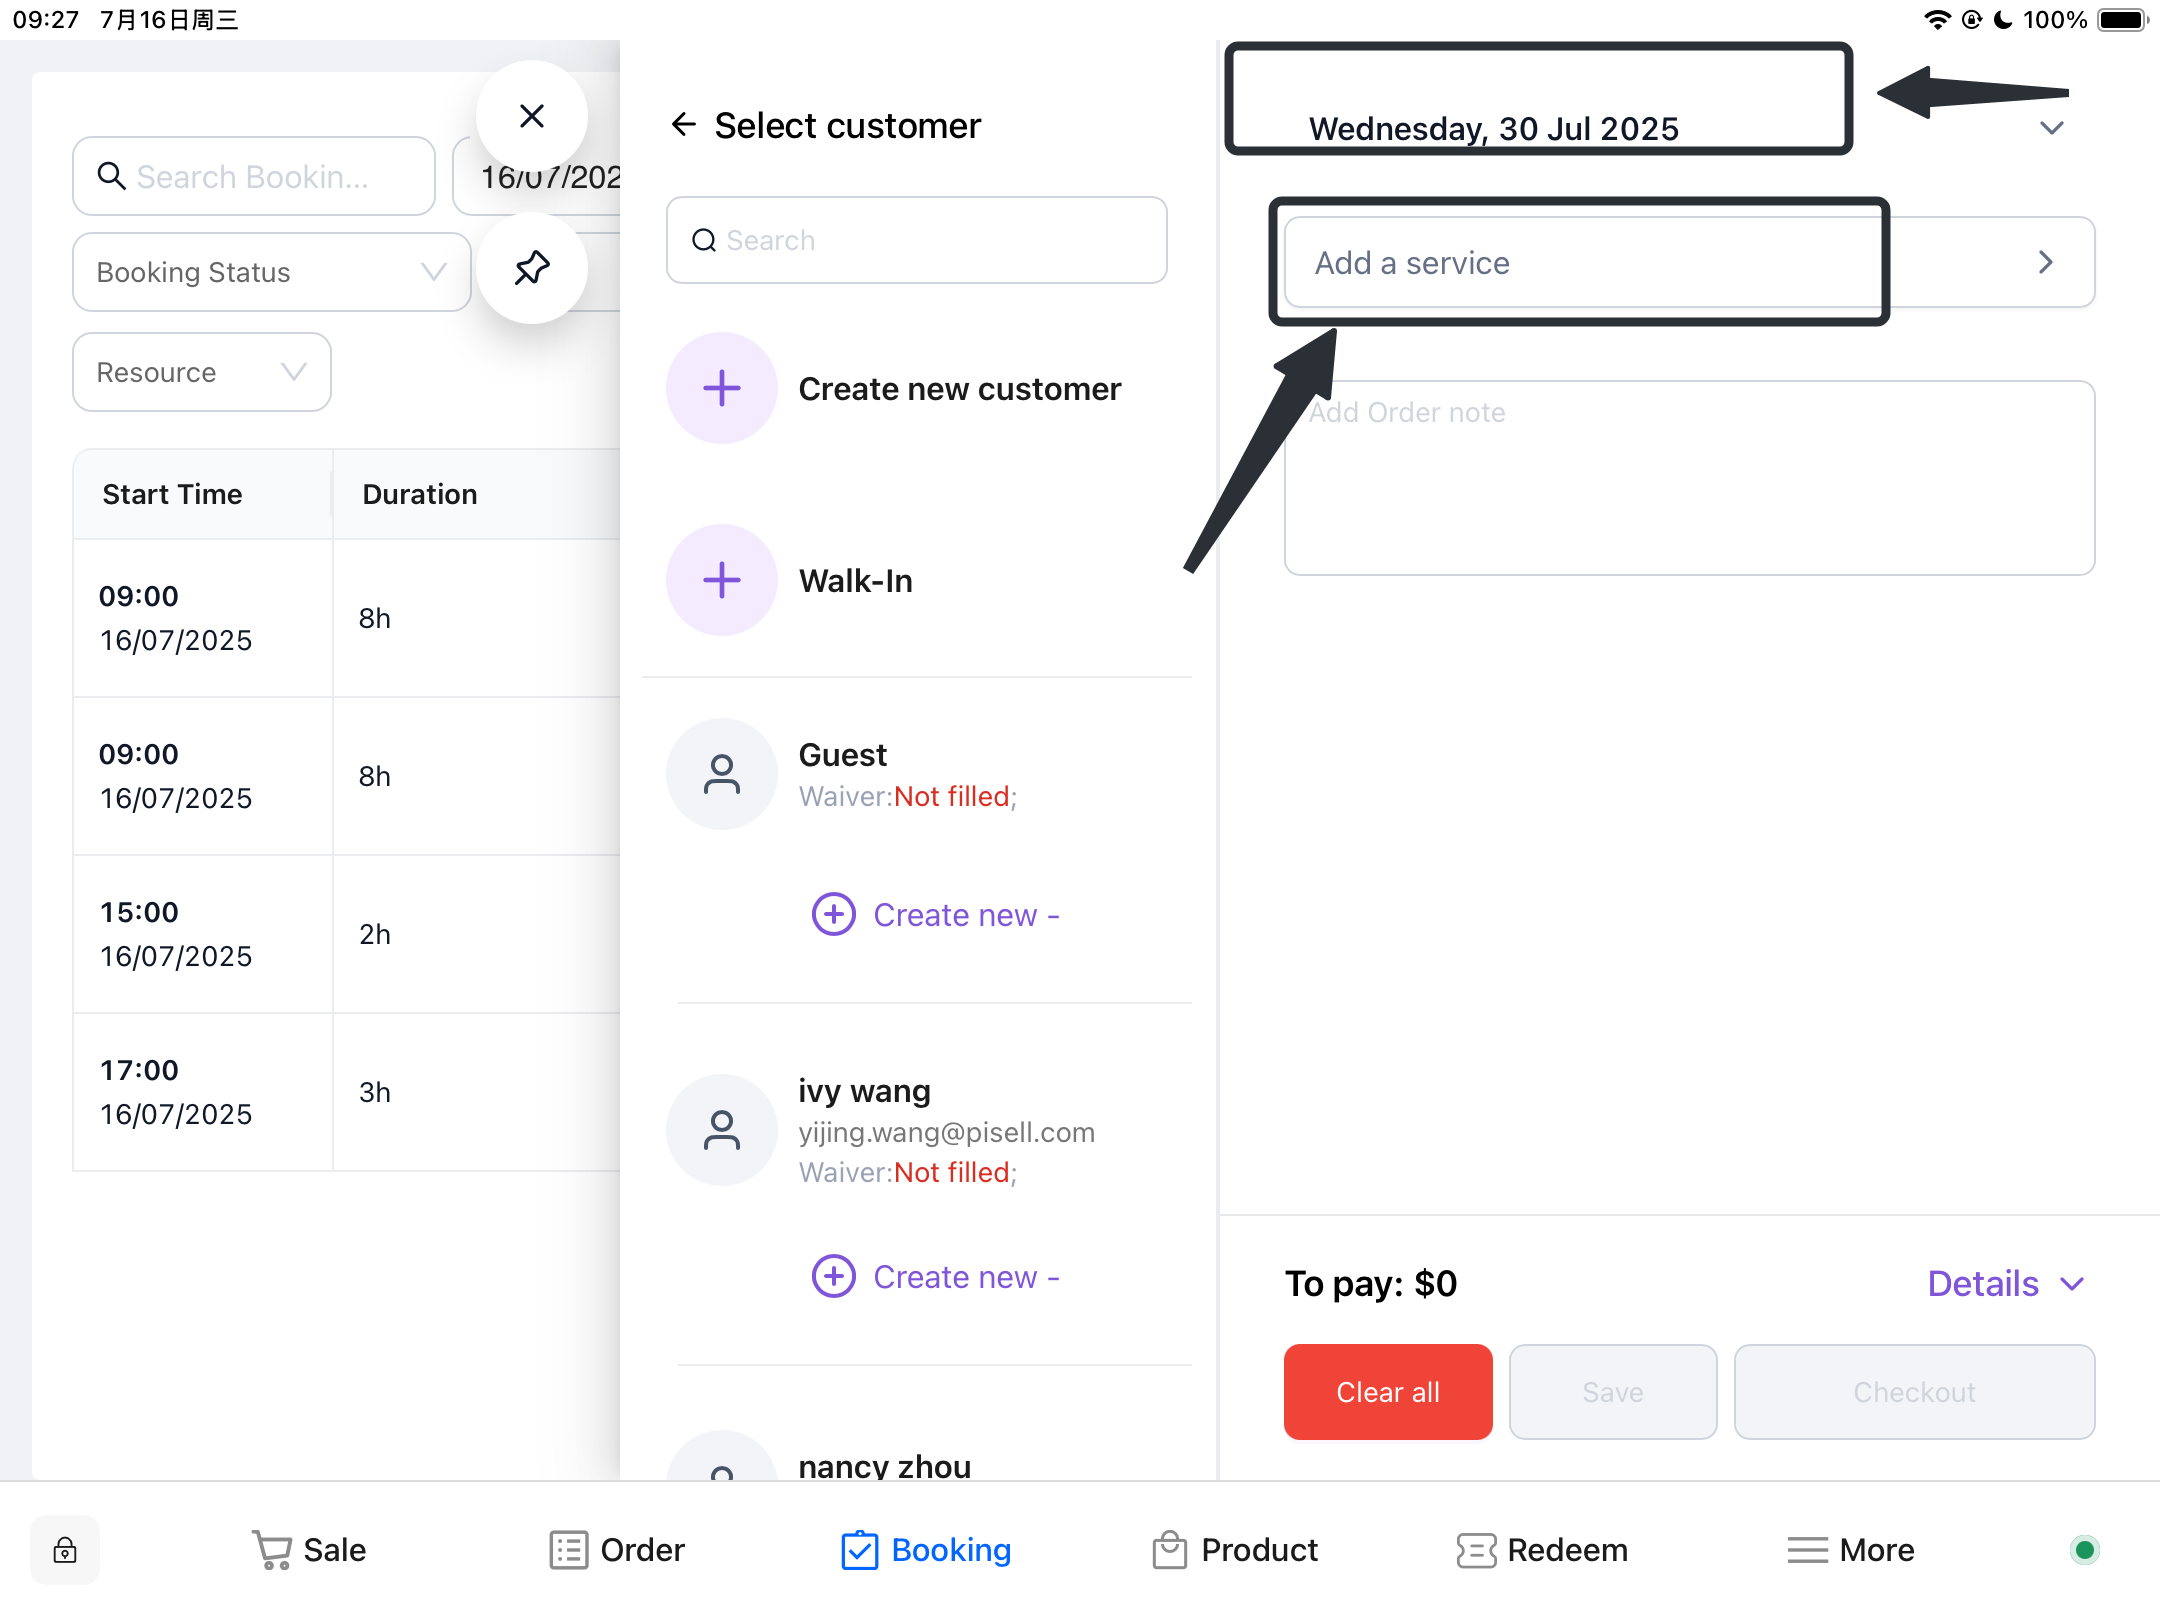
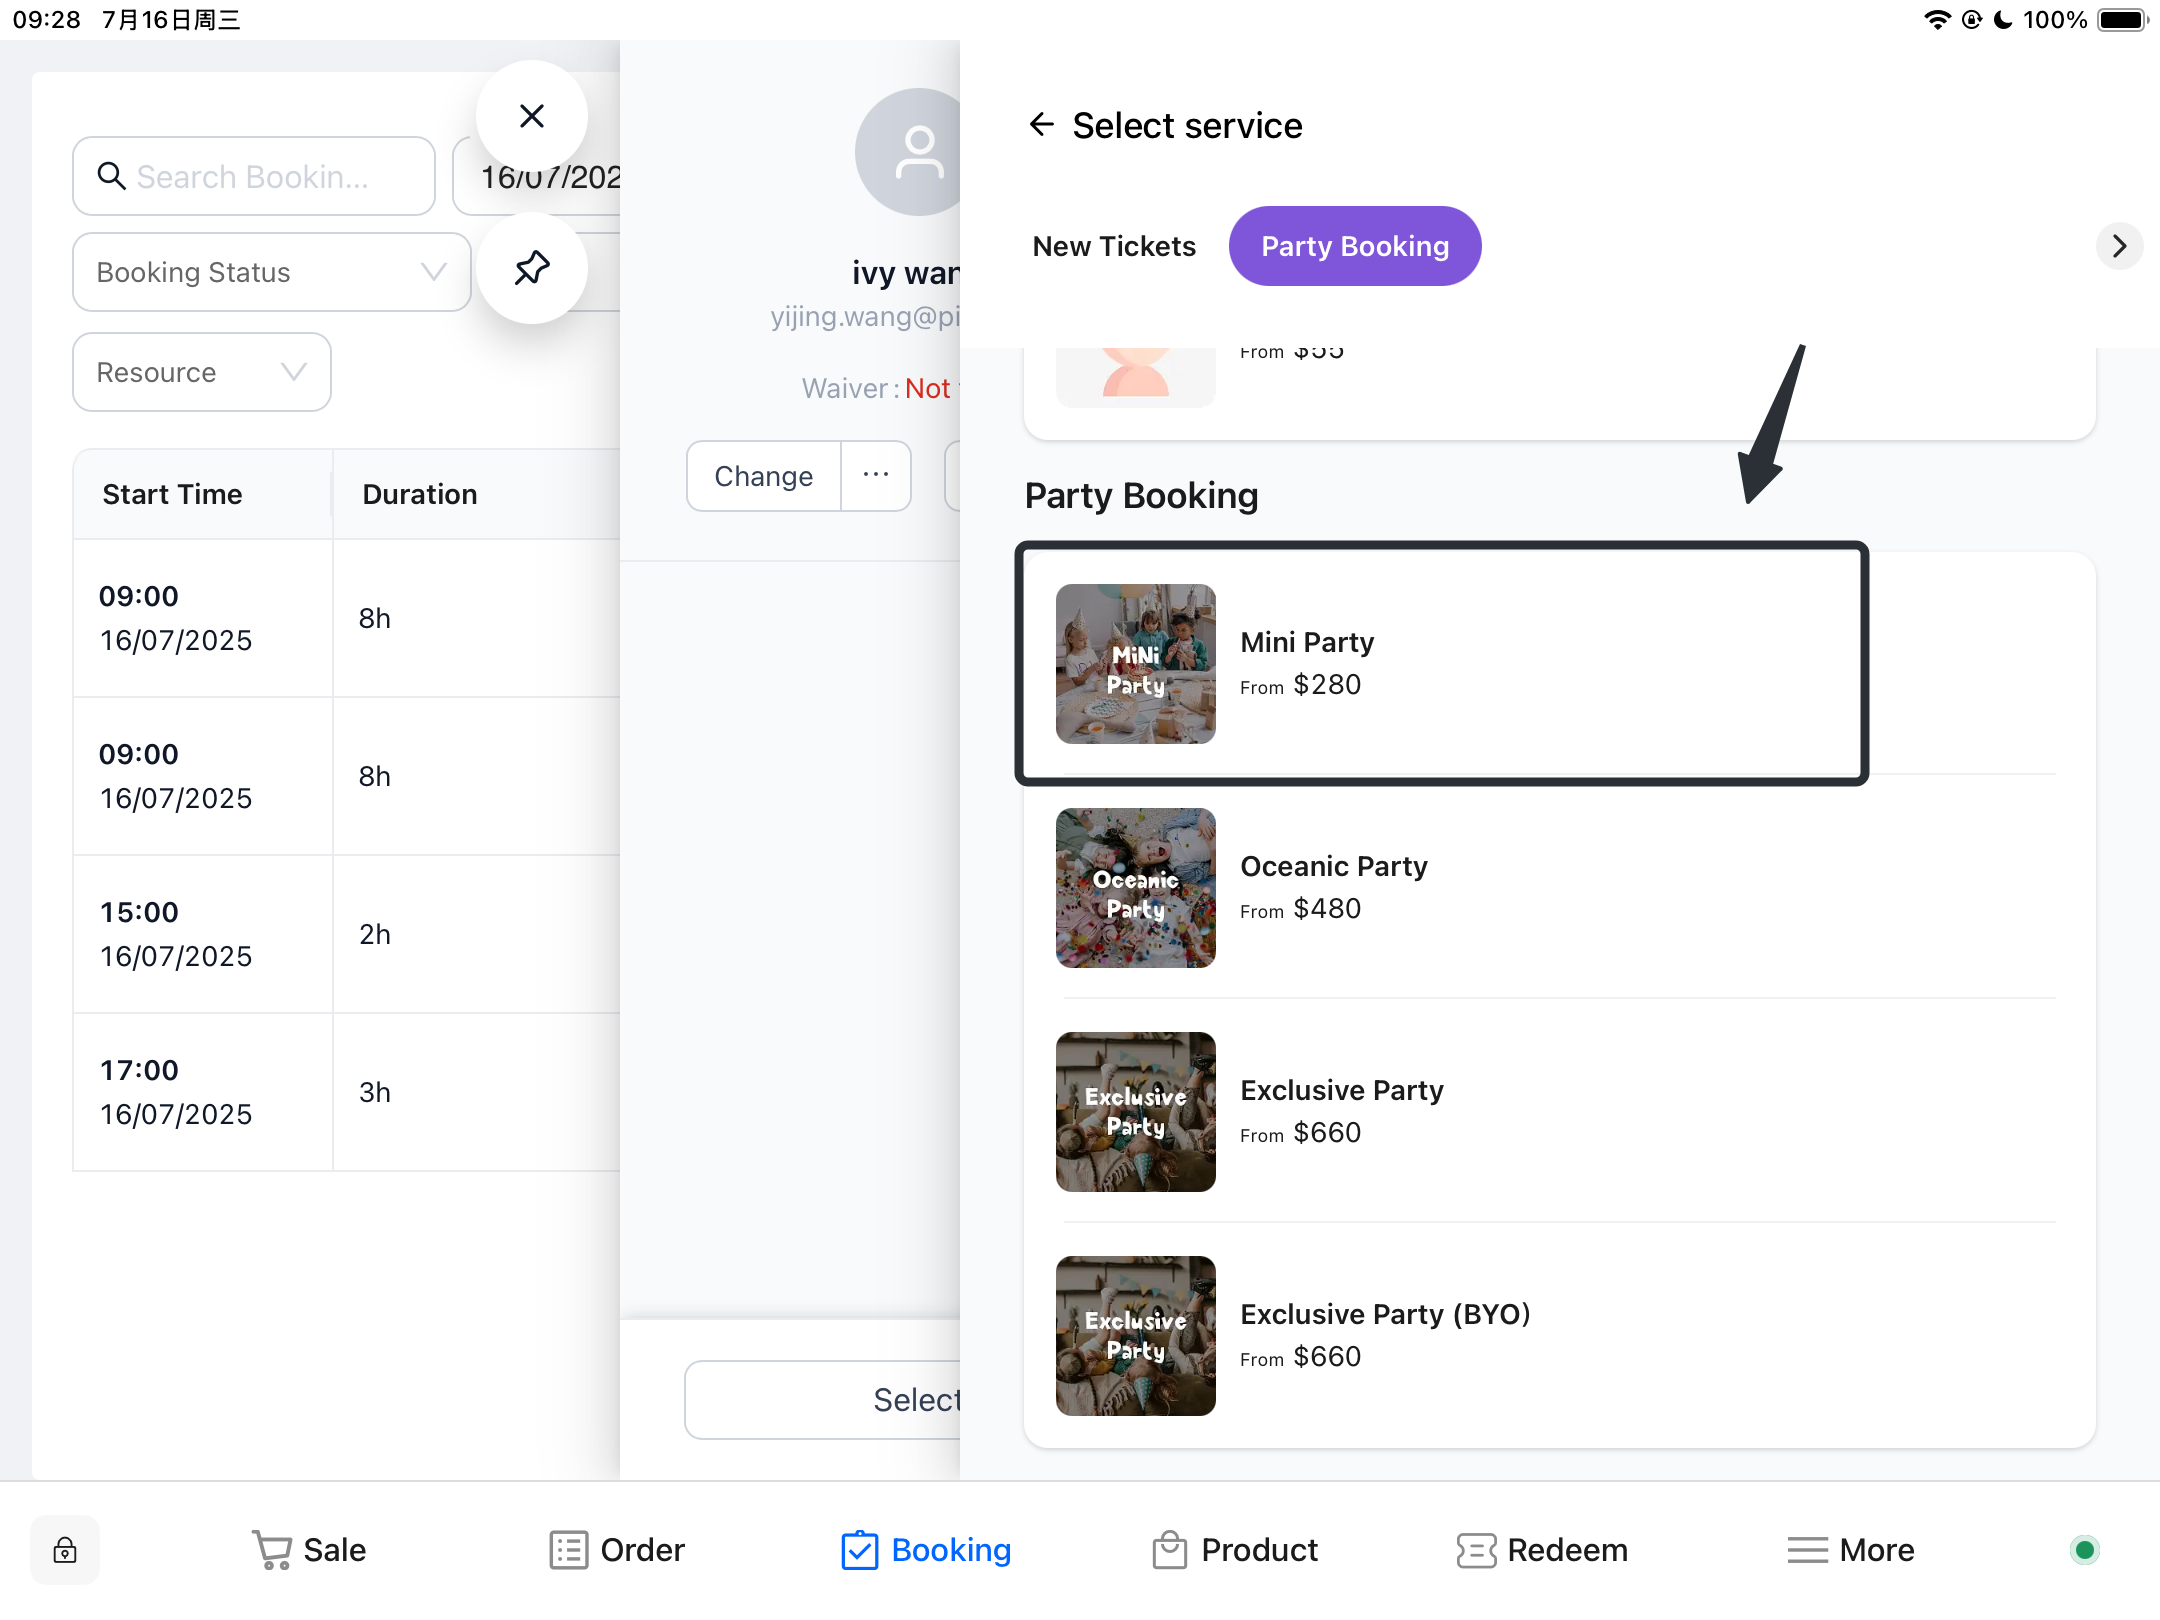
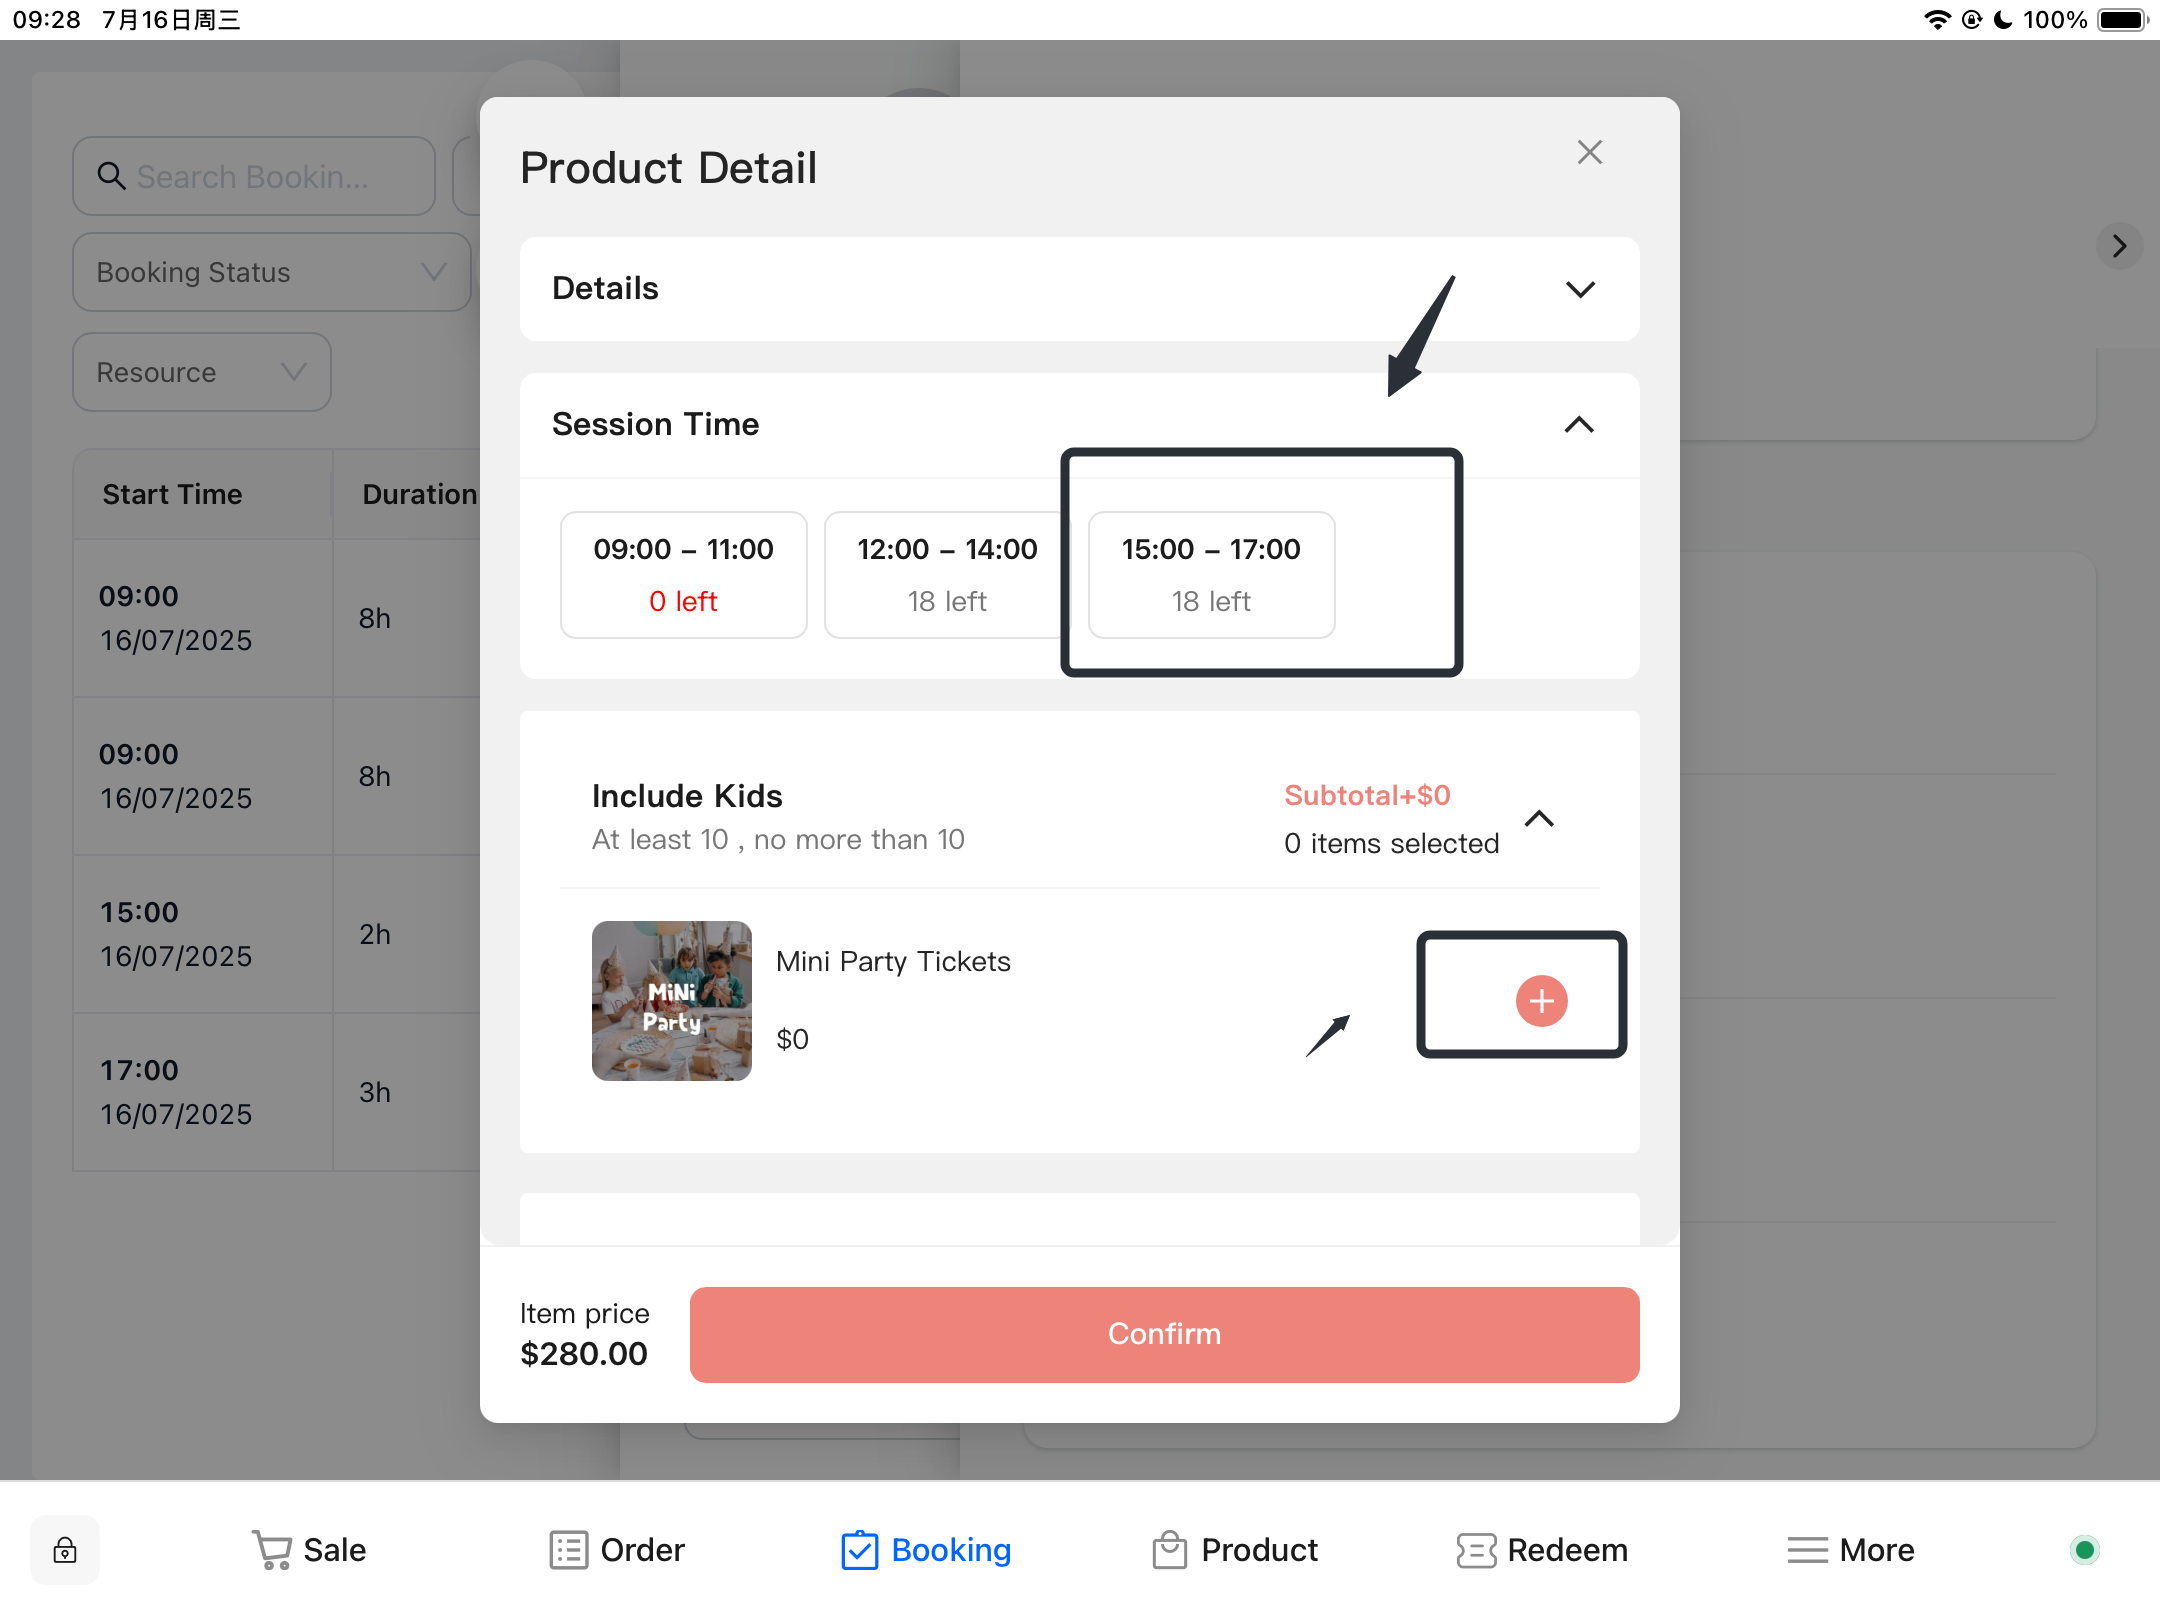
Adding Items
- According to the customer's needs, select the corresponding time and the items included in the party package.
- Click the "Add" button to add the selected items to the reservation.
-
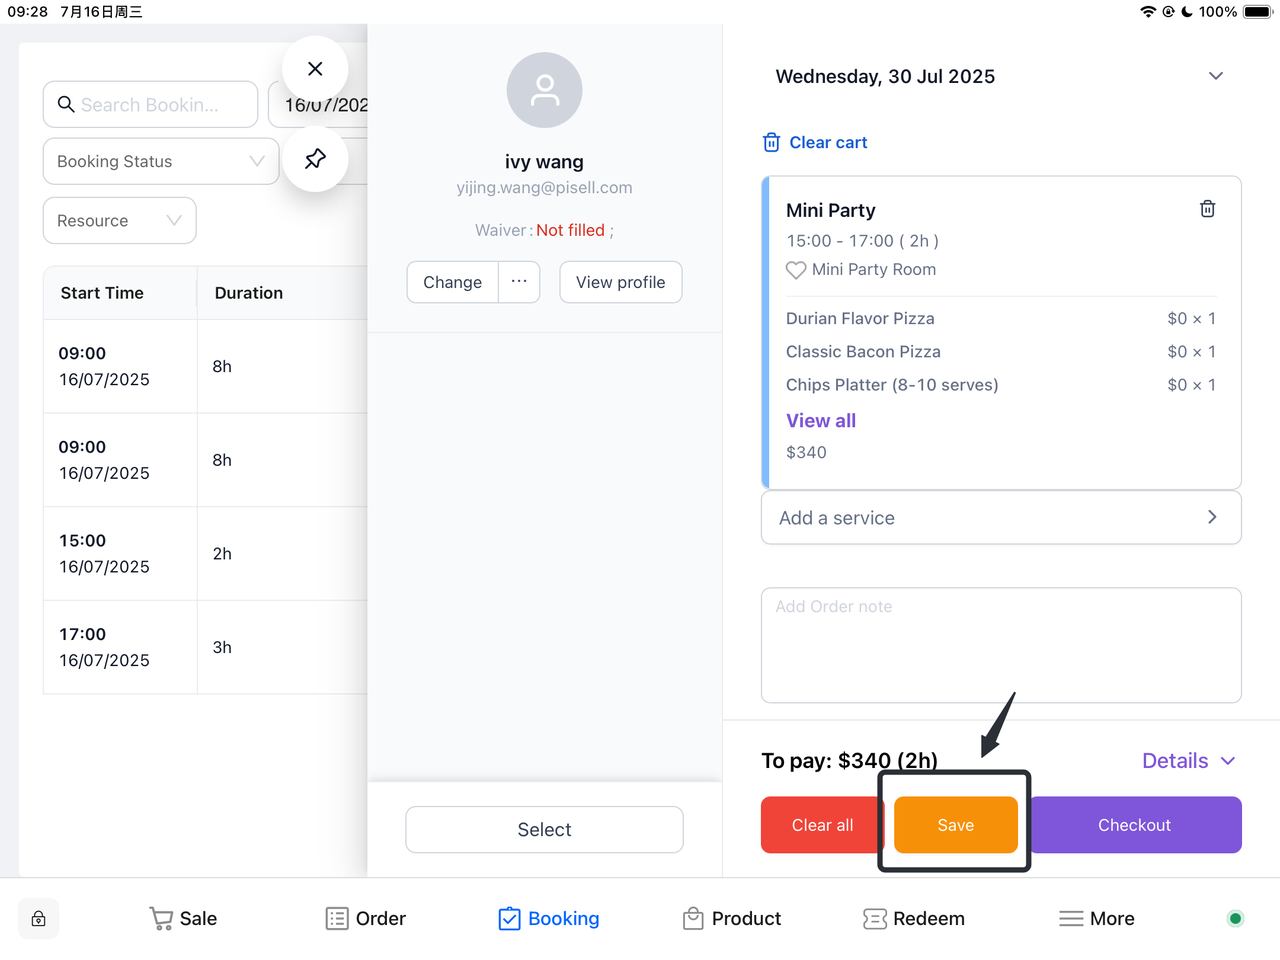
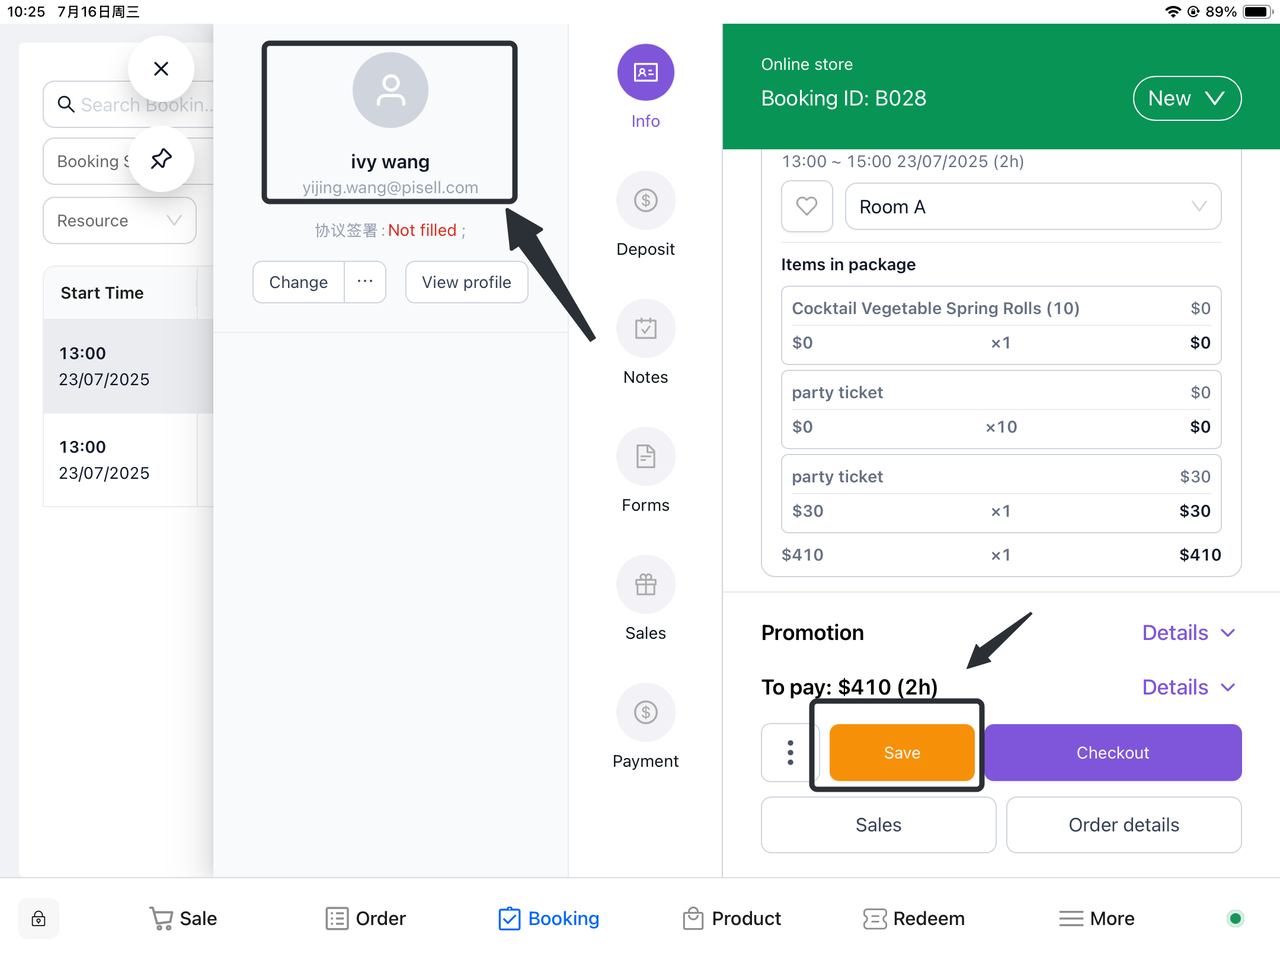
Confirm Reservation
- After verifying that all information is correct, click the "Settle" or "Save" button to complete the reservation.
-
How to Pay the Party Deposit?
- Save Reservation
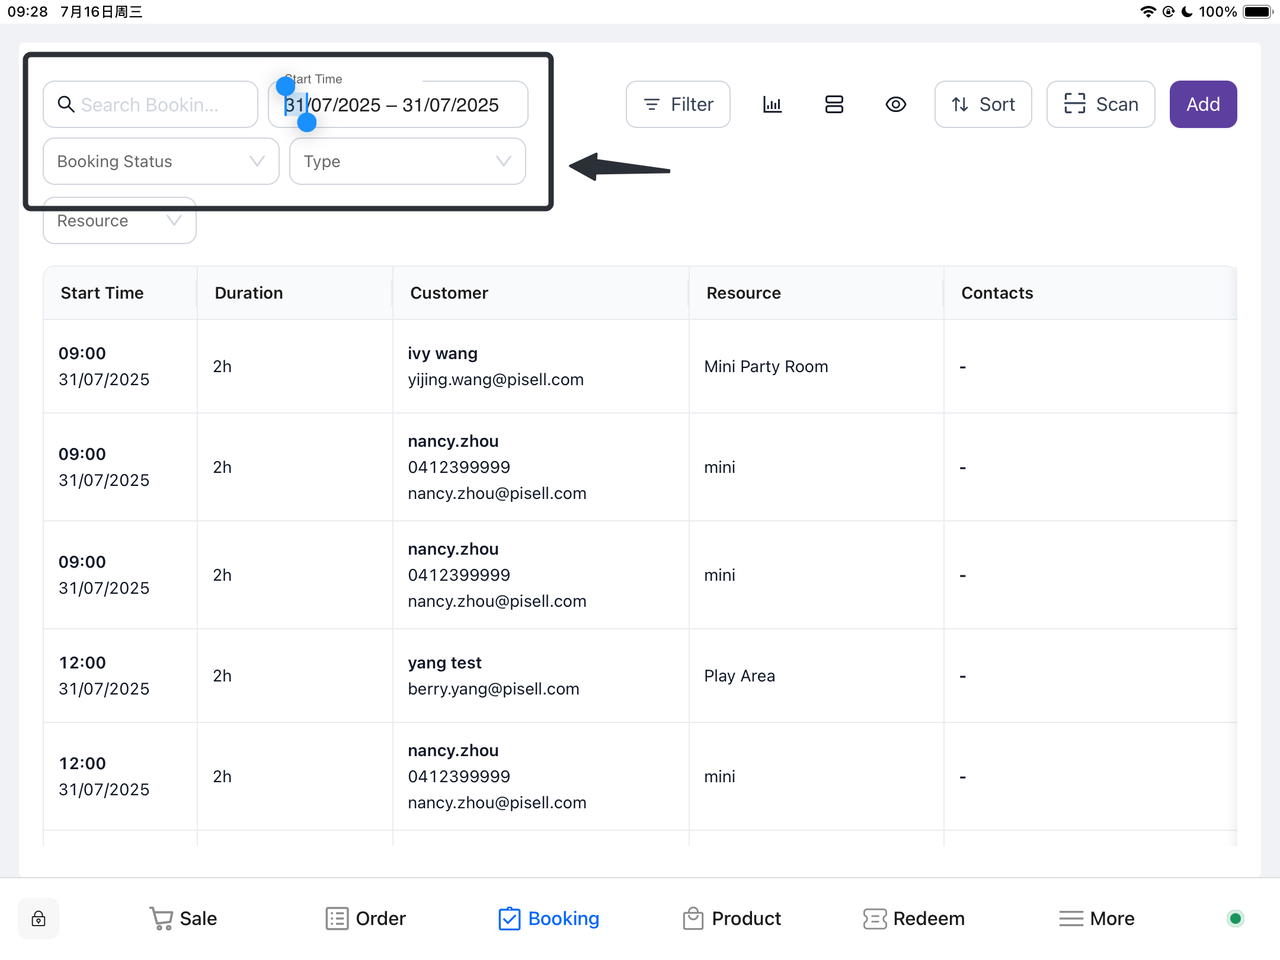
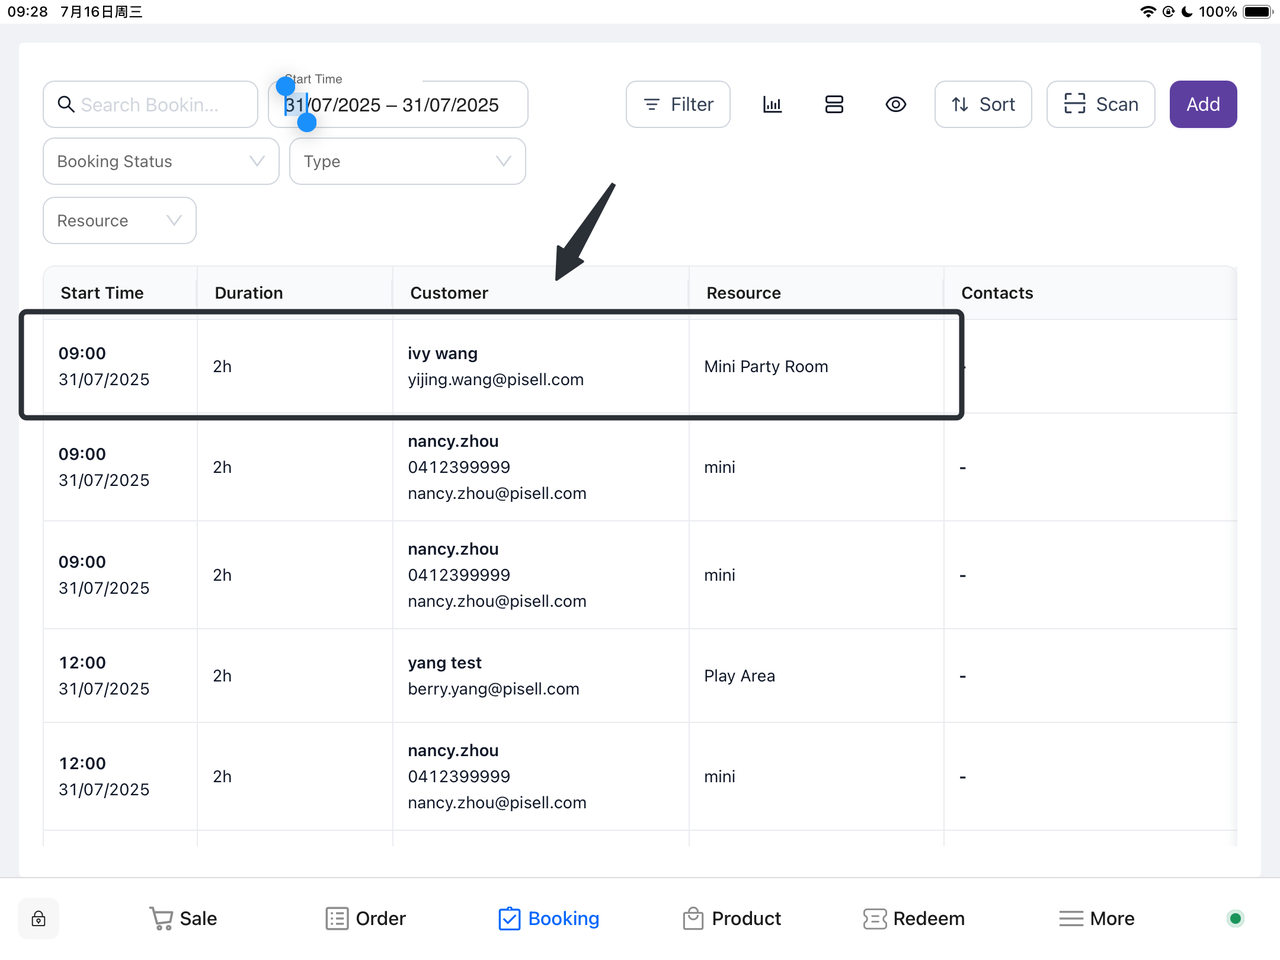
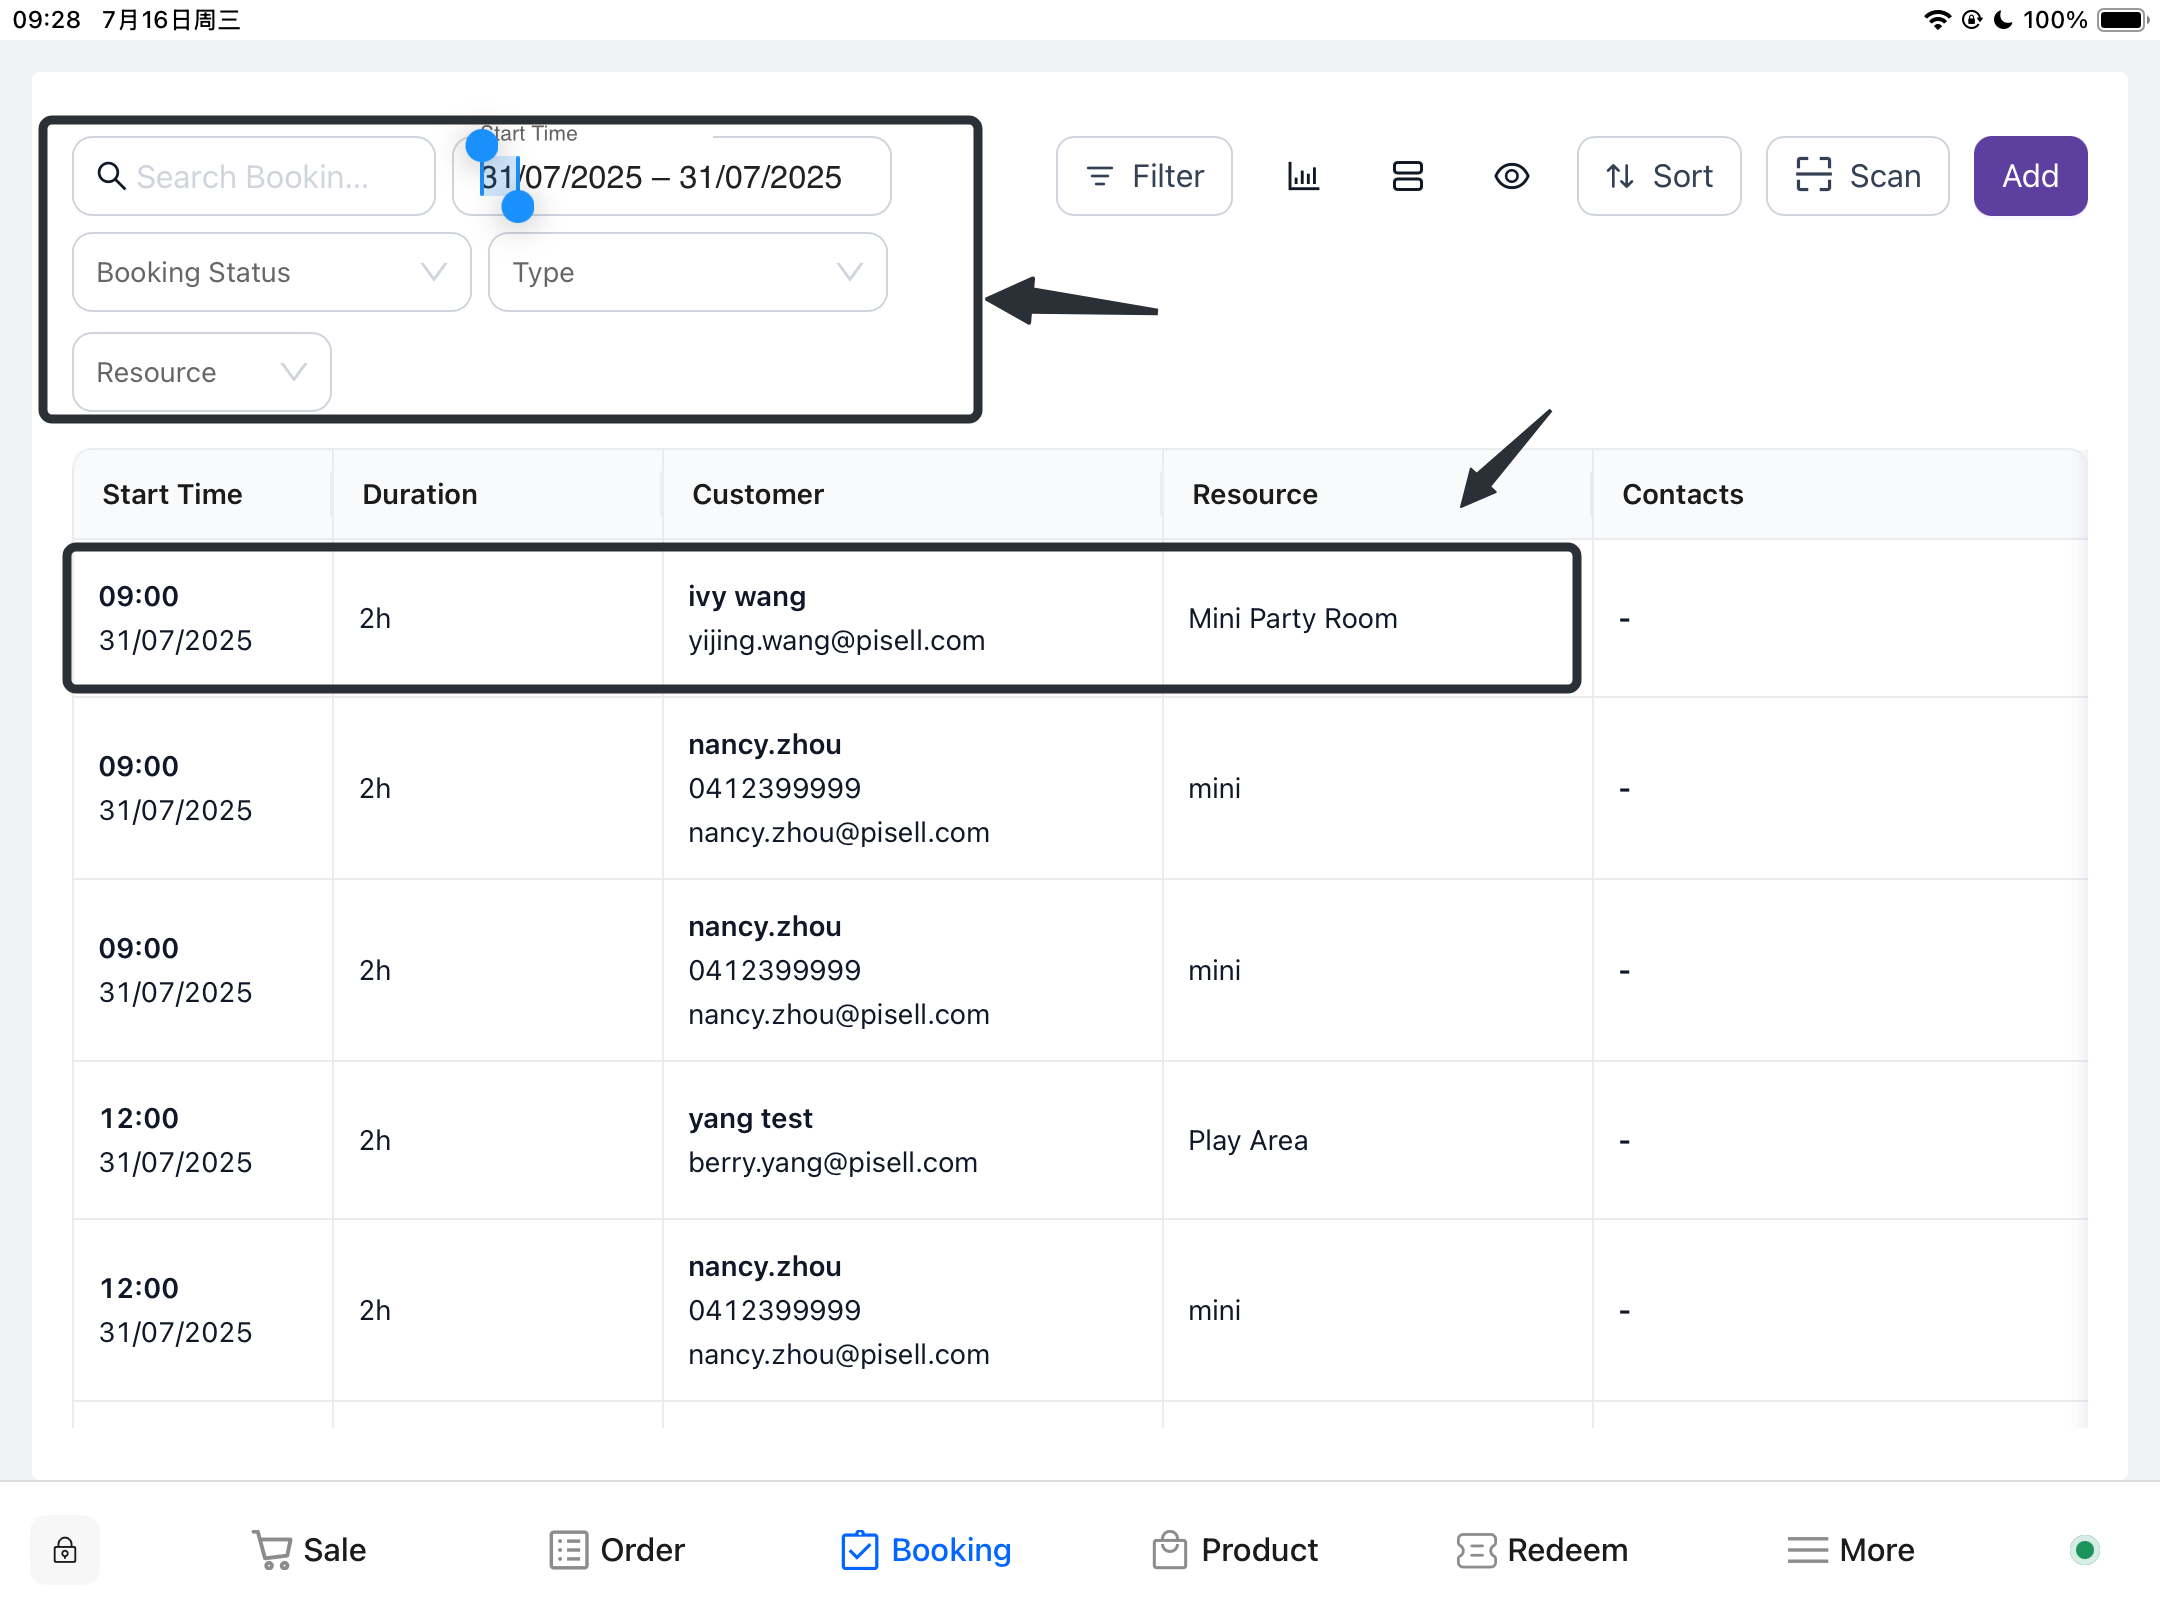
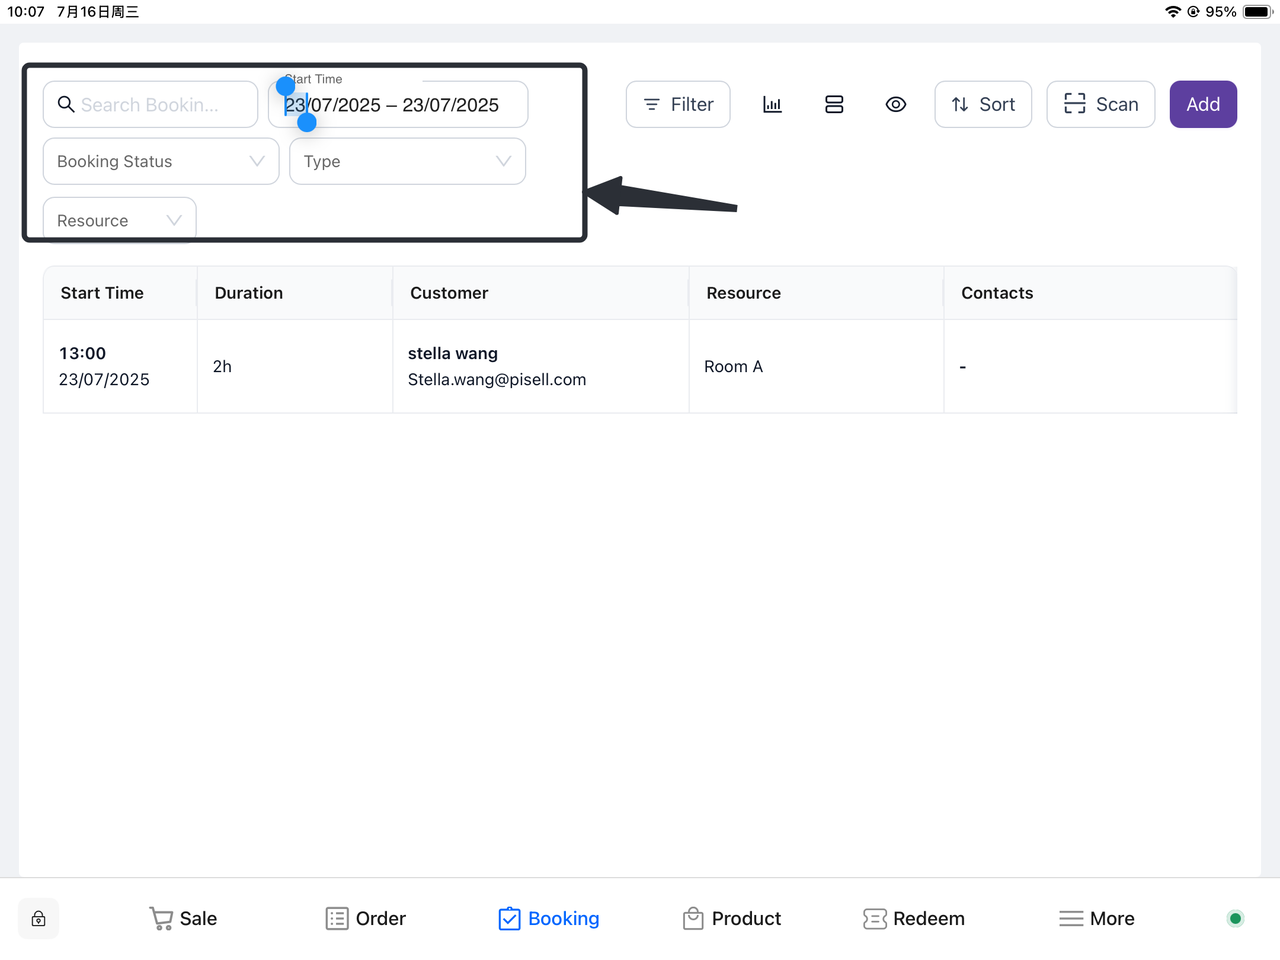
- Filter Orders
If full payment is not required and only a deposit needs to be paid, select the corresponding conditions in the filter section at the top of the page to filter out the newly created party orders.

-
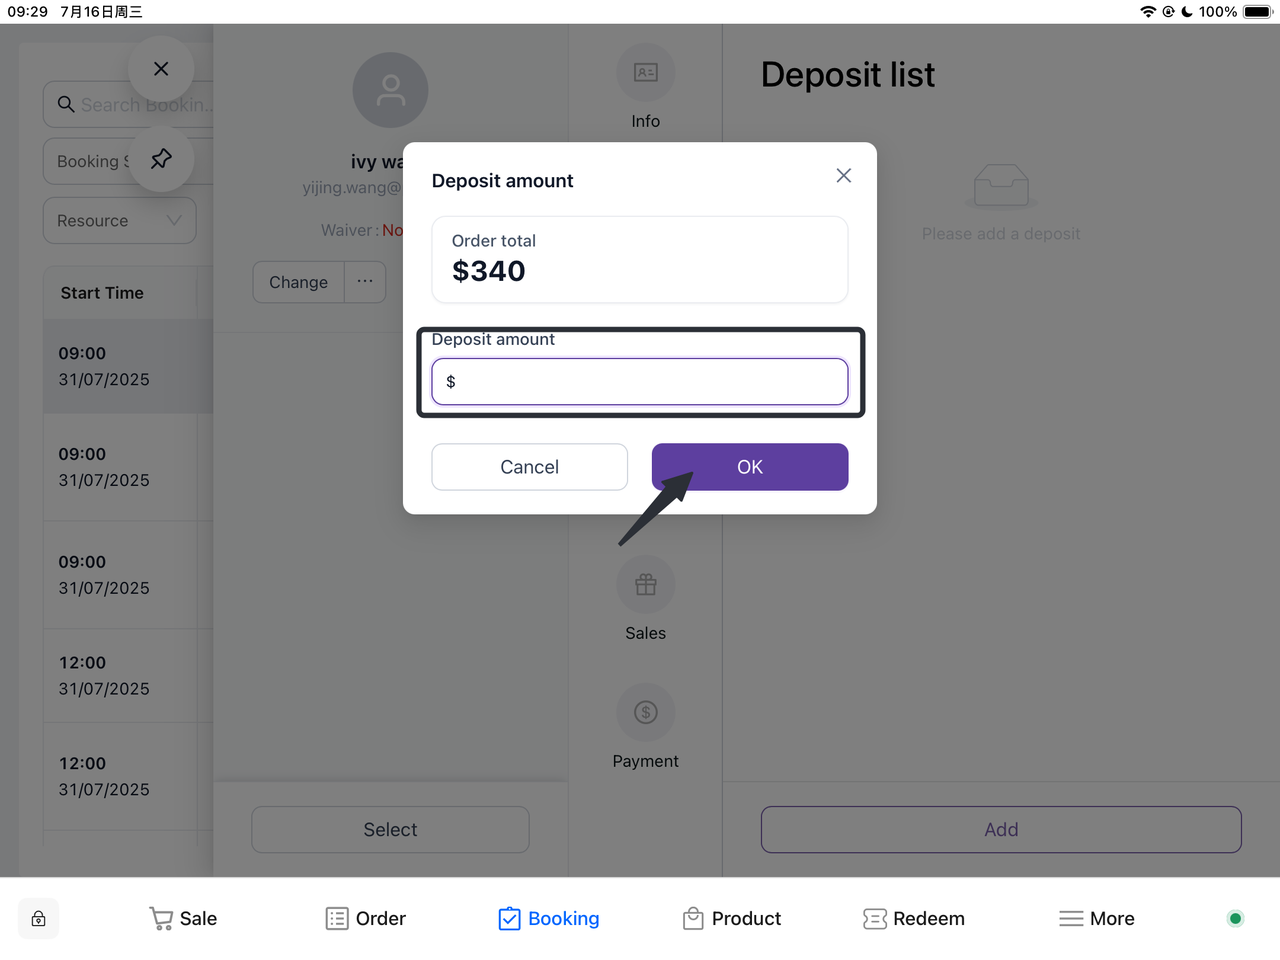
Set the Deposit Amount
Click on the corresponding order, select "Deposit" in the pop-up Booking panel, then click "Add", enter the required deposit amount, and click "OK".


-
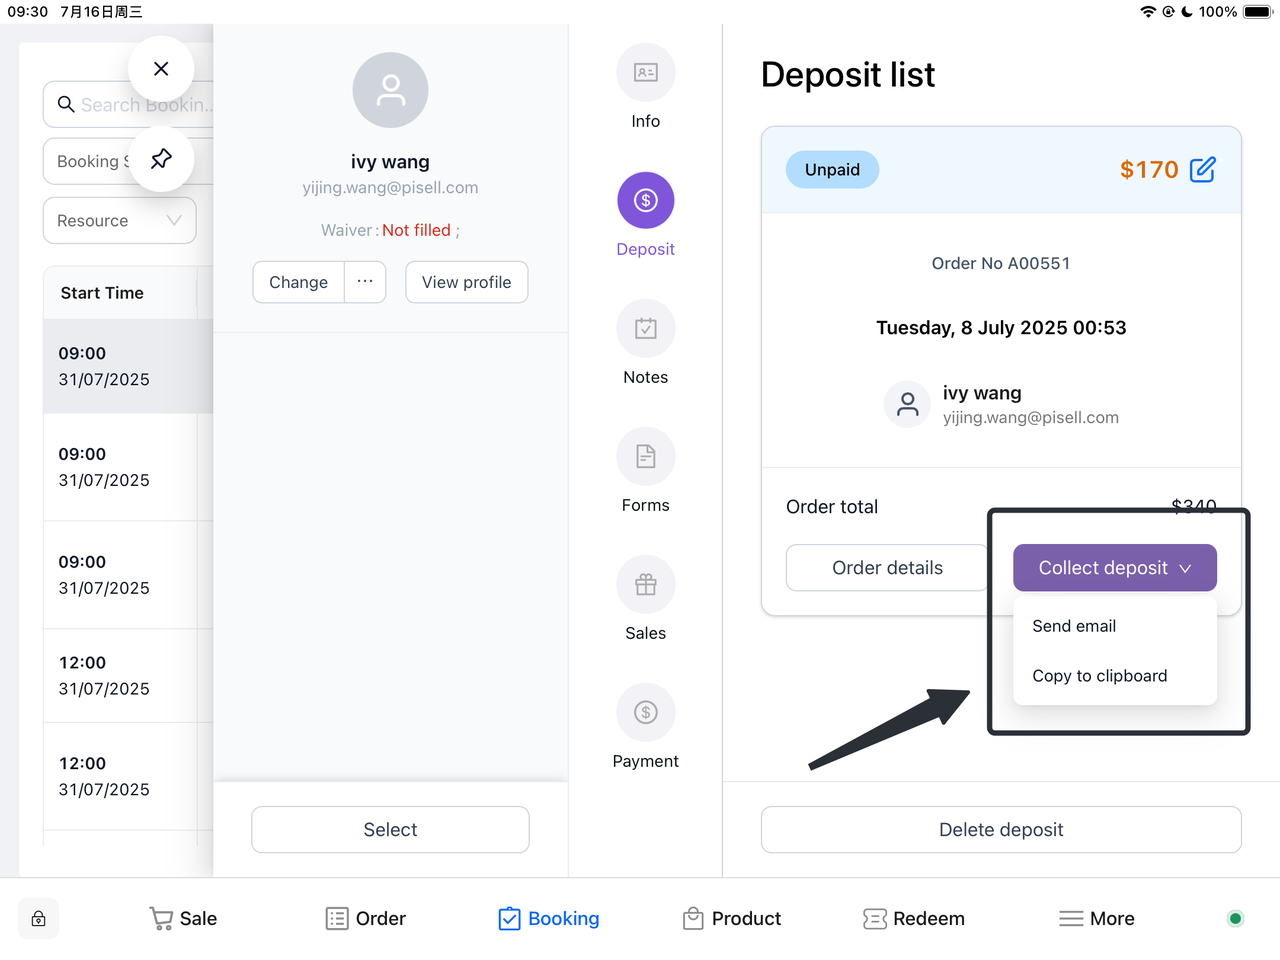
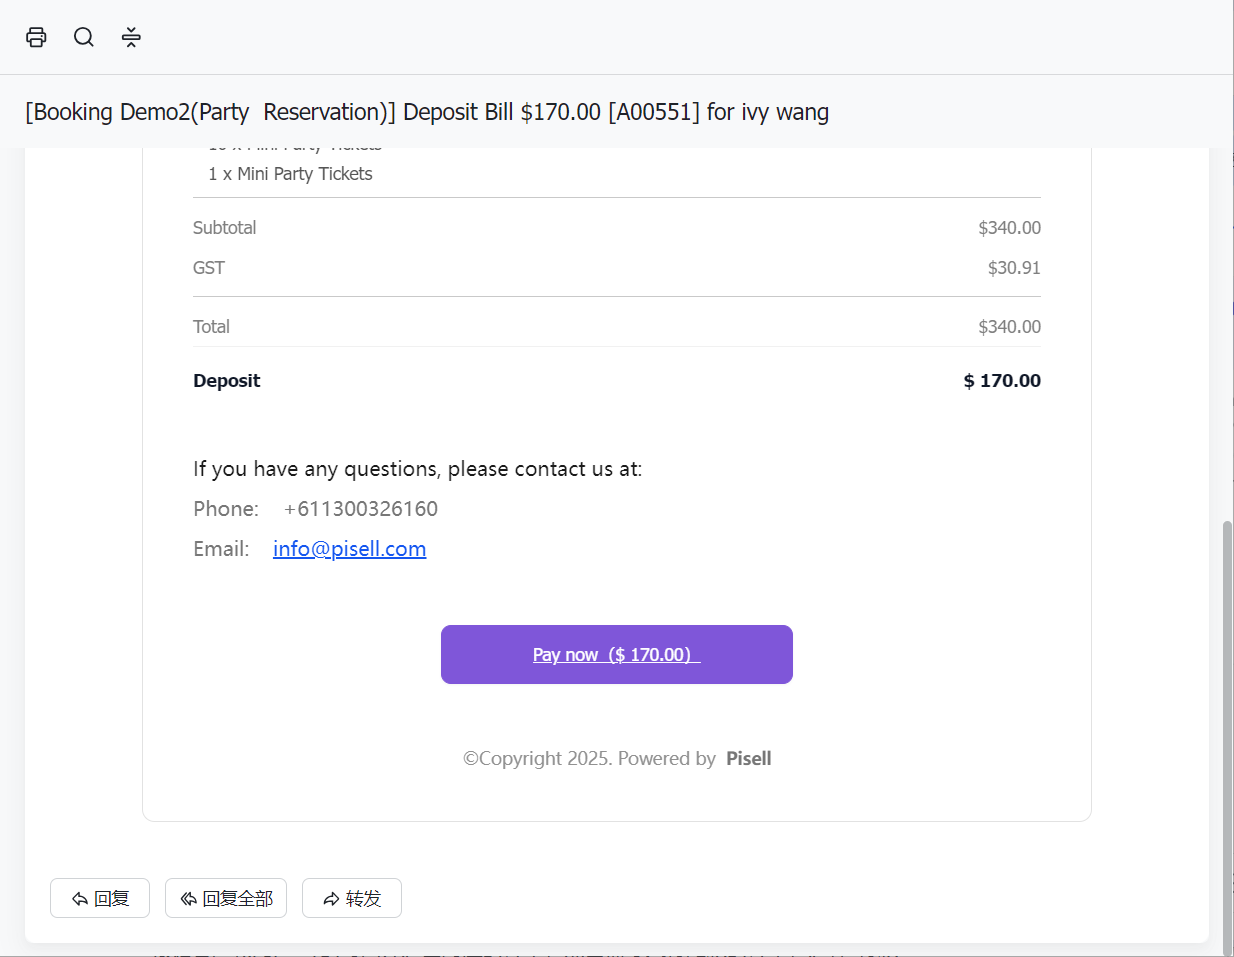
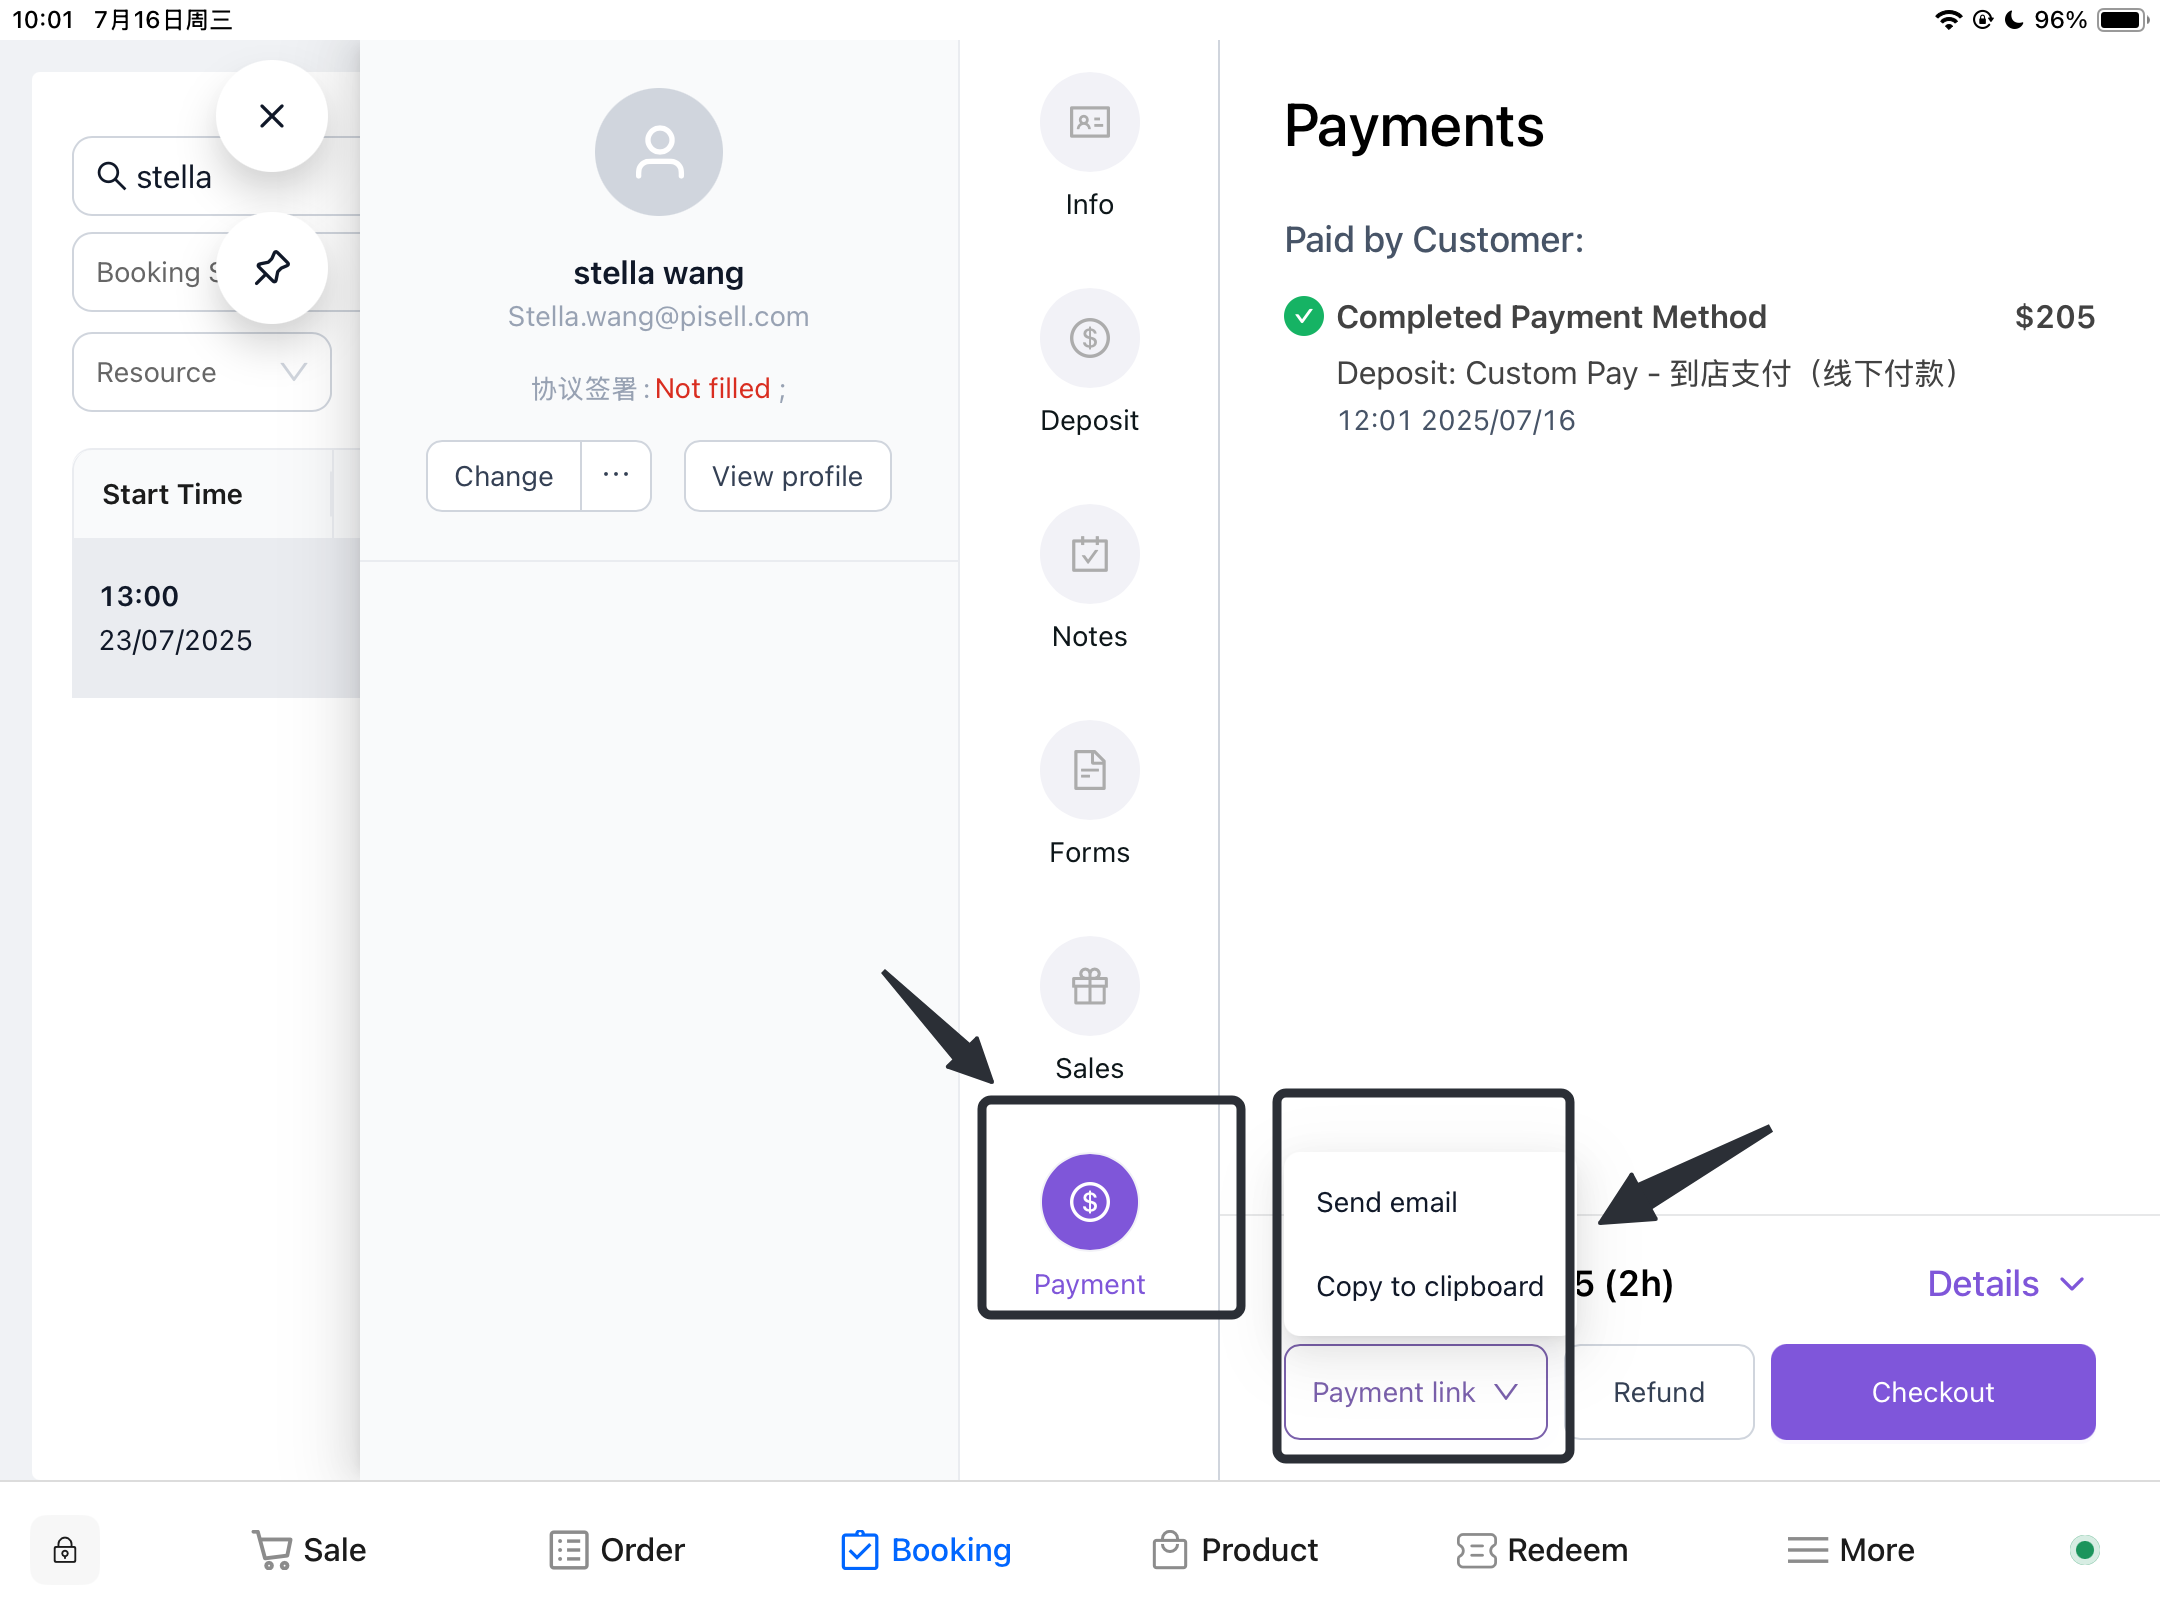
Collect the Deposit
After confirming the deposit amount, select "Collect Deposit" on the deposit page. From the drop-down options, you can send the corresponding deposit payment link to the customer's email or copy the link and send it to the customer via social media for payment. The customer only needs to click "Pay Now" to open the link and make the payment.
-
How to Pay the Party Balance?
Filter the corresponding order based on the customer's booked party date, click on the order for which the balance needs to be paid, and select "Pay".
-
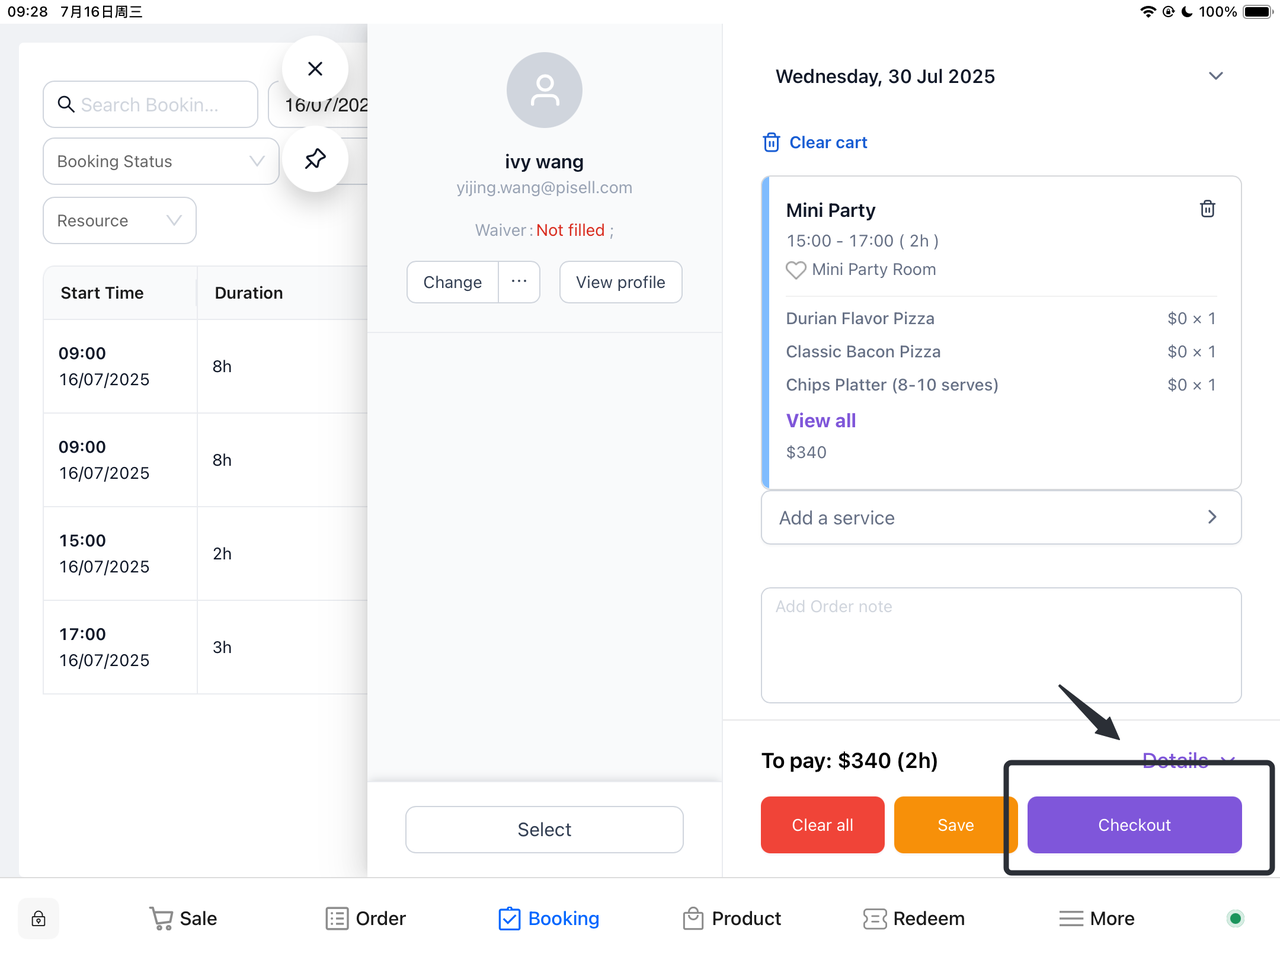
Method 1: On-site Checkout
-
Open the "Payment" Interface: After logging into the system, navigate to the "Payment" interface.
-
Automatic Balance Calculation: The system will automatically calculate the remaining balance after the deposit has been paid.
-
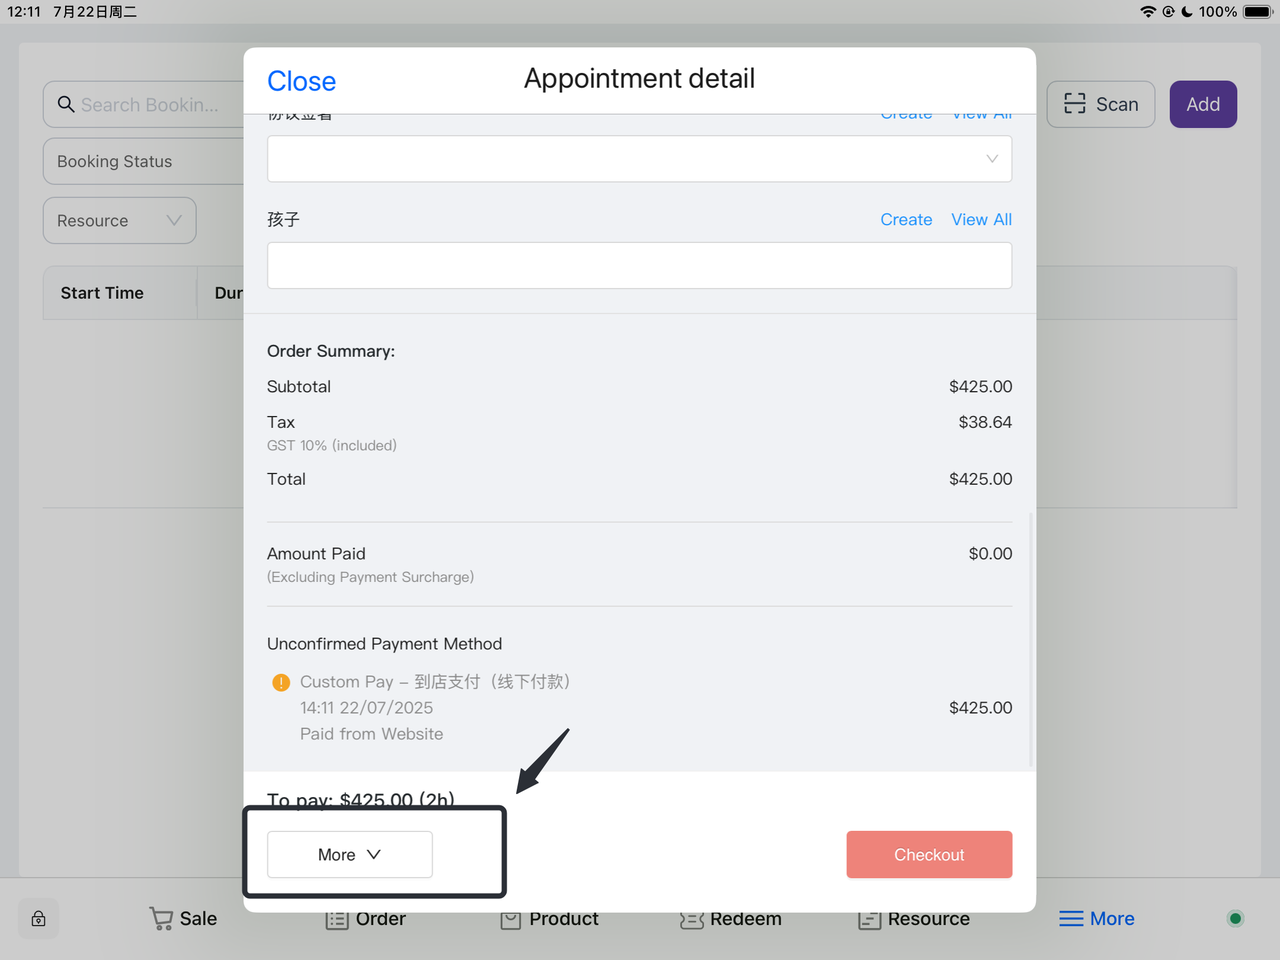
Verify Information: Carefully check the order information and price to ensure accuracy.
-
Select "Checkout": After confirming the information is correct, click the "Checkout" button to make the payment.
-

-
Method 2: If the customer cannot pay on-site or needs to settle the balance before the party starts
-
Access the "All Booking" Interface
-
Select the Corresponding Order:
-
Click to Send Payment Link: Find the "Payment Link" on the payment page.
-
Option 1: Click "Send Email", and the system will automatically send the balance payment link to the customer for easy payment.
-
Option 2: Copy to cilpboard the link and send it via the communication platform with the customer for convenient payment.
-
II. Order Management and Inquiry
-
How Can Merchants View Party Bookings Made by Customers on the Client Side?
Method 1:
Customer Creates an Order:
The customer creates and submits a new order on the client side.

First, Enable Terminal Booking Notifications
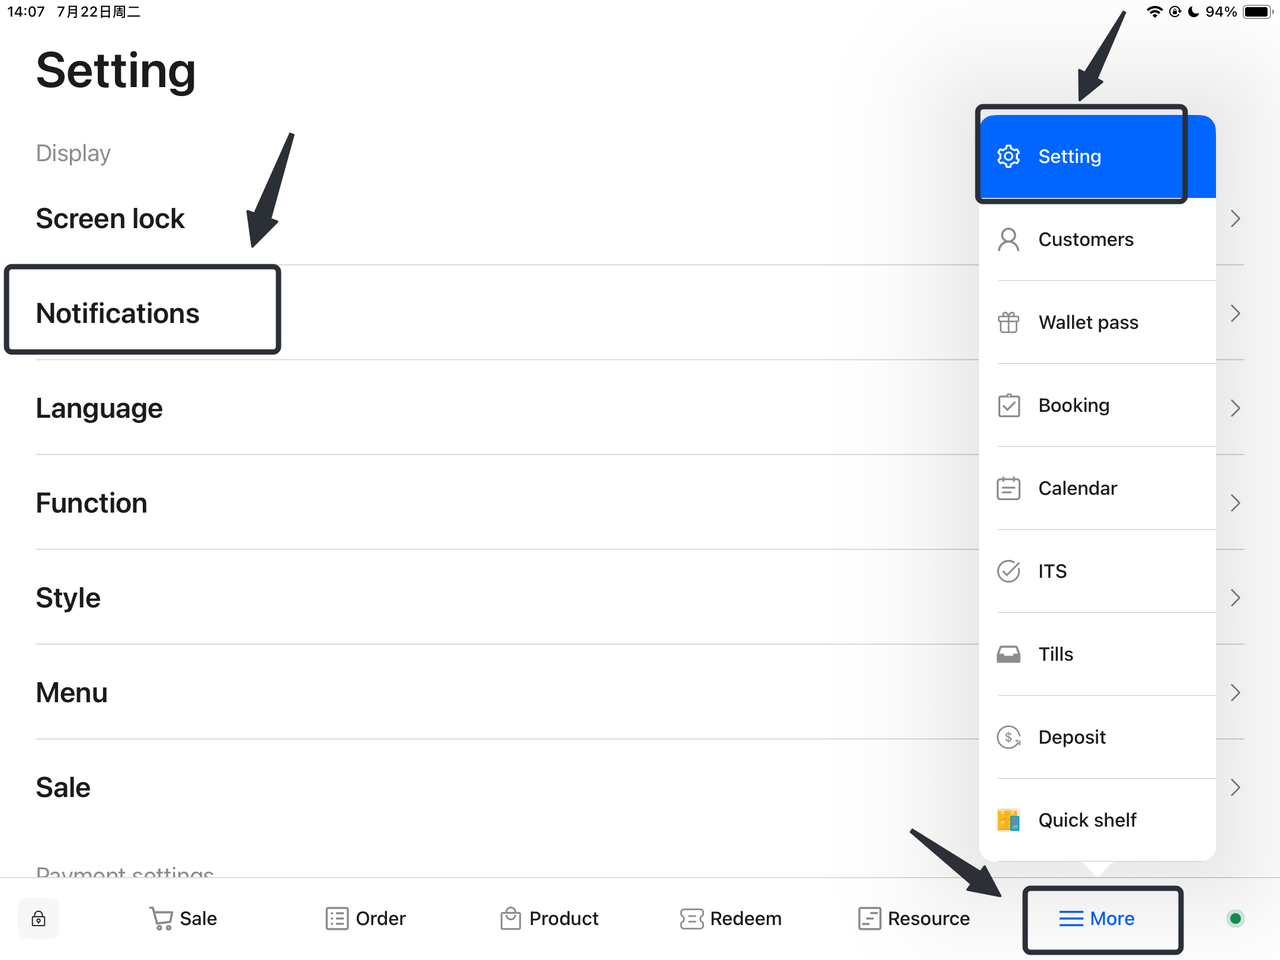
- Open Terminal:
Launch your terminal application.
- Navigate to More Options:
In the terminal interface, find and click the "More" option.
- Access Settings:
Select "Settings" from the drop-down menu.
- Choose Notification Settings:
In the settings menu, find and click the "Notifications" option.
-
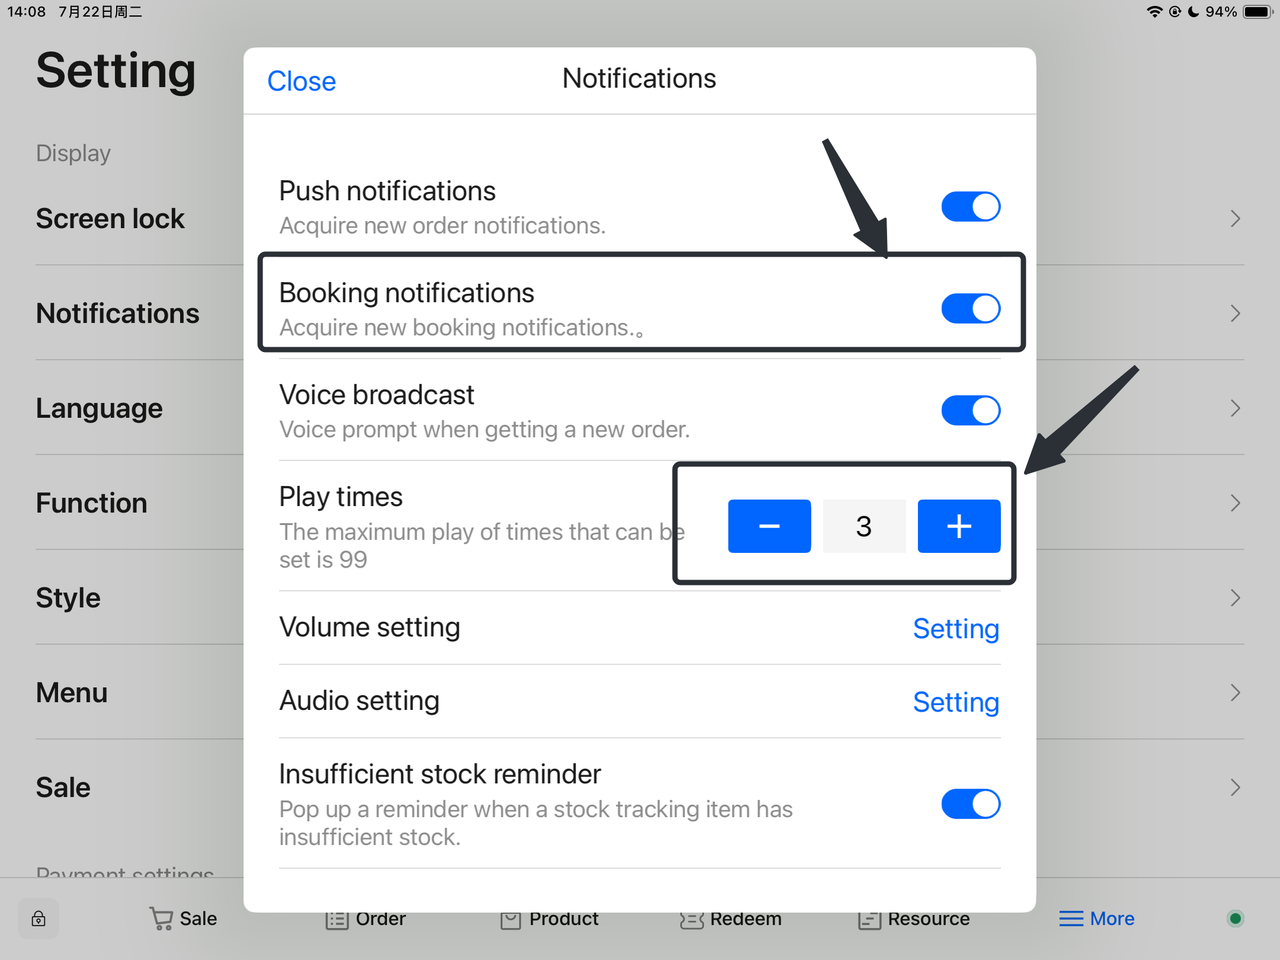
Enable Booking Notifications:
-
Locate the "Booking Notifications" option and toggle it to the enabled state.
-
-
Set Play times:
-
In the Booking notification settings, enter or select the desired number of broadcasts.
-
-
Receive New Booking Alerts:
-
After the merchant logs in to Terminal, the system will automatically detect new orders.
-
A reminder will pop up on the Terminal interface: "You have a new Booking!".
-
-
View the New Order:
-
The merchant clicks the "View" button in the reminder.
-
The system will redirect to the order interface, displaying details of the new Booking.
-

-
Check Order Details:
-
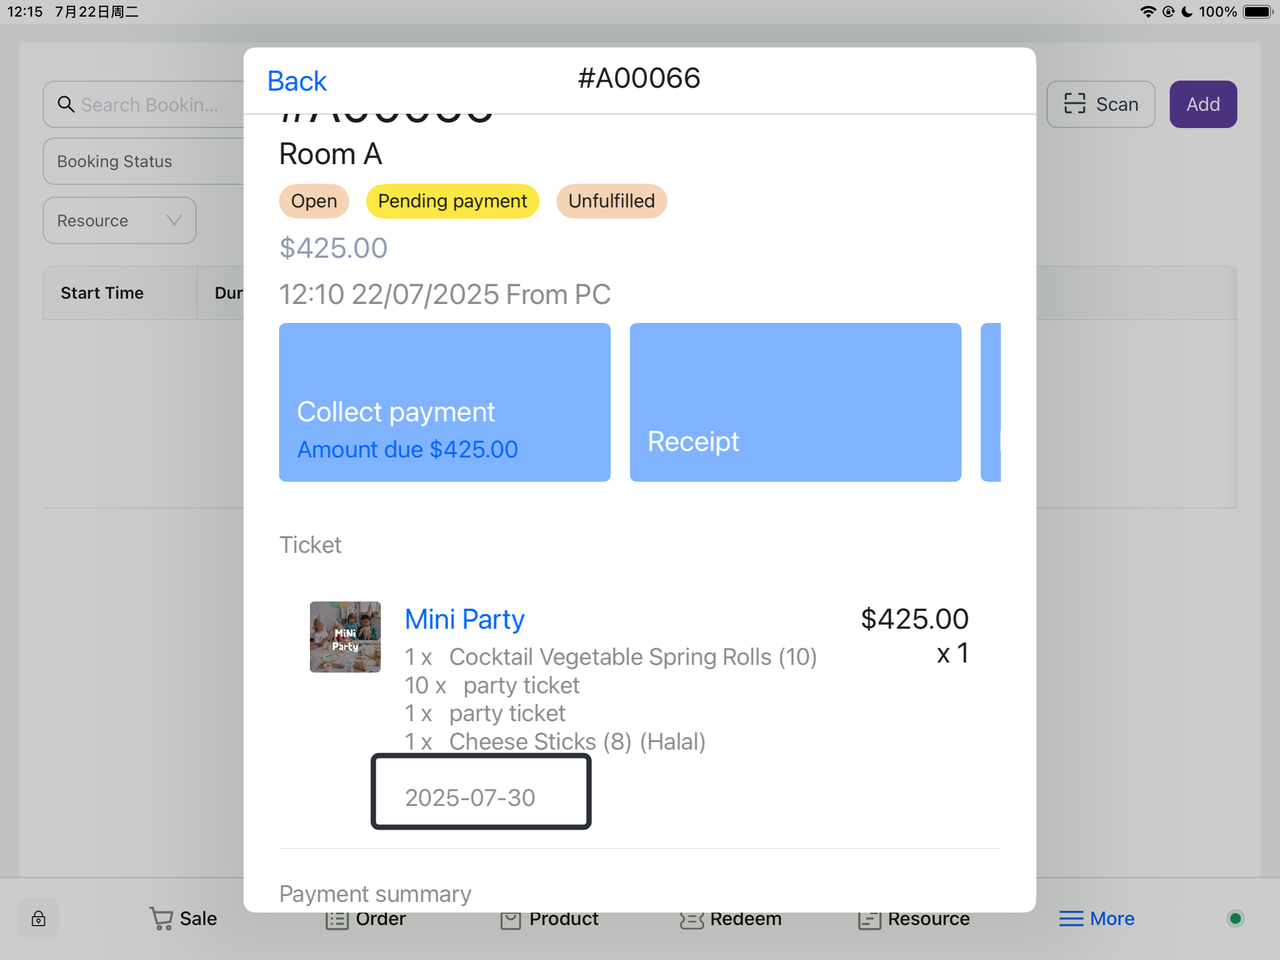
On the order interface, the merchant can view the customer's booking date and basic order information.
-
The merchant clicks the "More" button, and the system will display detailed order information.
-
-
View Catering and Details:
-
On the order details page, the merchant can check all catering items, quantities, and other details (such as remarks, special requests, etc.) included in the order.
-
-
Process the Order:
-
The merchant can make preparations or perform subsequent actions (such as confirmation, modification, cancellation, etc.) based on the order information.
-
Method 2:
-
Navigate to Notice Settings:
-
Find and click the "Notice" option in the Settings menu.
-
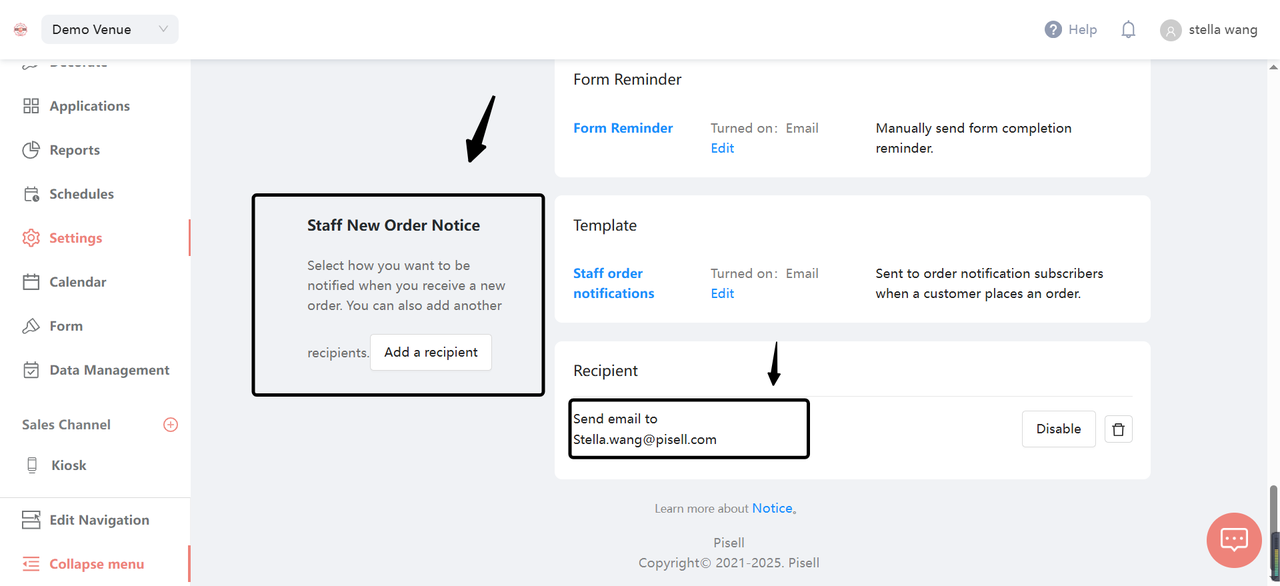
Select "Staff New Order Notice".
-
-
Add Recipients:
-
Click the "Add a Recipient" button.
-
Enter the corresponding email address in the pop-up input box.
-
Verify that the entered email address is correct.
-
-
Save Settings:
-
Click "Save" or "Confirm" to save the added recipient.
-
-
Customer Books a Party:
-
The customer books a party on the client side.
-
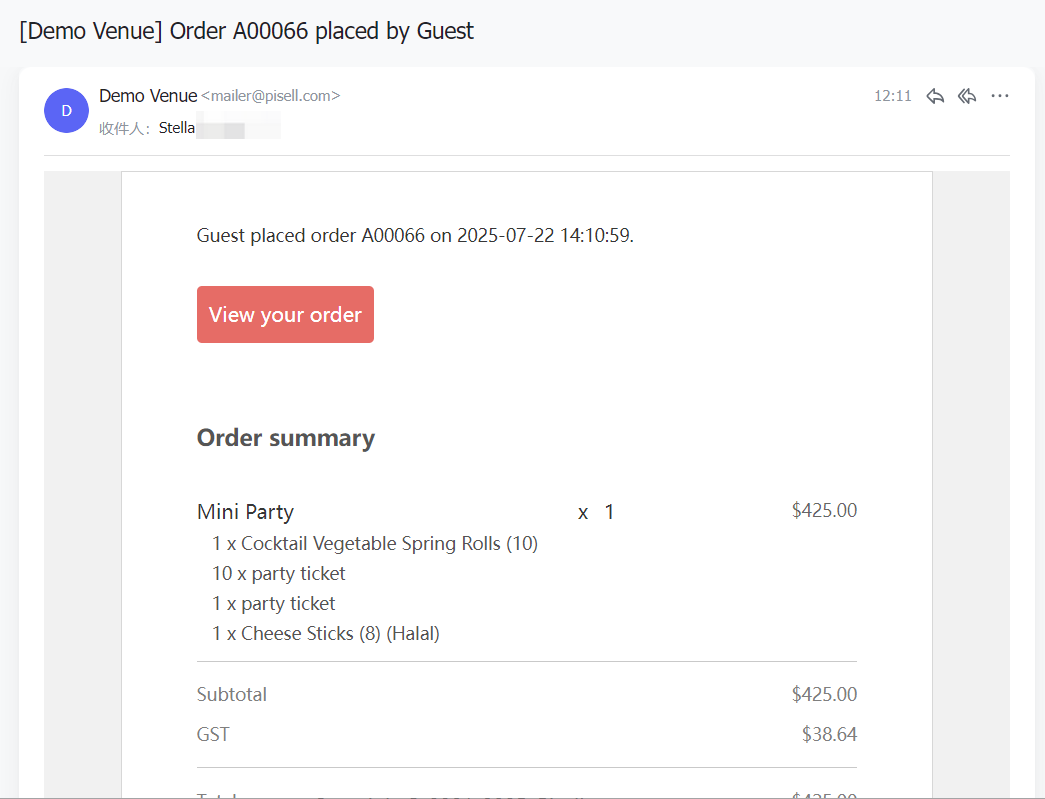
After completing the booking, the system will automatically trigger an email notification.
-
-
Send Email Reminder:
-
The added recipient will receive an email reminder about the customer's party booking.
-


-
How to Find a Party Order and View Its Details?
-
Click "Booking": Select the "Booking" option on the system's main interface.
-
Choose "All Booking": Click "All Booking" in the drop-down menu to view all orders.
-
Find the Order:
-
By Booking Date: Enter the booking date to filter.
-
By Order Number: Enter the corresponding order number for quick search.
-
By Deposit Payment Status: Select the deposit payment status to filter orders.
-
-
Select the Corresponding Order: Once the target order is found, click on it to view detailed information.
-
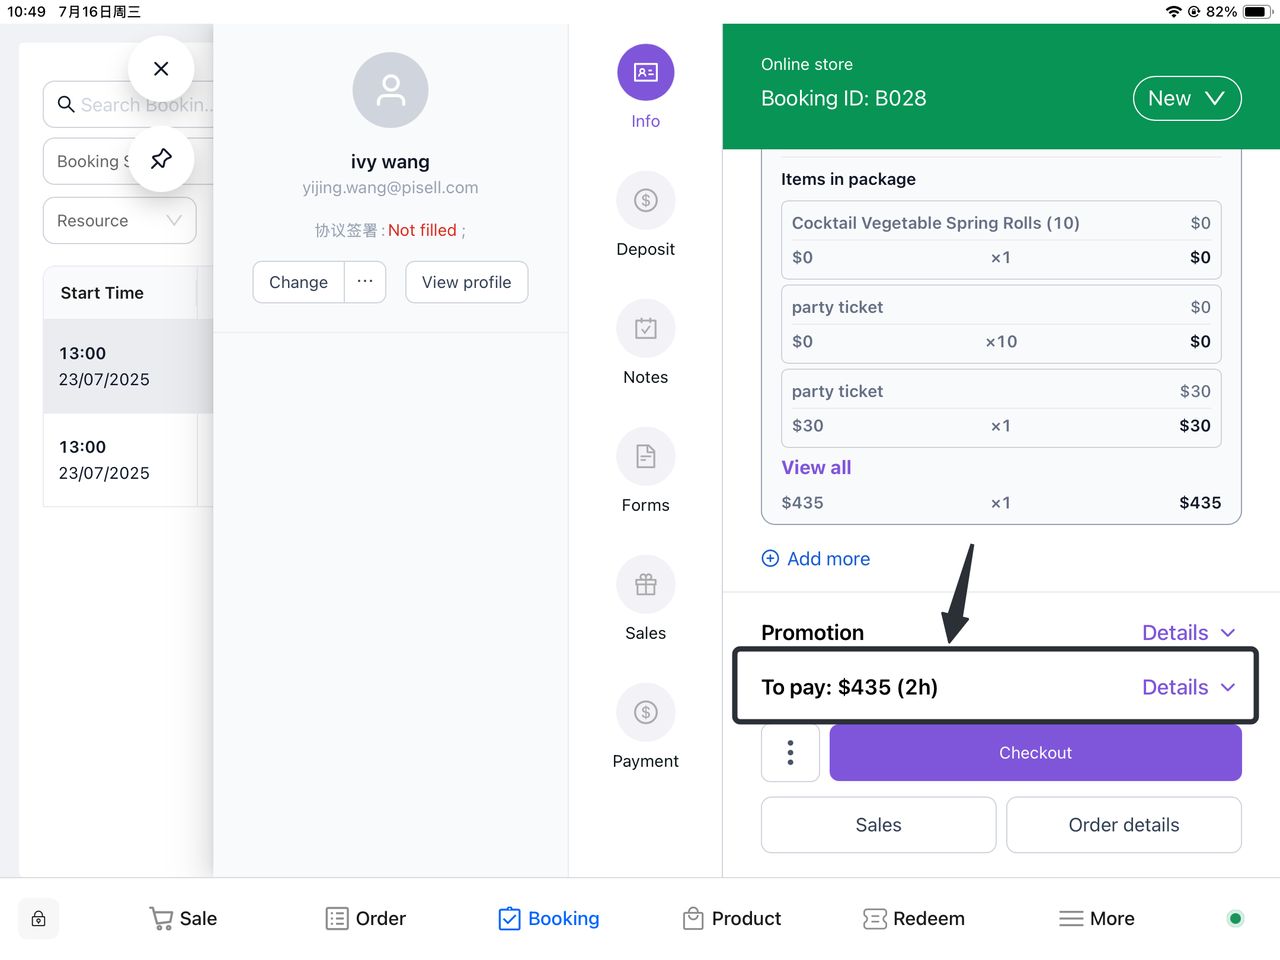
View Order Details: On the order details page, you can check the booked content and related information.
 Order Information:Method 1: Scroll down on the order information page and click "View all" to get additional party details.
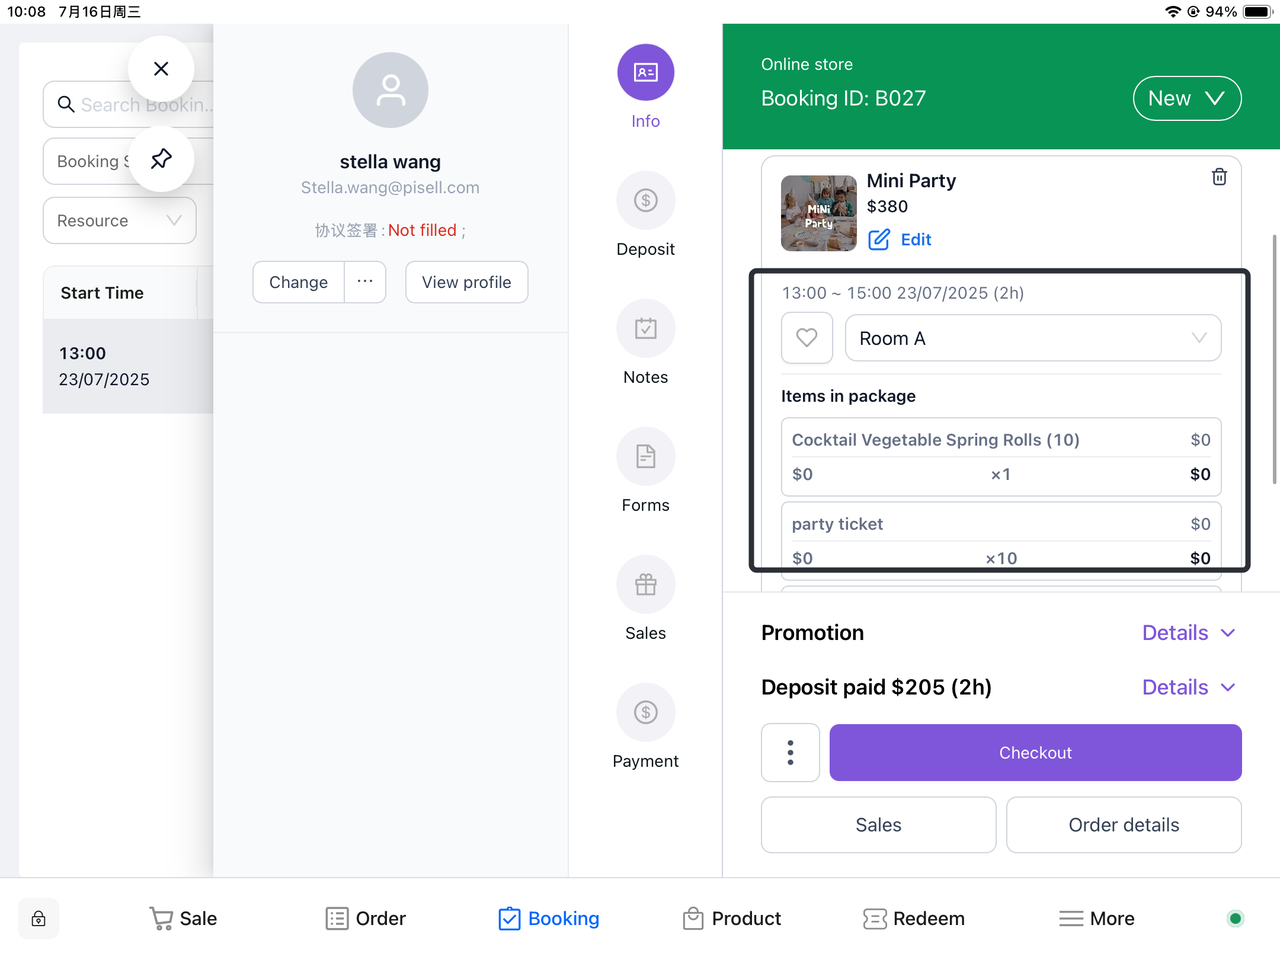
 Method 2: Click "Order details" in the bottom right corner to redirect to the corresponding details page and view related information.
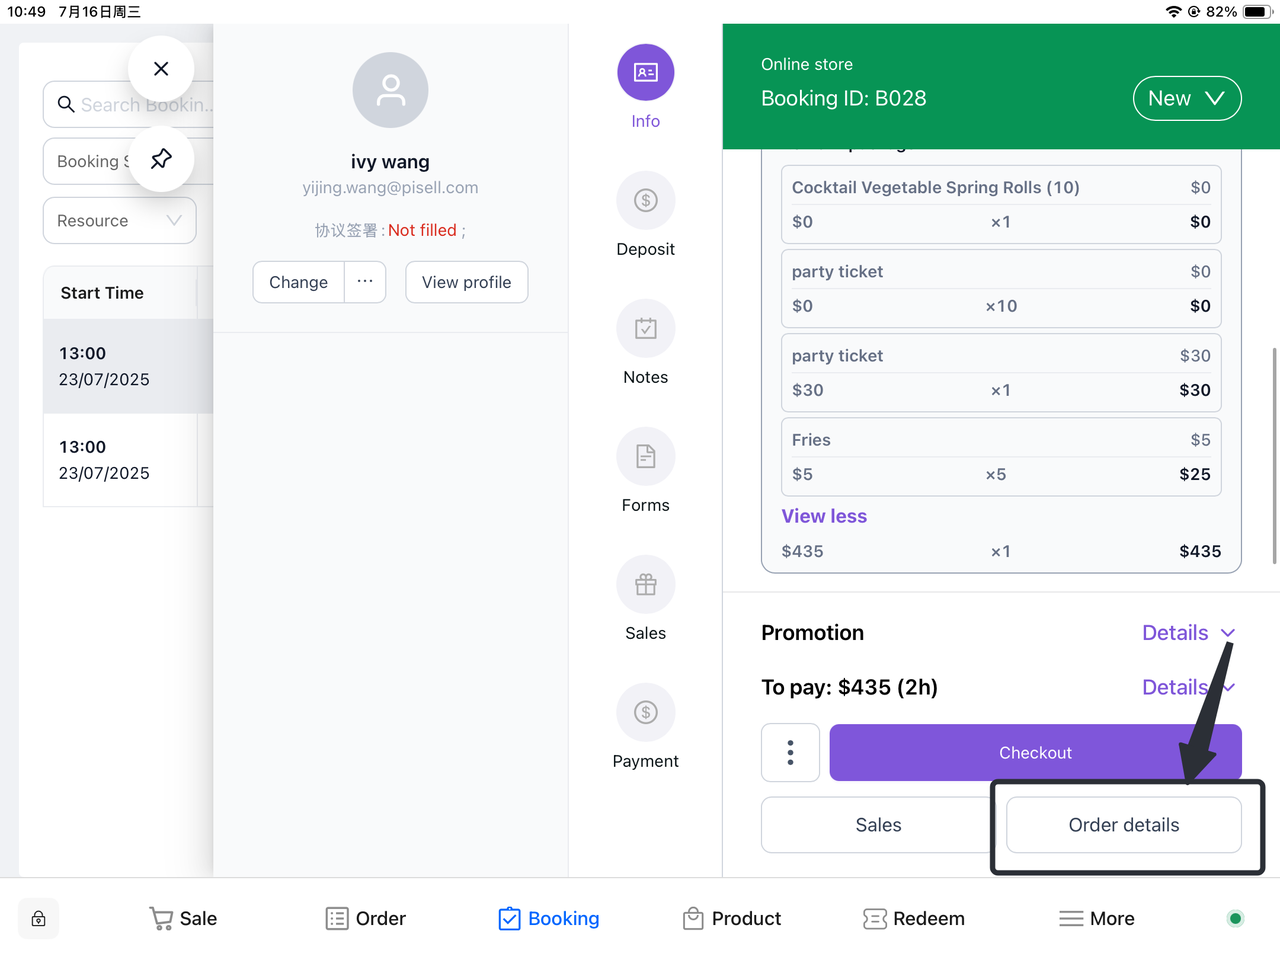
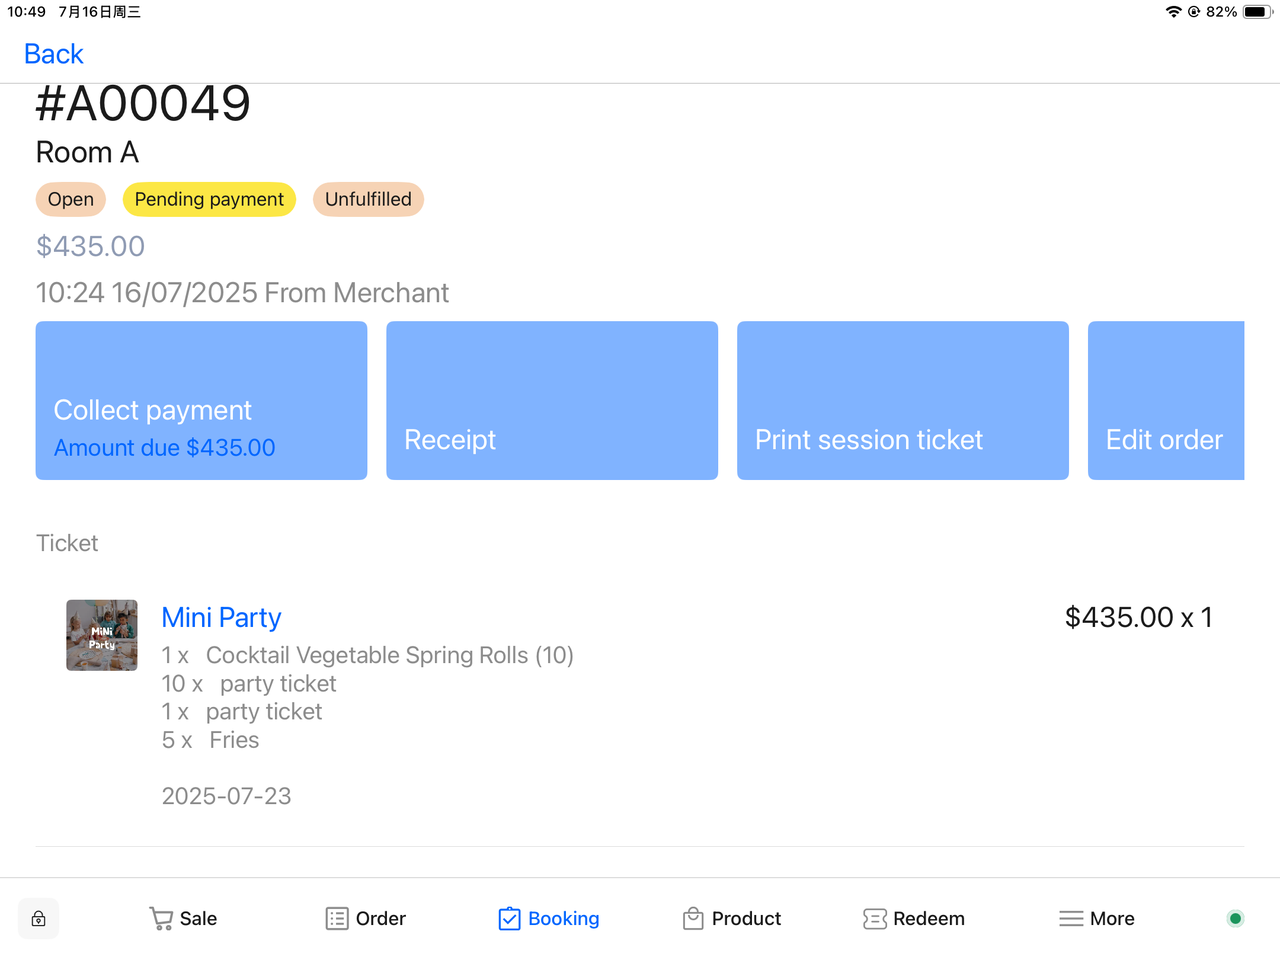
Payment Details: Click the corresponding payment details to view relevant payment information.

-
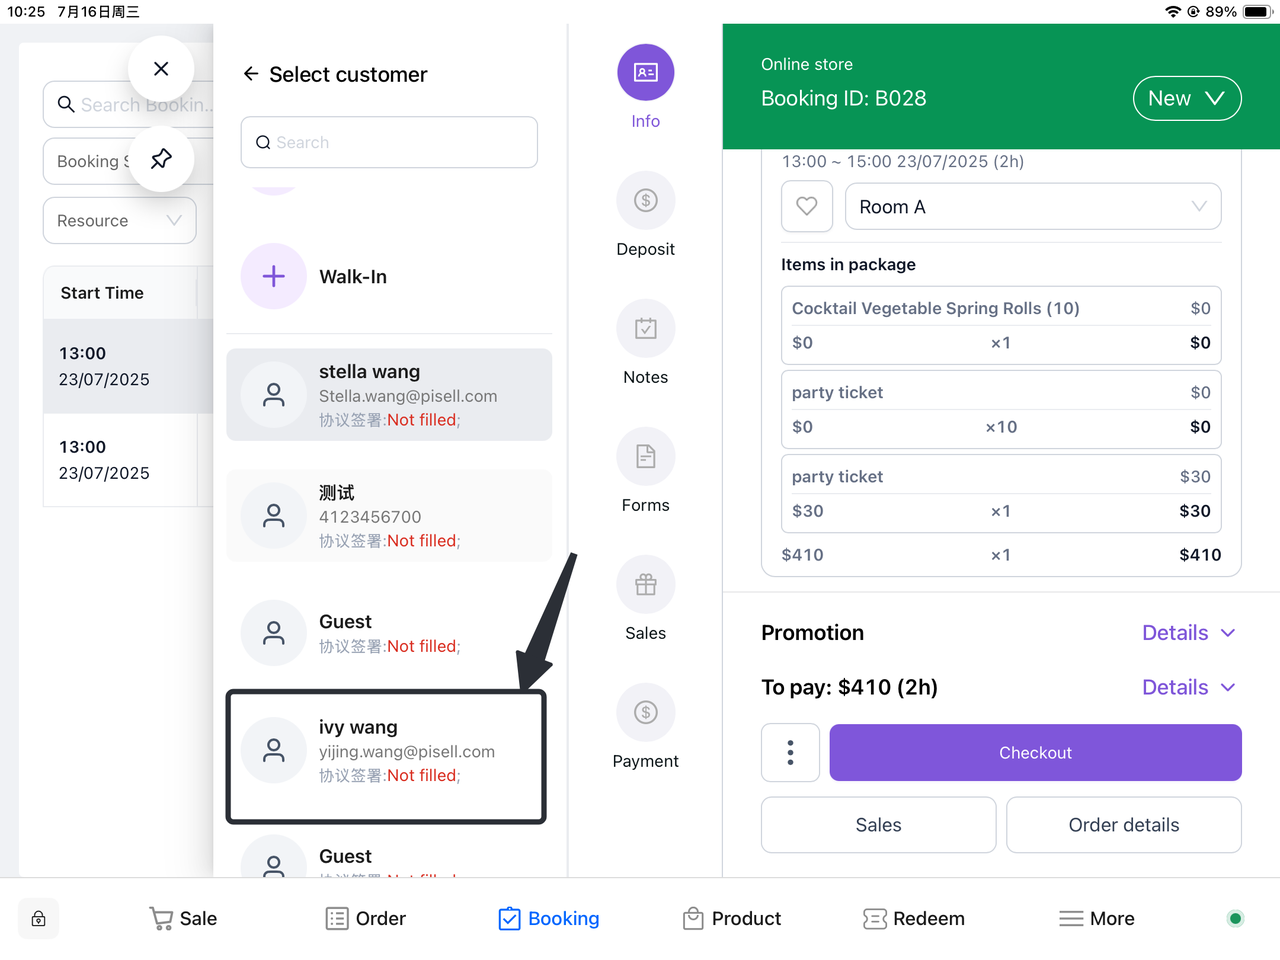
How to Modify Customer Information Associated with a Party?
-
Find the Corresponding Order: Locate and select the target order in "All Booking".
-
Choose "Change Customer": On the order details page, click the "Change Customer" option.
-
Select Customer Type:
-
Existing Customer: Select an existing customer from the system.
-
New Customer: Enter the relevant information of the new customer to create a new customer profile.
-
-
Confirm the Change: After verifying that the selected customer information is correct, confirm to update the order.
-

-
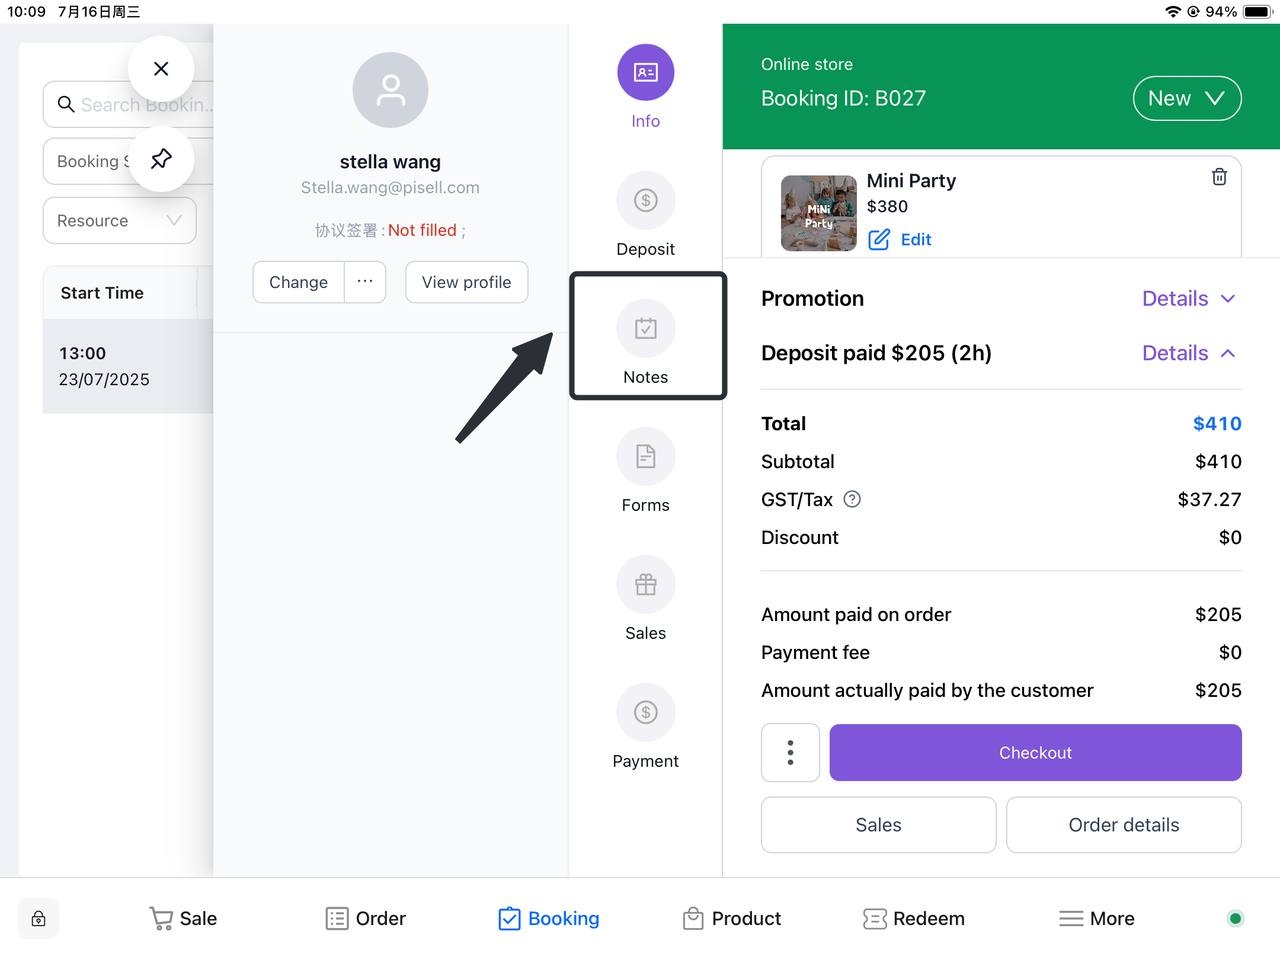
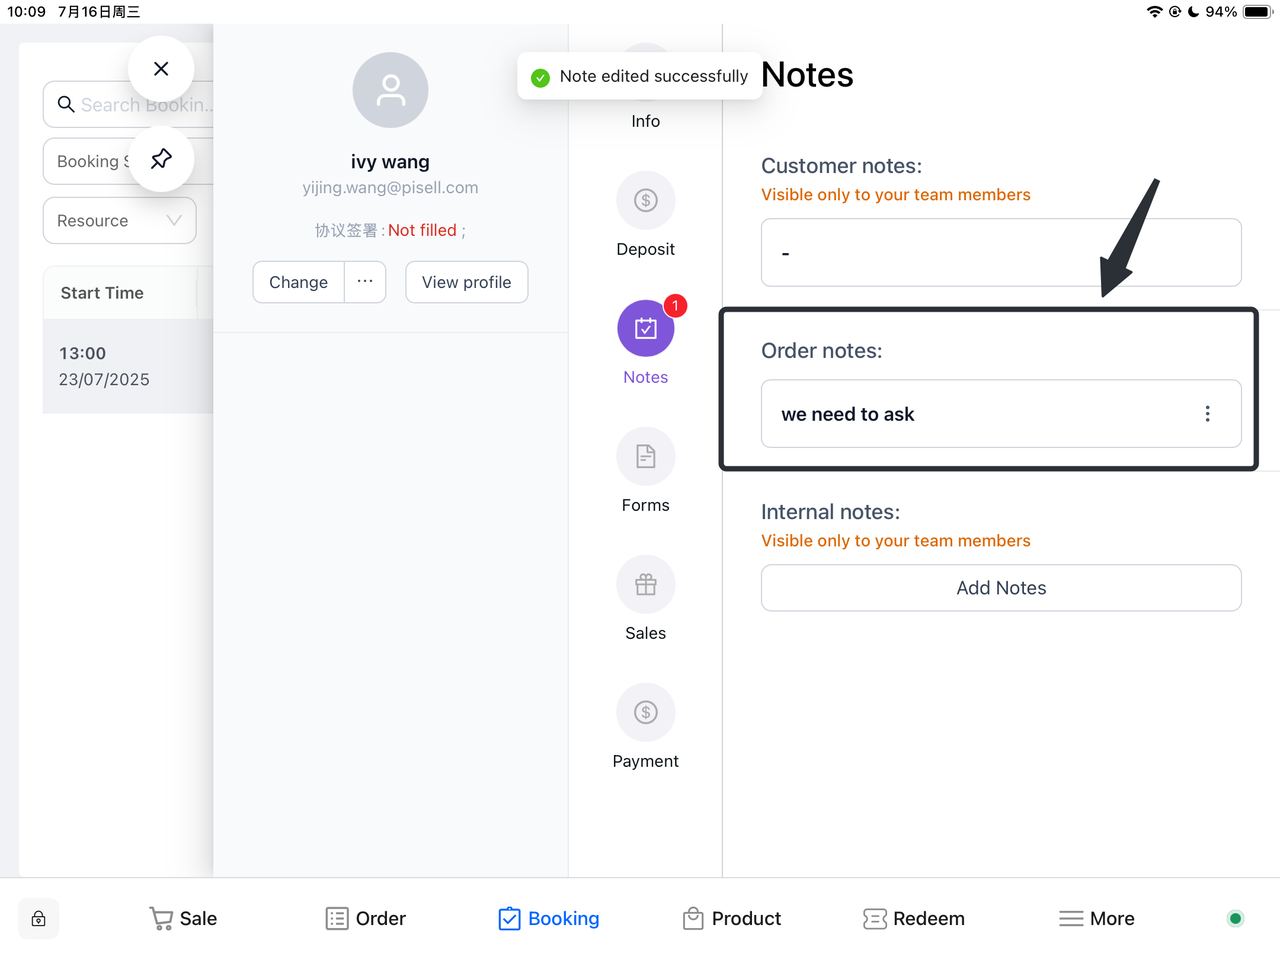
How to Add Order Remarks?
-
Click the Order to Add Remarks: Locate and select the target order in "All Booking".
-
Open the Booking Details Page: In the order list, click the selected order to view detailed information.
-
Select "Notes": In the pop-up Booking details page, find and click the "Notes" option.
-
Add Remarks:
-
Order Remarks: Enter remarks for the customer in the corresponding field.
-
Internal Remarks: Enter information visible only to team members in the internal remarks field.
-
-
Save Remarks: After ensuring all remark information is correct, click the save or confirm button to complete the remark addition.
III. Terminal Operations
-
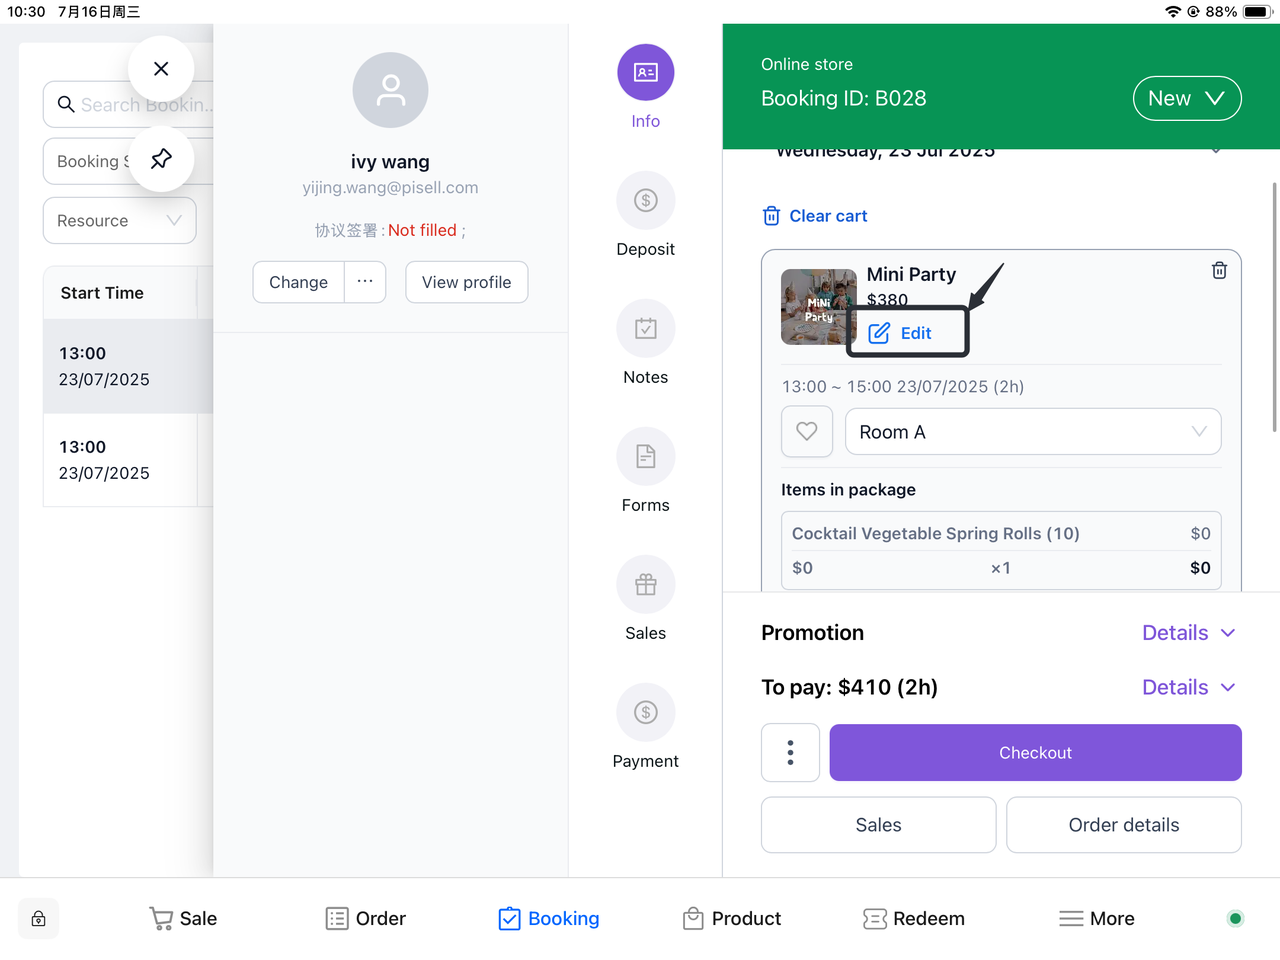
How to Add Items to a Party on Terminal?
-
Filter the Corresponding Order: Use the filter function in "All Booking" to find the target order.
-
Click to View Booking Details: Select the order and click to enter the Booking details page.
-
Click "Edit": On the Booking details page, find and click the "Edit" button.
-
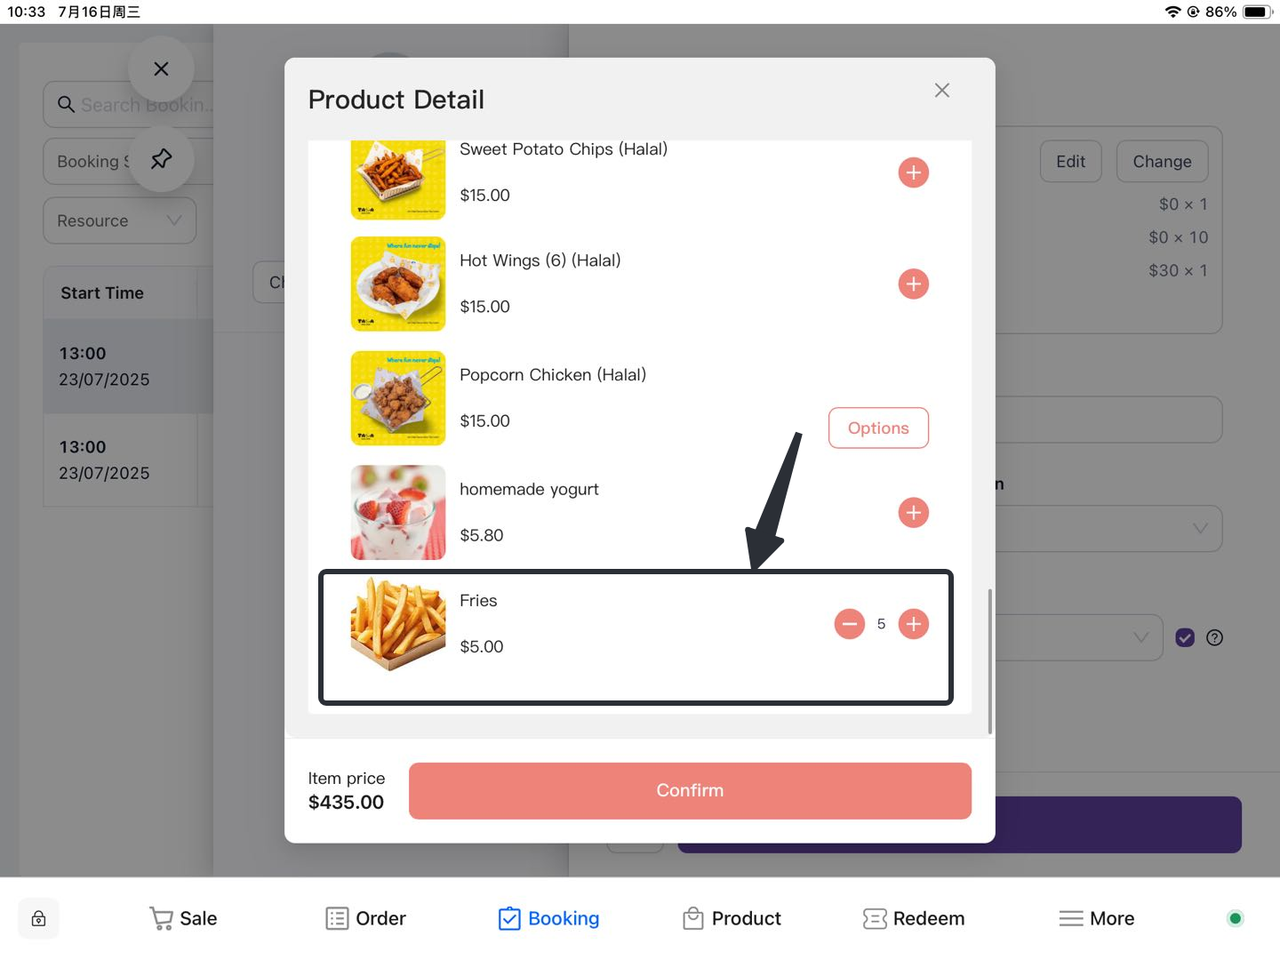
Add the Required Items in the Pop-up Product Details:
-
Locate the product or service item to be added.
-
Select the corresponding item.
-
-
Click "Add": Click the "Add" button to add the selected item to the order.
-
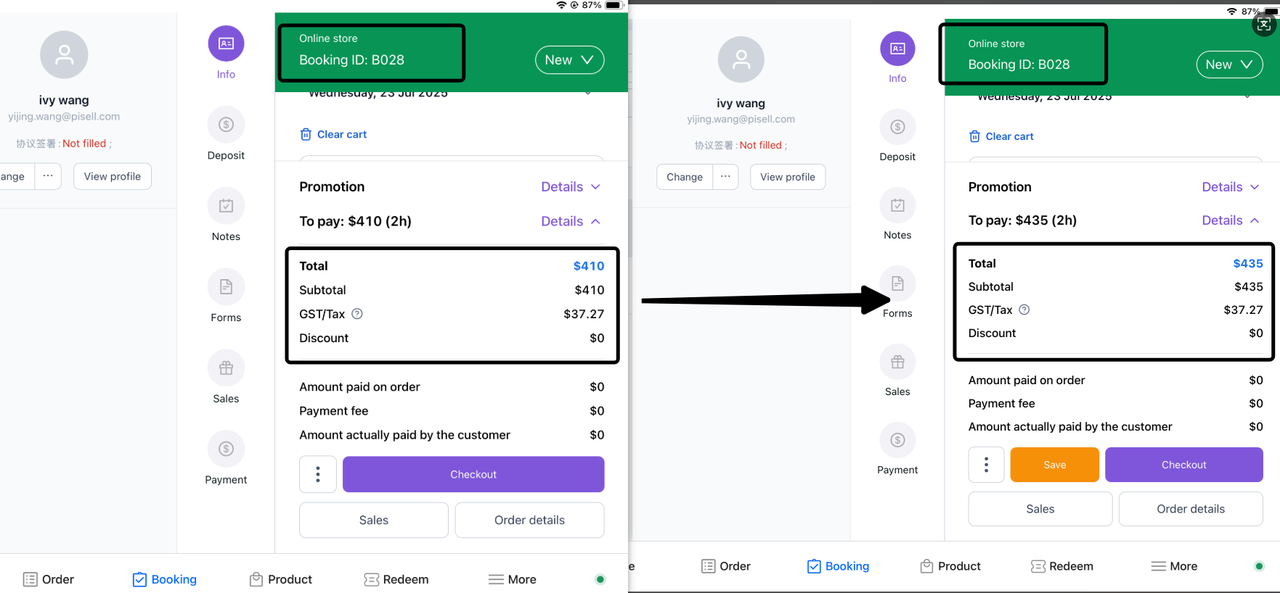
Click Confirm: After verifying all changes are correct, click the "Confirm" button to save the changes. The corresponding balance will be automatically updated based on the amount of the items added by the customer.

-
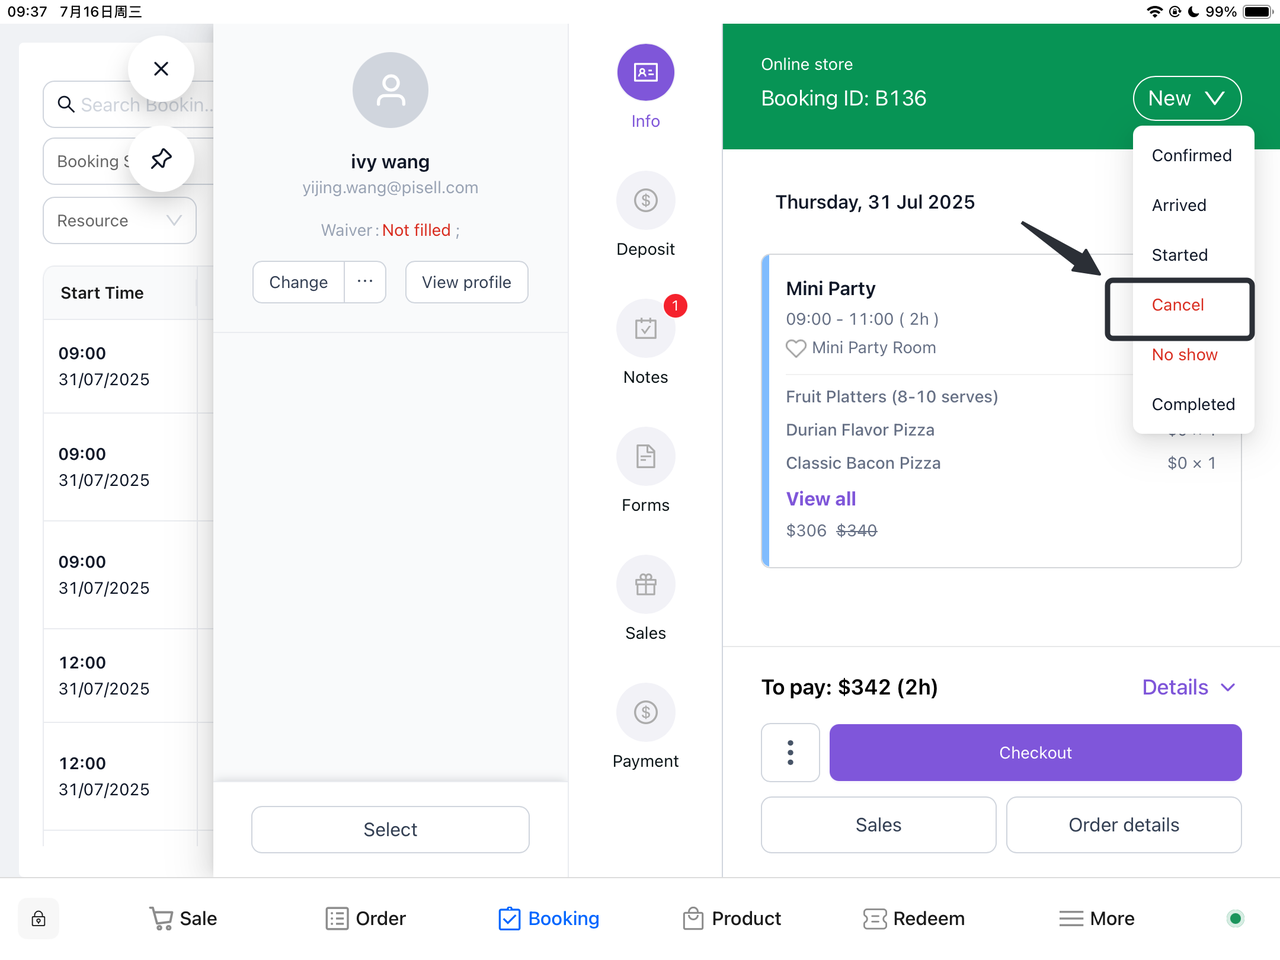
How to Cancel a Customer's Booked Party on Terminal?
-
Filter the Corresponding Order: Use the filter function in "All Booking" to find the target order.
-
Click to View Booking Details: Select the order and click to enter the Booking details page.
-
Click "Booking": Select "Cancel" - Click "Cancel Booking".
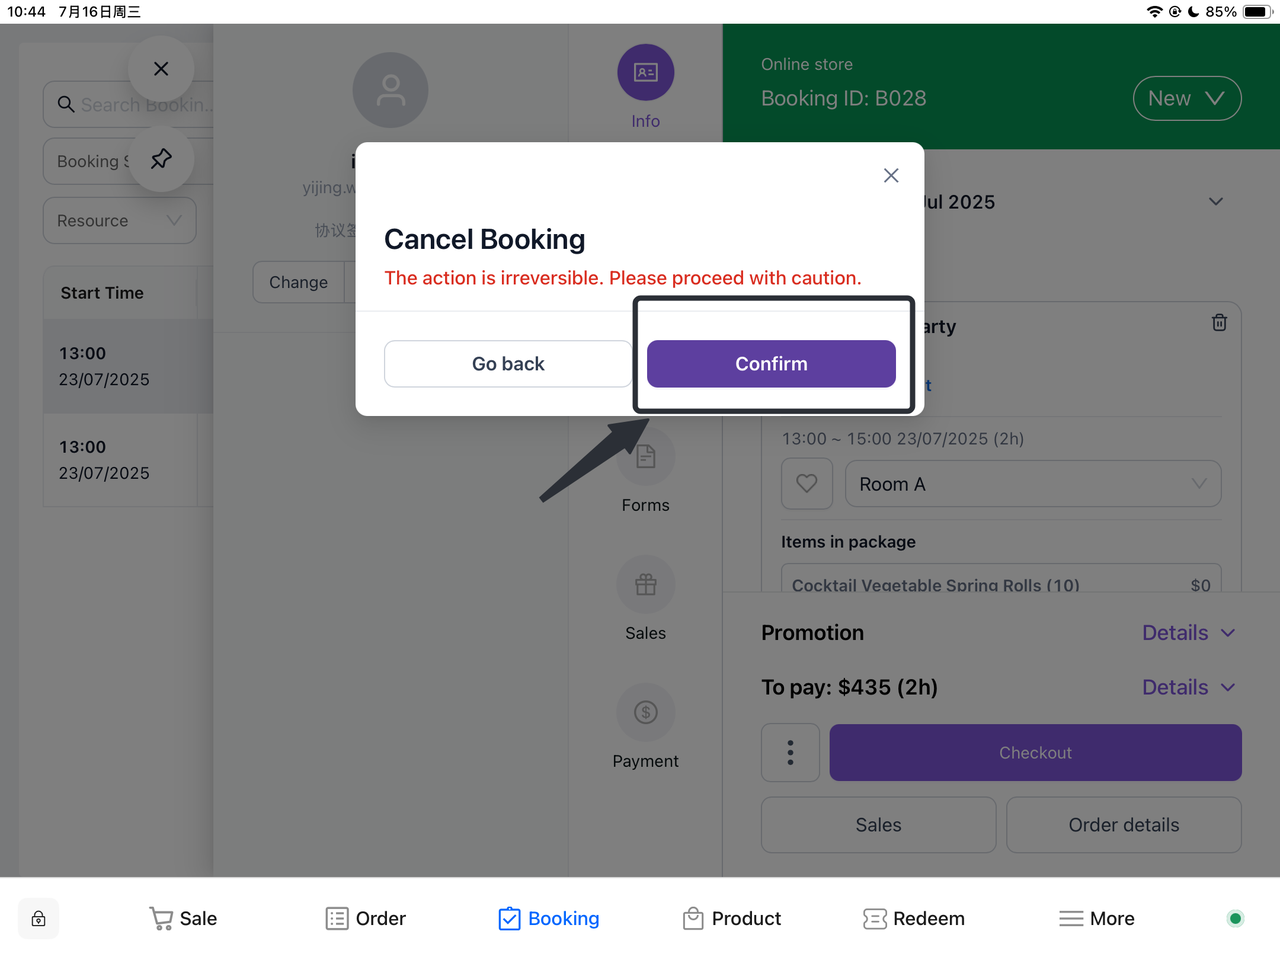
The Cancellation Will Be Displayed on the Booking Interface:
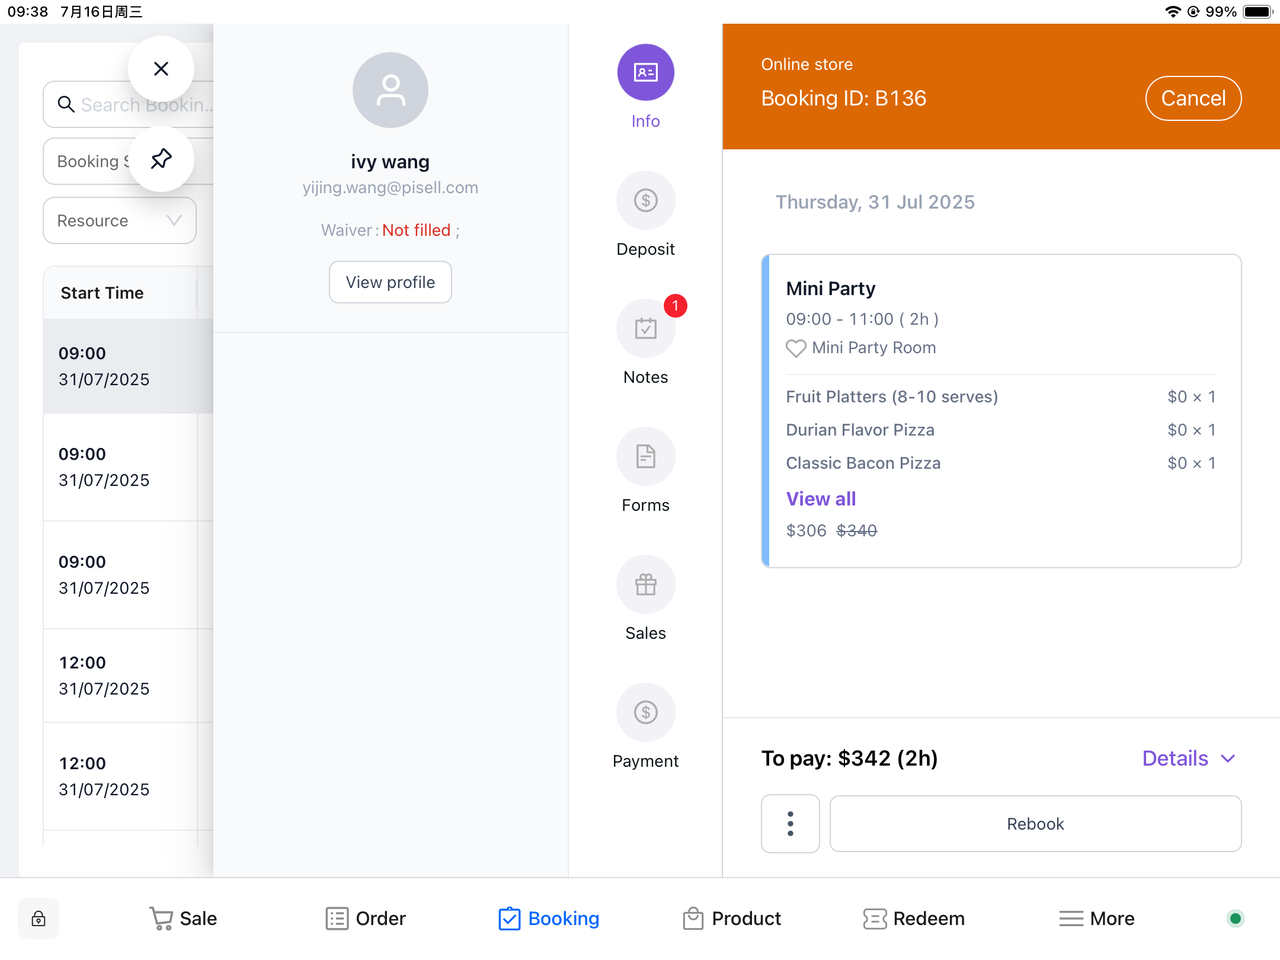
The customer will receive an email notification of the order cancellation:

-
-
-
-
-
 - Client-Side Booking for Parties and Tickets") 10
10Family-Friendly Restaurant User Guide (Operational Items) - Client-Side Booking for Parties and Tickets
22Family-Friendly Restaurant User Guide - Terminal for Booking Parties
![[Important Notice] Pisell Client Operations Team— Fixed Online Service Hours Pisell Support](https://file.mypisell.com/pisel/image/435/d7d250eb99c80ca34e3e7fc75c5b92cd2025_09_26_18_07_00_009_03613999964__2880_2112__.jpeg?x-oss-process=image/format,jpg/interlace,1,image/resize,w_1080/quality,Q_90/sharpen,90 "[Important Notice] Pisell Client Operations Team— Fixed Online Service Hours Pisell Support") 1061
1061[Important Notice] Pisell Client Operations Team— Fixed Online Service Hours Pisell Support
") 1402
1402Guidelines for Estimating Reserve (Merchant Self-Assessment Version)
 1327
1327Voluntary Withholding Funds & Reserve Explanation
 1249
1249Voluntary Withholding Funds
 1419
1419Online Payment 3DS Security Upgrade
 1712
1712Kids Playground Owners Beware: Your Payment System Might Be Charging You 3x More Than You Think
 3441
3441Manage Your Pisell Subscription
 3511
3511Pisell Payment Chargeback FAQ
 4036
4036Pisell Terminal Connecting to Cash Box
 3876
3876最好用的澳洲会员系统! - Pisell
 4100
4100Pisell Terminal Connected to Zebra DS2278 Barcode Scanner
 4469
4469Australian POS System vs. Traditional POS System: Which is Better?
 4530
4530